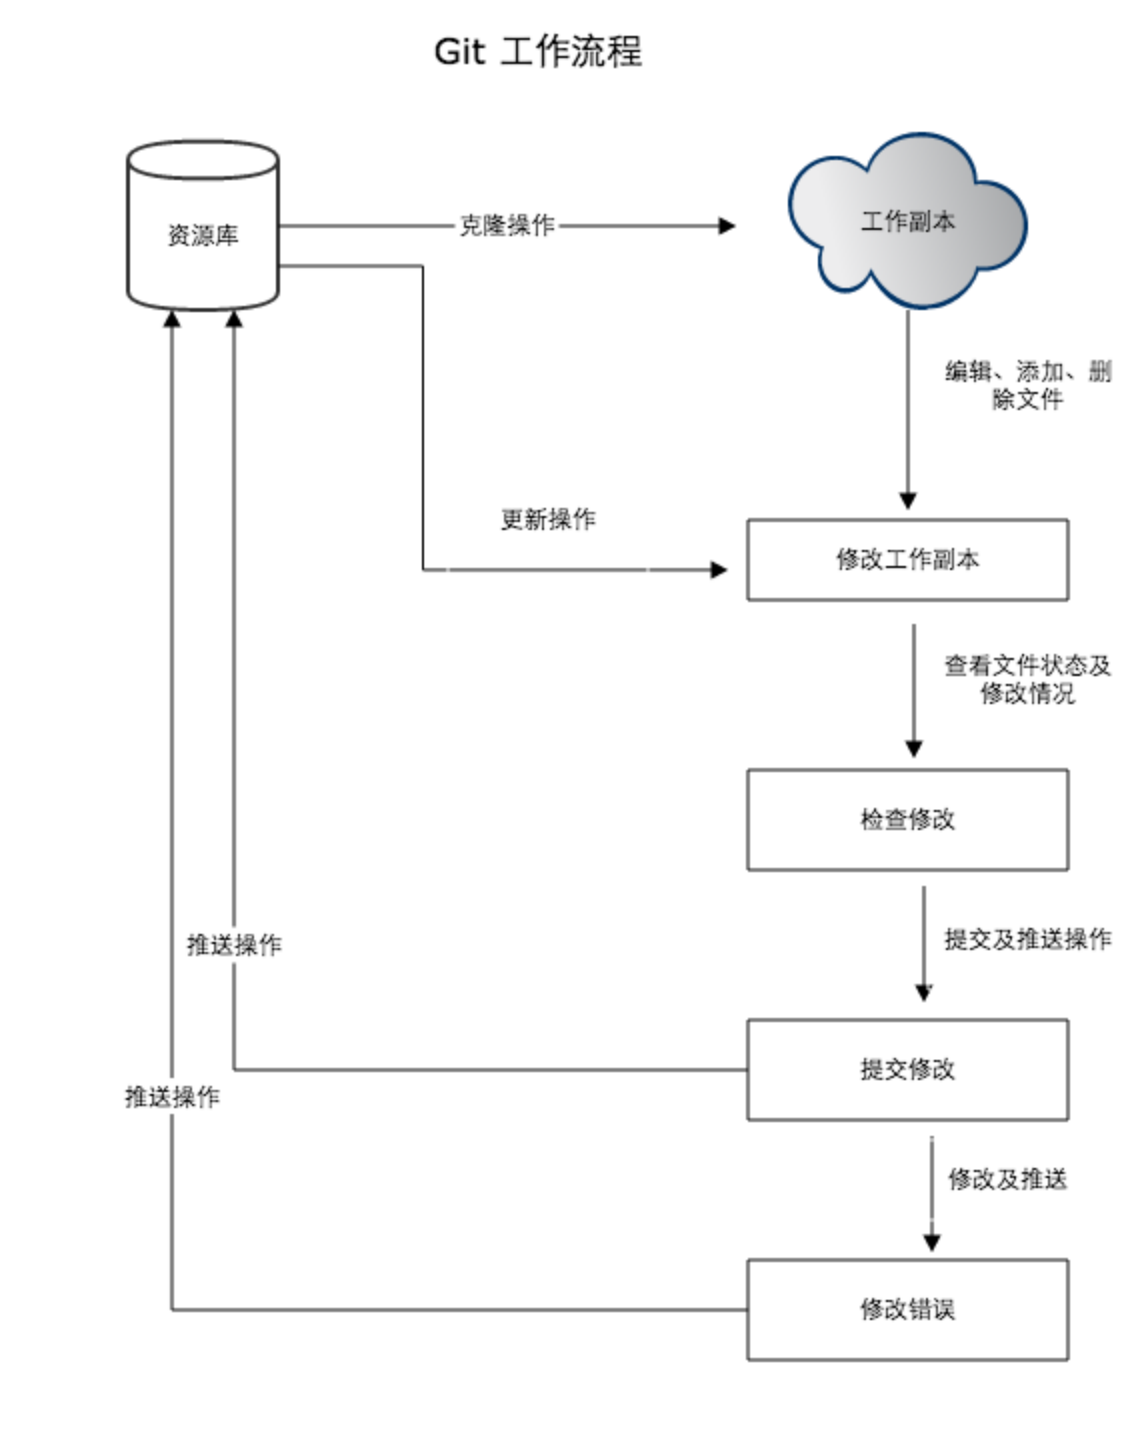
 #### 3.git的工作区、暂存区和版本库
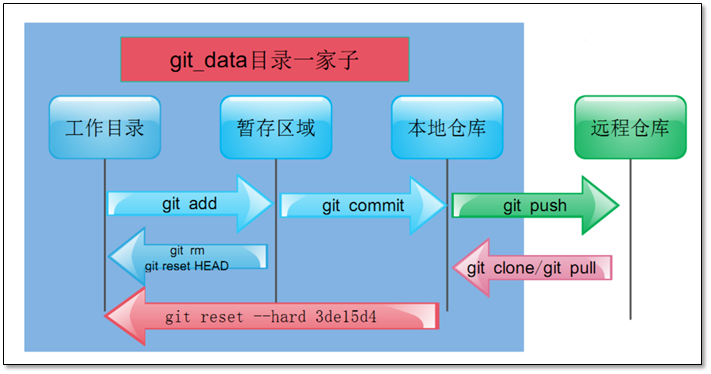
工作区:就是你在电脑里能看到的目录
暂存区:英文叫stage, 或index。一般存放在"git目录"下的index文件(.git/index)中,所以我们把暂存区有时也叫作索引(index)
版本库:工作区有一个隐藏目录.git,这个不算工作区,而是Git的版本库
#### 4.Git安装
```shell
[root@xingdian-git ~]# yum -y install git curl-devel expat-devel gettext-devel openssl-devel zlib-devel git-core
```
## 三:Git使用
Git 提供了一个叫做 git config 的工具,专门用来配置或读取相应的工作环境变量
这些环境变量,决定了 Git 在各个环节的具体工作方式和行为。这些变量可以存放在以下三个不同的地方:
/etc/gitconfig 文件:系统中对所有用户都普遍适用的配置。若使用 git config 时用 --system 选项,读写的就是这个文件
~/.gitconfig 文件:用户目录下的配置文件只适用于该用户。若使用 git config 时用 --global 选项,读写的就是这个文件
当前项目的 Git 目录中的配置文件(也就是工作目录中的 .git/config 文件):这里的配置仅仅针对当前项目有效
#### 1.Git用户信息
配置个人的用户名称和电子邮件地址:
```shell
[root@xingdian-git ~]# git config --global user.name "xingdian"
[root@xingdian-git ~]# git config --global user.email "xingdian@1000phone.com"
```
#### 2.查看配置信息
```shell
[root@xingdian-git ~]# git config --list
user.name=xingdian
user.email=xingdian@1000phone.com
```
这些配置我们也可以在 ~/.gitconfig 或 /etc/gitconfig 看到,如下所示:
```shell
[root@xingdian-git ~]# cat ~/.gitconfig
[user]
name = xingdian
email = xingdian@1000phone.com
```
注意:
```shell
git config --global 参数
取消代理:
git config --global --unset http.proxy
git config --global --unset https.proxy
设置代理:
git config --global http.proxy http://domain.local\vsilva:Passw0rd@proxyServer:8080
出现各种 SSL certificate problem 的解决办法:
git config --global http.sslVerify false
```
#### 3.常用的git 命令
```shell
[root@xingdian-git ~]# git init
# 初始化
[root@xingdian-git ~]# git add main.cpp
# 将某一个文件添加到暂存区
[root@xingdian-git ~]# git add .
# 将文件夹下的所有的文件添加到暂存区
[root@xingdian-git ~]# git commit -m 'note'
# 将暂存区中的文件保存成为某一个版本
[root@xingdian-git ~]# git log
# 查看所有的版本日志
[root@xingdian-git ~]# git status
# 查看现在暂存区的状况
[root@xingdian-git ~]# git diff
# 查看现在文件与上一个提交-commit版本的区别
[root@xingdian-git ~]# git reset --hard HEAD^
# 回到上一个版本
[root@xingdian-git ~]# git reset --hard XXXXX
# XXX为版本编号,回到某一个版本
[root@xingdian-git ~]# git pull origin master
# 从主分支pull到本地
[root@xingdian-git ~]# git push -u origin master
# 从本地push到主分支
[root@xingdian-git ~]# git pull
# pull默认主分支
[root@xingdian-git ~]# git push
# push默认主分支 ...
```
#### 4.Git使用
ssh 链接:
客户机上产生公钥上传到gitlab的SSH-Keys里,git clone下载和git push上传都没问题,这种方式很安全
ssh连接github:
登录github,这是github的主页(如果没有账户需要注册)
Git服务器生成秘钥:
```shell
[root@xingdian ~]# ssh-keygen
Generating public/private rsa key pair.
Enter file in which to save the key (/root/.ssh/id_rsa):
Enter passphrase (empty for no passphrase):
Enter same passphrase again:
Your identification has been saved in /root/.ssh/id_rsa.
Your public key has been saved in /root/.ssh/id_rsa.pub.
The key fingerprint is:
SHA256:S/zPOA+wrn/FOnpnFzQponuXzDYDoIFpYTxWeiGKC7g root@xingdian
The key's randomart image is:
+---[RSA 2048]----+
| ...o |
|.. .*o . |
|+ .o.=. . |
|.o +.... . . + |
|E . oSo o o . |
| ...=. o . |
| o.o* . . |
| .. B=@ . |
| .o+=.O++ |
+----[SHA256]-----+
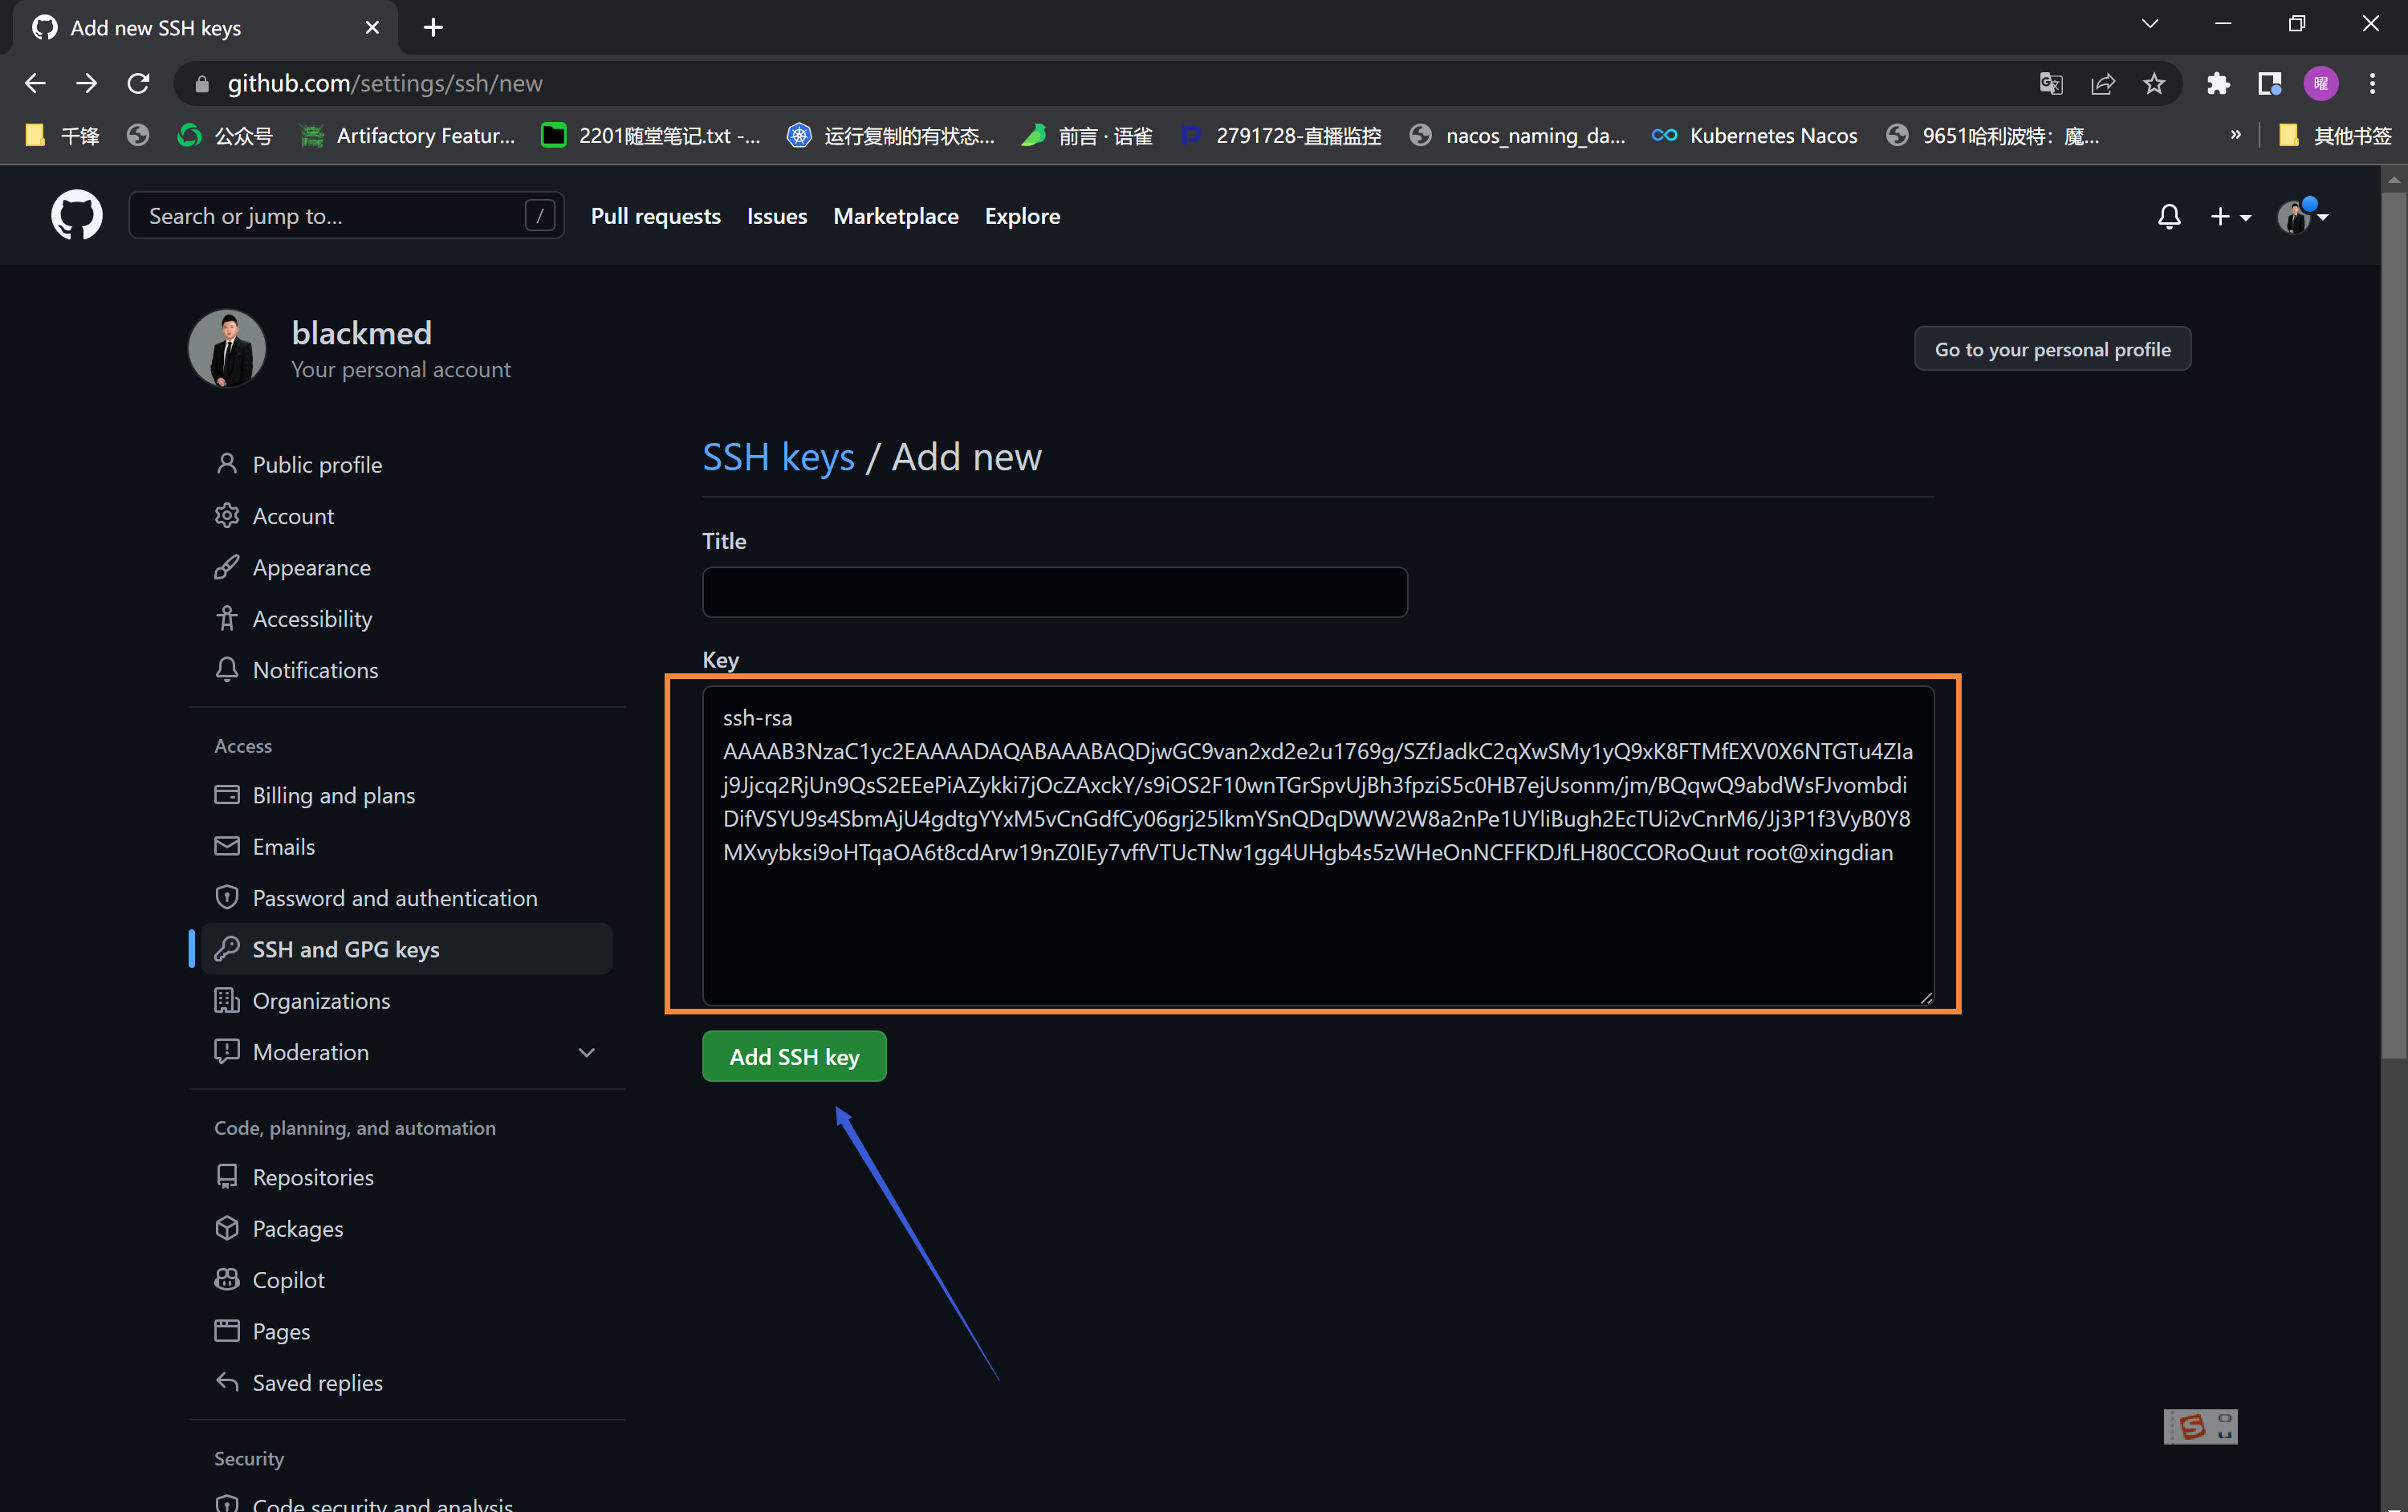
[root@xingdian ~]# cat .ssh/id_rsa.pub
ssh-rsa AAAAB3NzaC1yc2EAAAADAQABAAABAQDjwGC9van2xd2e2u1769g/SZfJadkC2qXwSMy1yQ9xK8FTMfEXV0X6NTGTu4ZIaj9Jjcq2RjUn9QsS2EEePiAZykki7jOcZAxckY/s9iOS2F10wnTGrSpvUjBh3fpziS5c0HB7ejUsonm/jm/BQqwQ9abdWsFJvombdiDifVSYU9s4SbmAjU4gdtgYYxM5vCnGdfCy06grj25lkmYSnQDqDWW2W8a2nPe1UYliBugh2EcTUi2vCnrM6/Jj3P1f3VyB0Y8MXvybksi9oHTqaOA6t8cdArw19nZ0IEy7vffVTUcTNw1gg4UHgb4s5zWHeOnNCFFKDJfLH80CCORoQuut root@xingdian
```
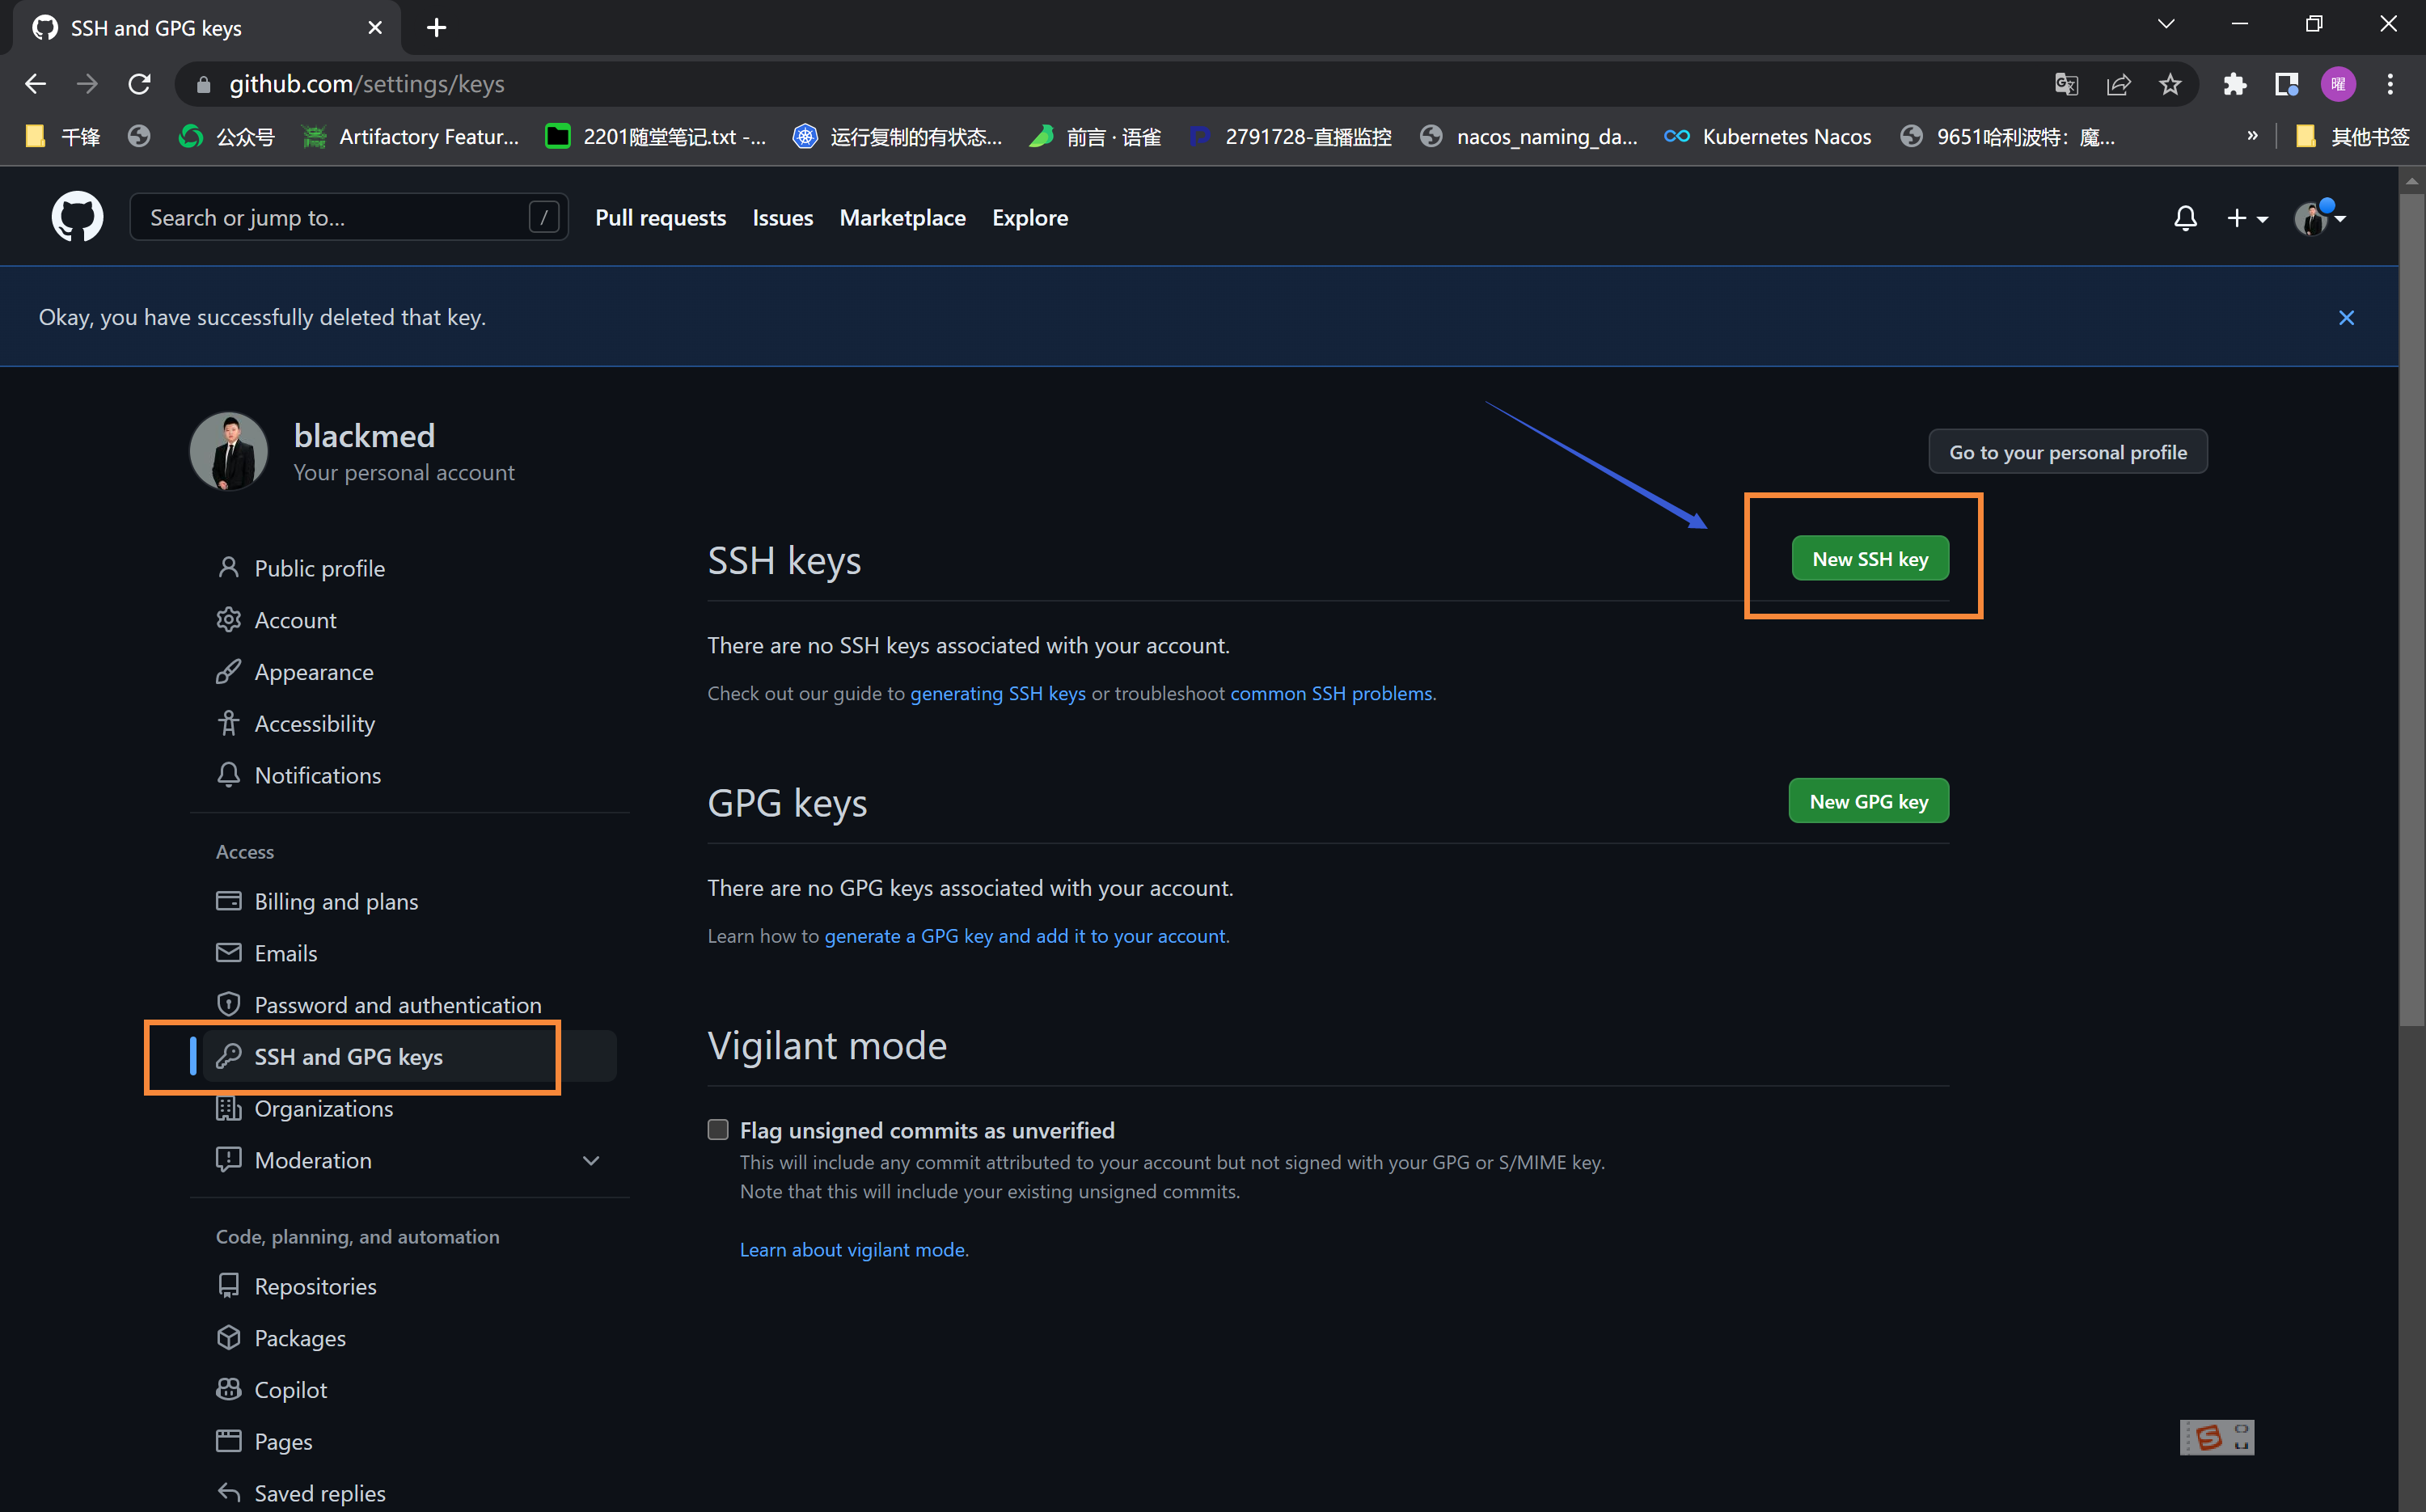
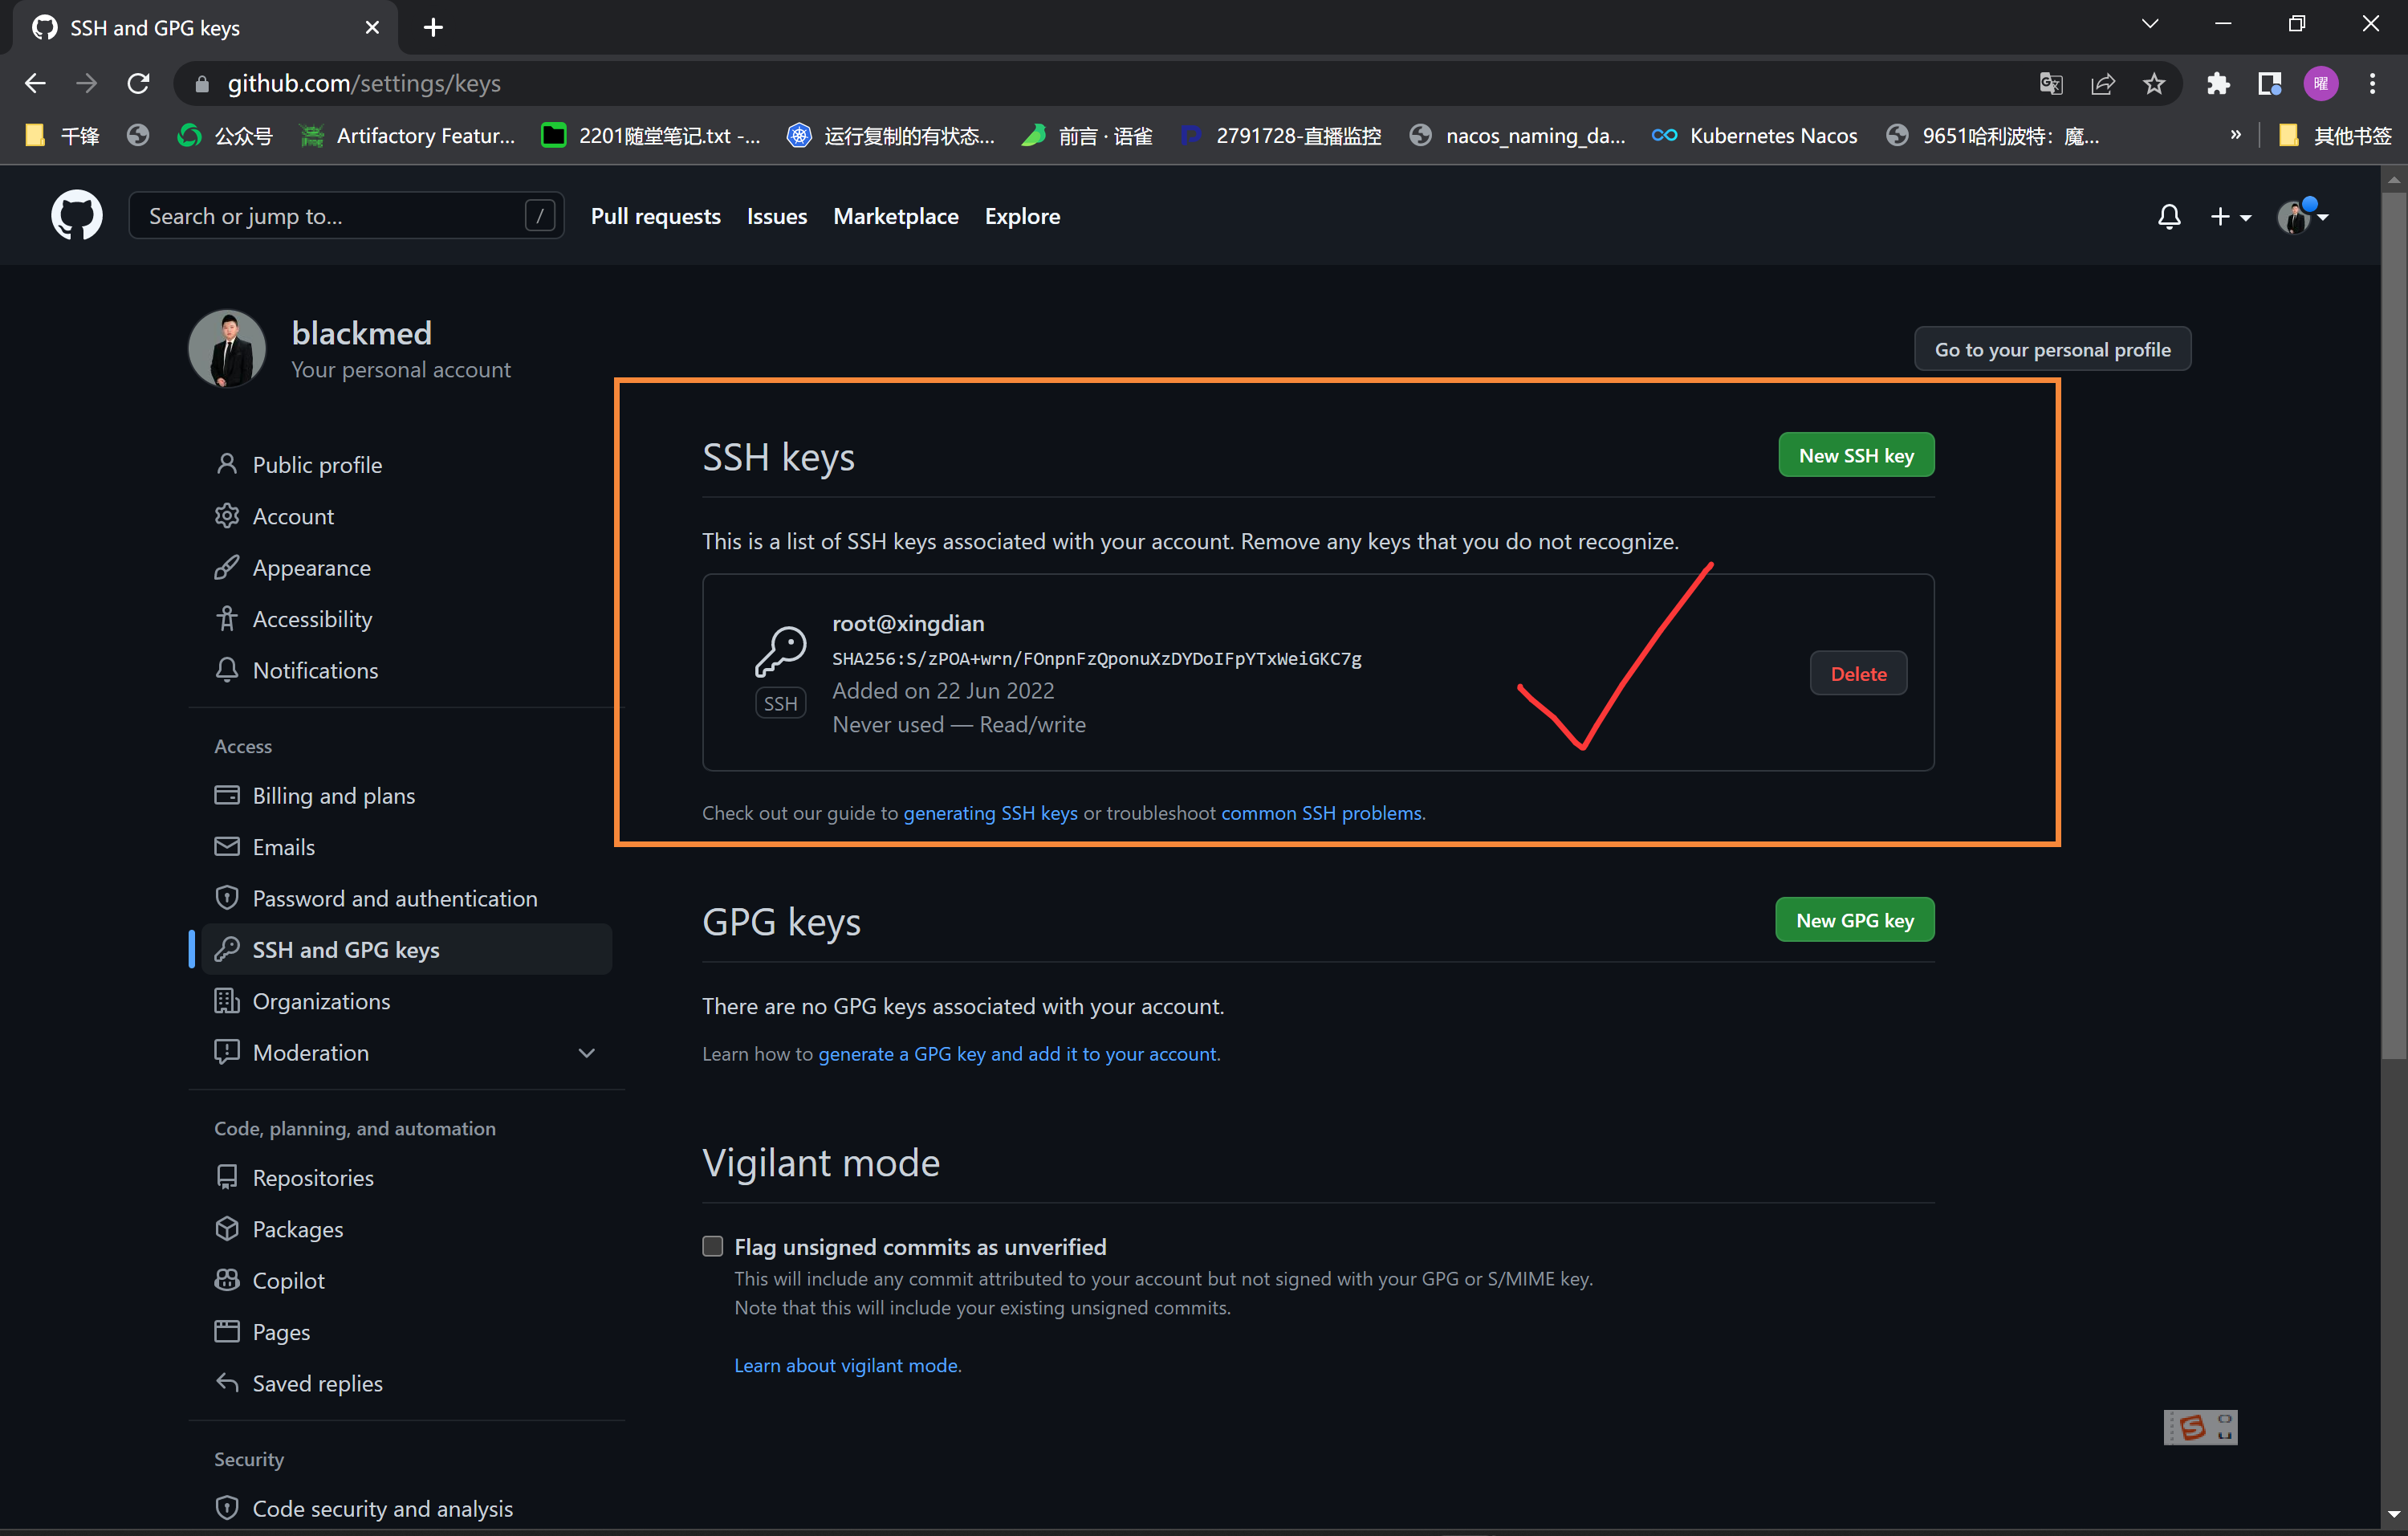
Github添加Git服务器秘钥:
#### 3.git的工作区、暂存区和版本库
工作区:就是你在电脑里能看到的目录
暂存区:英文叫stage, 或index。一般存放在"git目录"下的index文件(.git/index)中,所以我们把暂存区有时也叫作索引(index)
版本库:工作区有一个隐藏目录.git,这个不算工作区,而是Git的版本库

#### 4.Git安装
```shell
[root@xingdian-git ~]# yum -y install git curl-devel expat-devel gettext-devel openssl-devel zlib-devel git-core
```
## 三:Git使用
Git 提供了一个叫做 git config 的工具,专门用来配置或读取相应的工作环境变量
这些环境变量,决定了 Git 在各个环节的具体工作方式和行为。这些变量可以存放在以下三个不同的地方:
/etc/gitconfig 文件:系统中对所有用户都普遍适用的配置。若使用 git config 时用 --system 选项,读写的就是这个文件
~/.gitconfig 文件:用户目录下的配置文件只适用于该用户。若使用 git config 时用 --global 选项,读写的就是这个文件
当前项目的 Git 目录中的配置文件(也就是工作目录中的 .git/config 文件):这里的配置仅仅针对当前项目有效
#### 1.Git用户信息
配置个人的用户名称和电子邮件地址:
```shell
[root@xingdian-git ~]# git config --global user.name "xingdian"
[root@xingdian-git ~]# git config --global user.email "xingdian@1000phone.com"
```
#### 2.查看配置信息
```shell
[root@xingdian-git ~]# git config --list
user.name=xingdian
user.email=xingdian@1000phone.com
```
这些配置我们也可以在 ~/.gitconfig 或 /etc/gitconfig 看到,如下所示:
```shell
[root@xingdian-git ~]# cat ~/.gitconfig
[user]
name = xingdian
email = xingdian@1000phone.com
```
注意:
```shell
git config --global 参数
取消代理:
git config --global --unset http.proxy
git config --global --unset https.proxy
设置代理:
git config --global http.proxy http://domain.local\vsilva:Passw0rd@proxyServer:8080
出现各种 SSL certificate problem 的解决办法:
git config --global http.sslVerify false
```
#### 3.常用的git 命令
```shell
[root@xingdian-git ~]# git init
# 初始化
[root@xingdian-git ~]# git add main.cpp
# 将某一个文件添加到暂存区
[root@xingdian-git ~]# git add .
# 将文件夹下的所有的文件添加到暂存区
[root@xingdian-git ~]# git commit -m 'note'
# 将暂存区中的文件保存成为某一个版本
[root@xingdian-git ~]# git log
# 查看所有的版本日志
[root@xingdian-git ~]# git status
# 查看现在暂存区的状况
[root@xingdian-git ~]# git diff
# 查看现在文件与上一个提交-commit版本的区别
[root@xingdian-git ~]# git reset --hard HEAD^
# 回到上一个版本
[root@xingdian-git ~]# git reset --hard XXXXX
# XXX为版本编号,回到某一个版本
[root@xingdian-git ~]# git pull origin master
# 从主分支pull到本地
[root@xingdian-git ~]# git push -u origin master
# 从本地push到主分支
[root@xingdian-git ~]# git pull
# pull默认主分支
[root@xingdian-git ~]# git push
# push默认主分支 ...
```
#### 4.Git使用
ssh 链接:
客户机上产生公钥上传到gitlab的SSH-Keys里,git clone下载和git push上传都没问题,这种方式很安全
ssh连接github:
登录github,这是github的主页(如果没有账户需要注册)
Git服务器生成秘钥:
```shell
[root@xingdian ~]# ssh-keygen
Generating public/private rsa key pair.
Enter file in which to save the key (/root/.ssh/id_rsa):
Enter passphrase (empty for no passphrase):
Enter same passphrase again:
Your identification has been saved in /root/.ssh/id_rsa.
Your public key has been saved in /root/.ssh/id_rsa.pub.
The key fingerprint is:
SHA256:S/zPOA+wrn/FOnpnFzQponuXzDYDoIFpYTxWeiGKC7g root@xingdian
The key's randomart image is:
+---[RSA 2048]----+
| ...o |
|.. .*o . |
|+ .o.=. . |
|.o +.... . . + |
|E . oSo o o . |
| ...=. o . |
| o.o* . . |
| .. B=@ . |
| .o+=.O++ |
+----[SHA256]-----+
[root@xingdian ~]# cat .ssh/id_rsa.pub
ssh-rsa AAAAB3NzaC1yc2EAAAADAQABAAABAQDjwGC9van2xd2e2u1769g/SZfJadkC2qXwSMy1yQ9xK8FTMfEXV0X6NTGTu4ZIaj9Jjcq2RjUn9QsS2EEePiAZykki7jOcZAxckY/s9iOS2F10wnTGrSpvUjBh3fpziS5c0HB7ejUsonm/jm/BQqwQ9abdWsFJvombdiDifVSYU9s4SbmAjU4gdtgYYxM5vCnGdfCy06grj25lkmYSnQDqDWW2W8a2nPe1UYliBugh2EcTUi2vCnrM6/Jj3P1f3VyB0Y8MXvybksi9oHTqaOA6t8cdArw19nZ0IEy7vffVTUcTNw1gg4UHgb4s5zWHeOnNCFFKDJfLH80CCORoQuut root@xingdian
```
Github添加Git服务器秘钥:
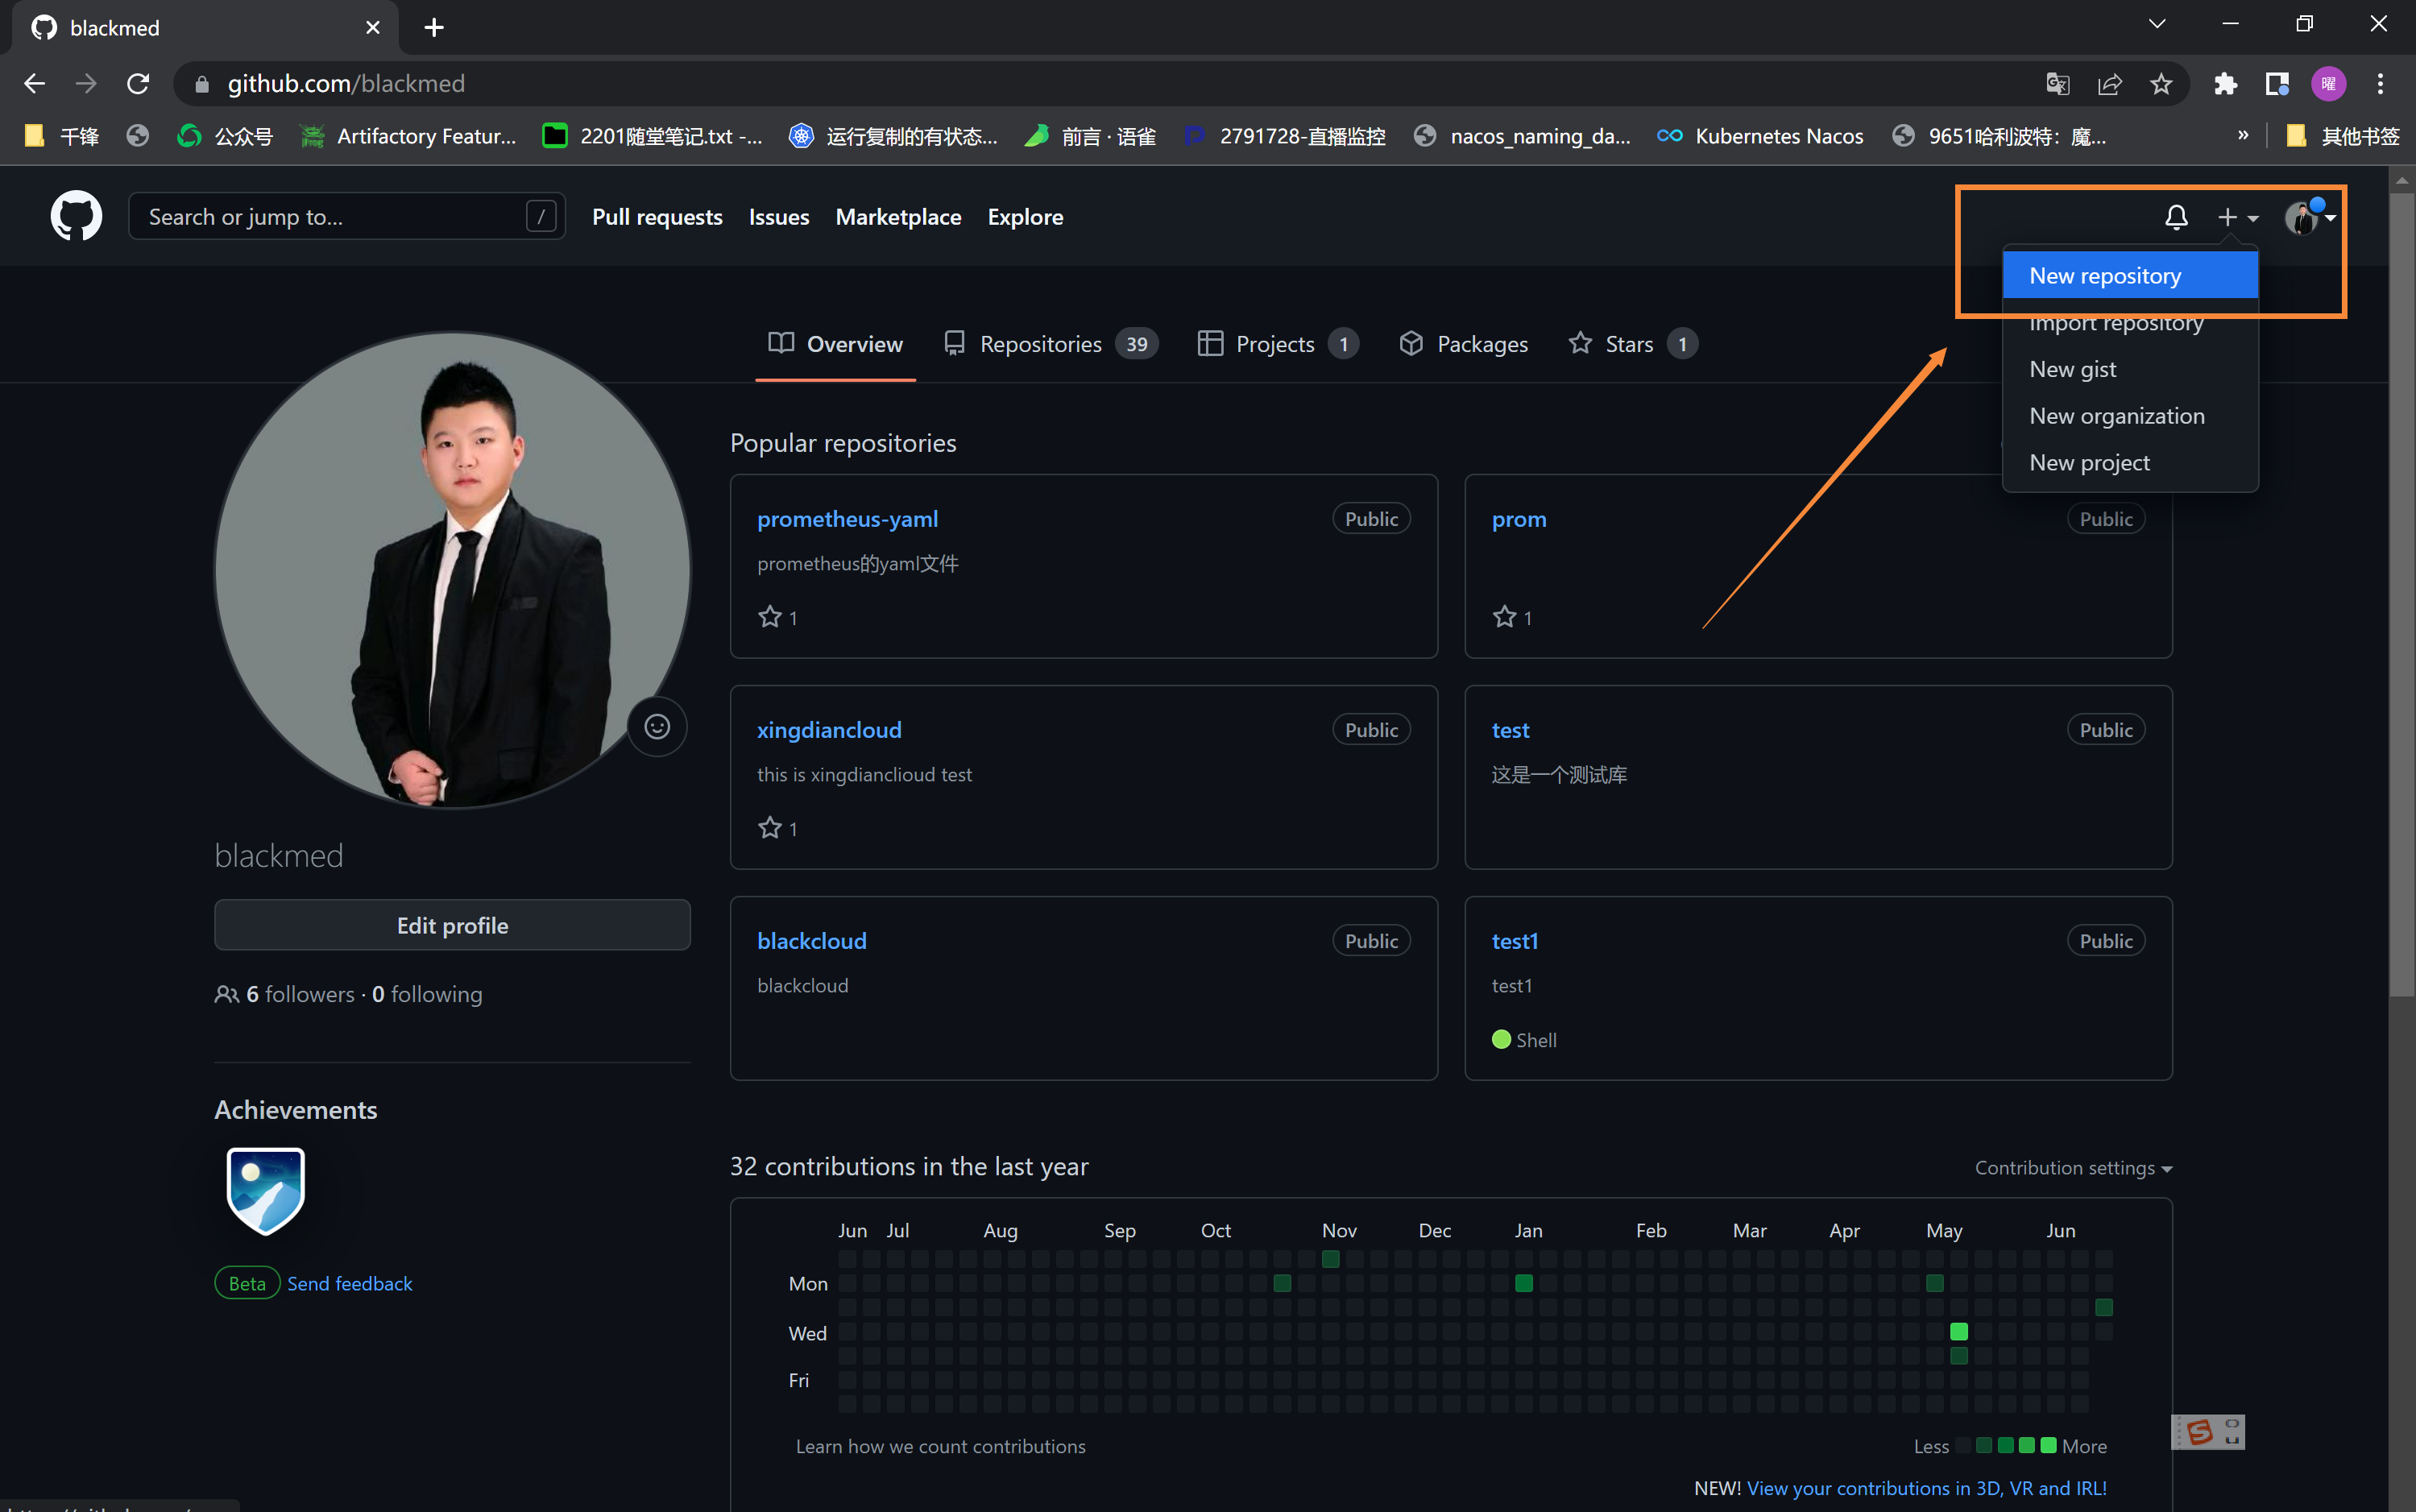
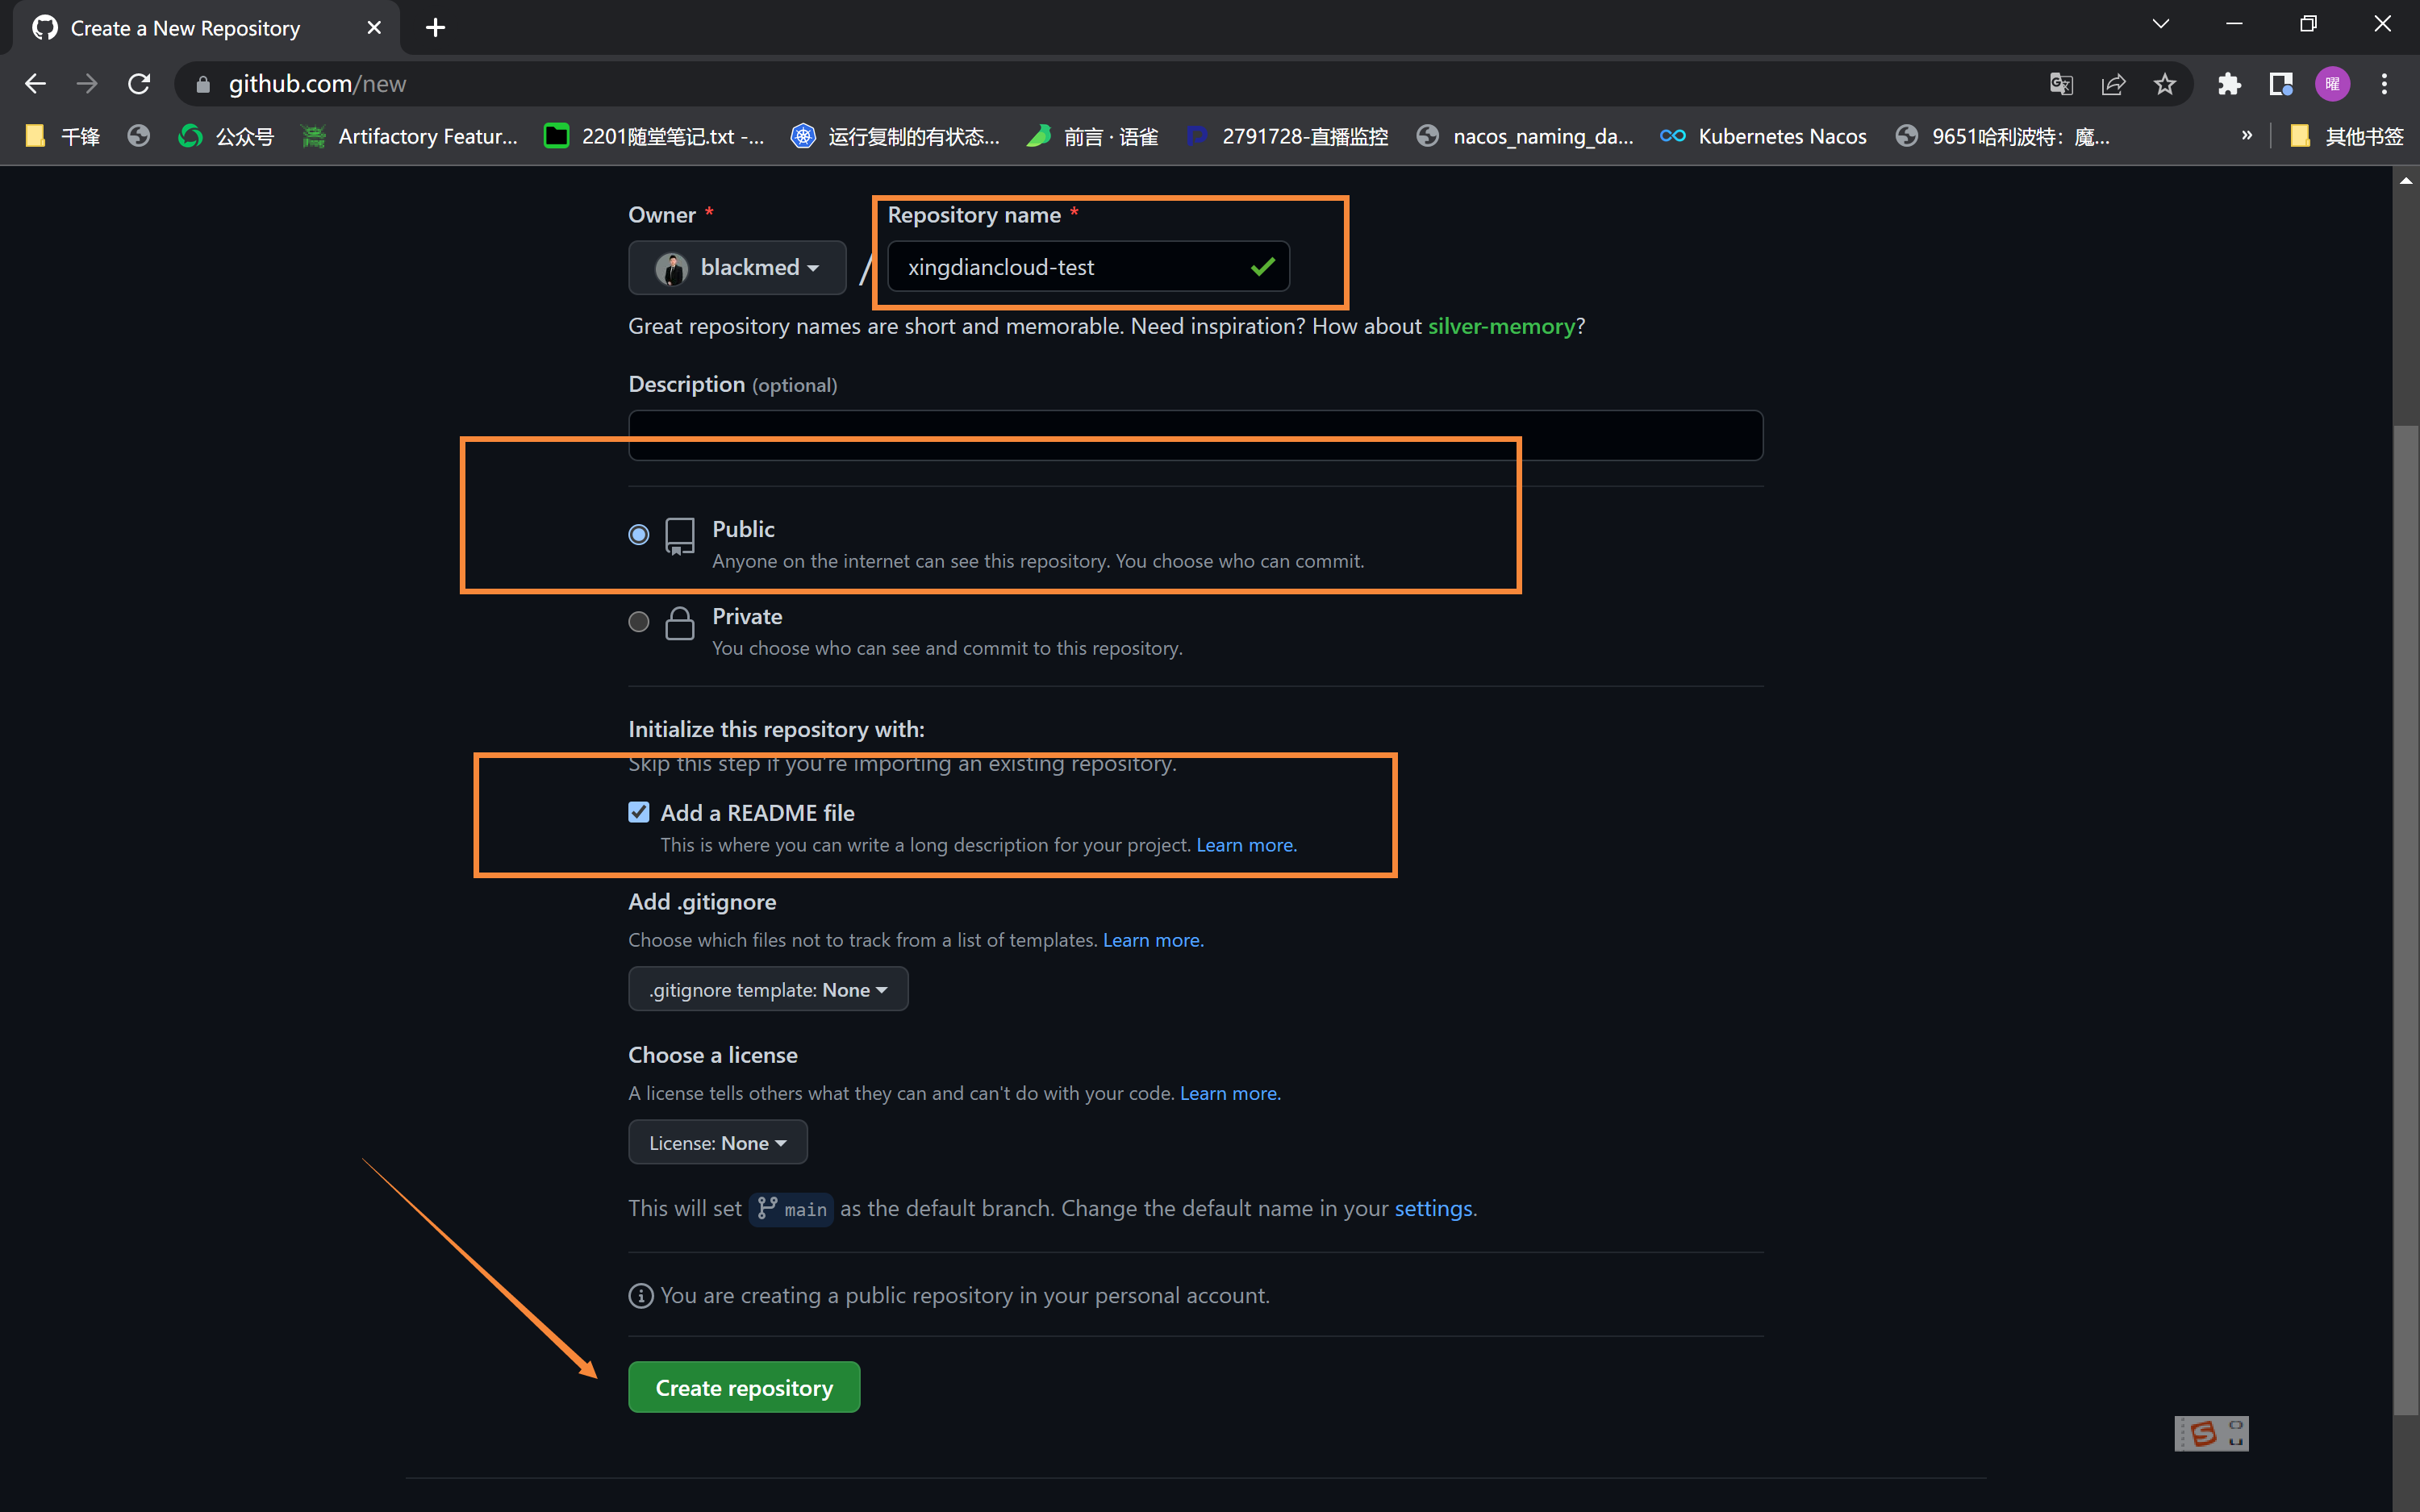
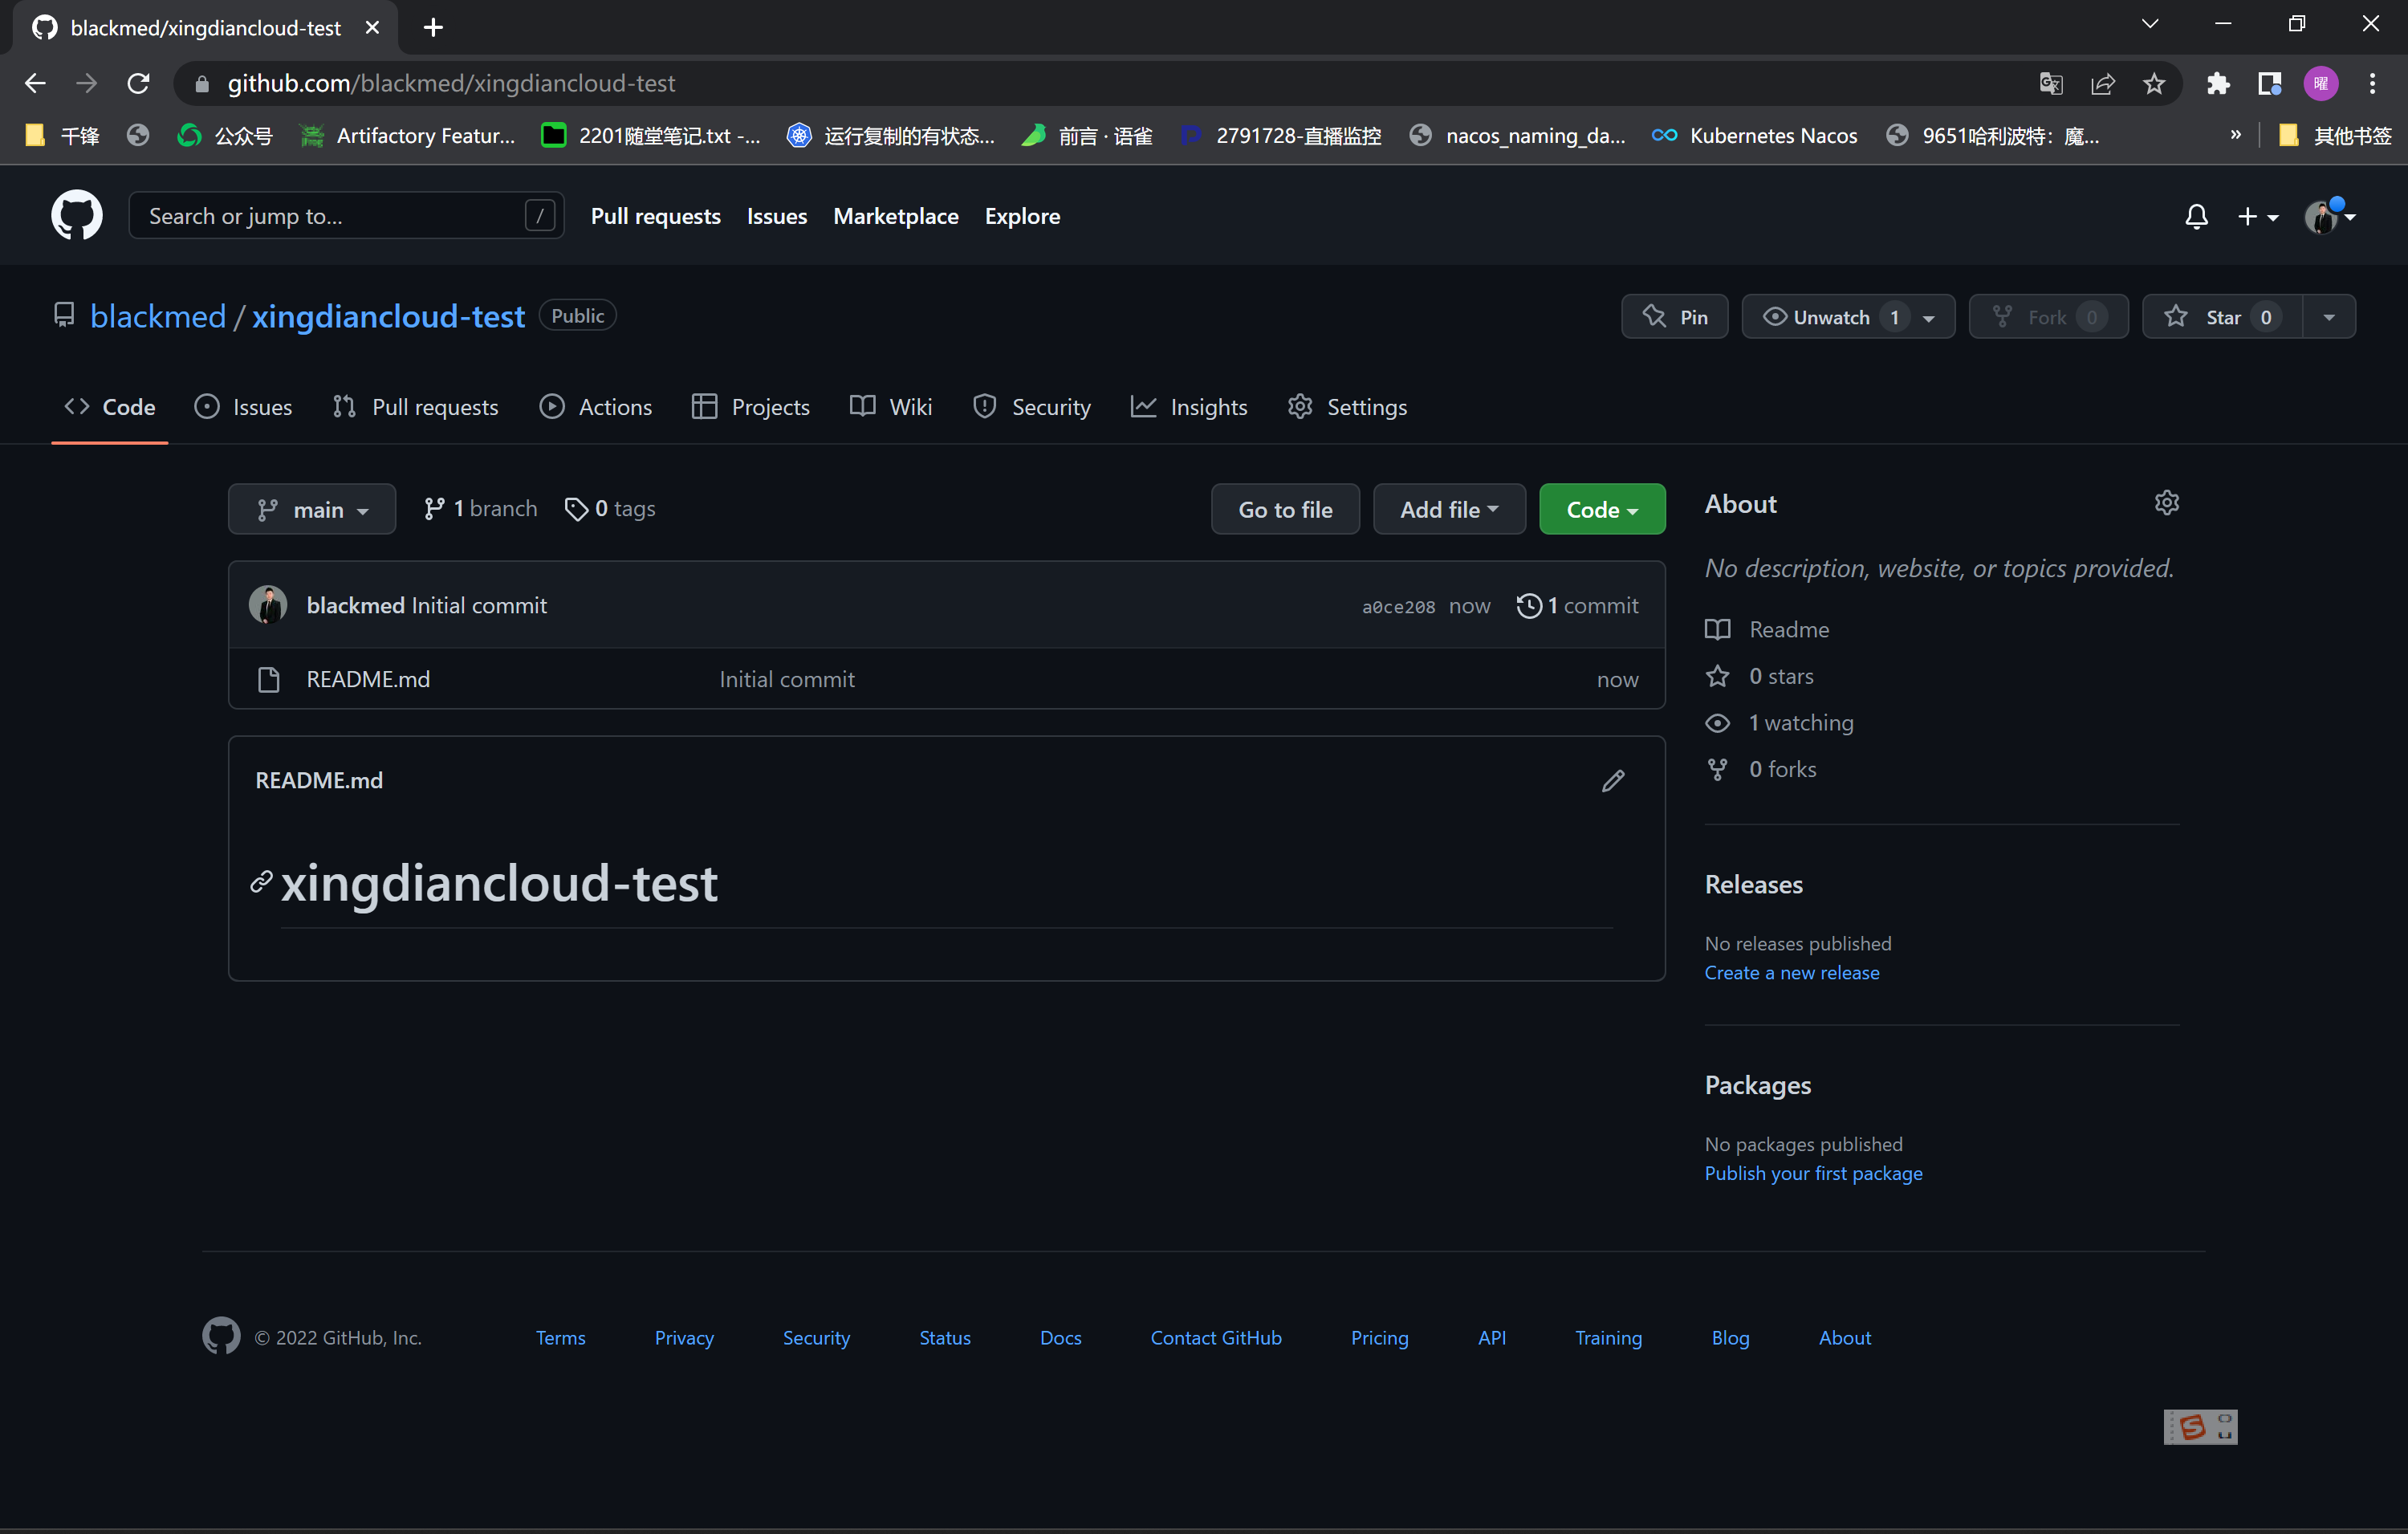
 Github创建仓库:

 git服务器上创建项目并上传到github:
```
[root@xingdian-cloud opt]# mkdir a
[root@xingdian-cloud opt]# cd a
[root@xingdian-cloud a]# git remote add origin git@github.com:blackmed/xingdiancloud-test.git
[root@xingdian-cloud a]# echo "hello xingdian" > xingdian
[root@xingdian-cloud a]# git add .
[root@xingdian-cloud a]# git commit -m "hello"
[master (root-commit) ec3f424] hello
1 file changed, 1 insertion(+)
create mode 100644 xingdian
[root@xingdian-cloud a]# git push -u origin master
Warning: Permanently added 'github.com,20.205.243.166' (ECDSA) to the list of known hosts.
Counting objects: 3, done.
Writing objects: 100% (3/3), 221 bytes | 0 bytes/s, done.
Total 3 (delta 0), reused 0 (delta 0)
remote:
remote: Create a pull request for 'master' on GitHub by visiting:
remote: https://github.com/blackmed/xingdiancloud-test/pull/new/master
remote:
To git@github.com:blackmed/xingdiancloud-test.git
* [new branch] master -> master
Branch master set up to track remote branch master from origin.
```
github查看:

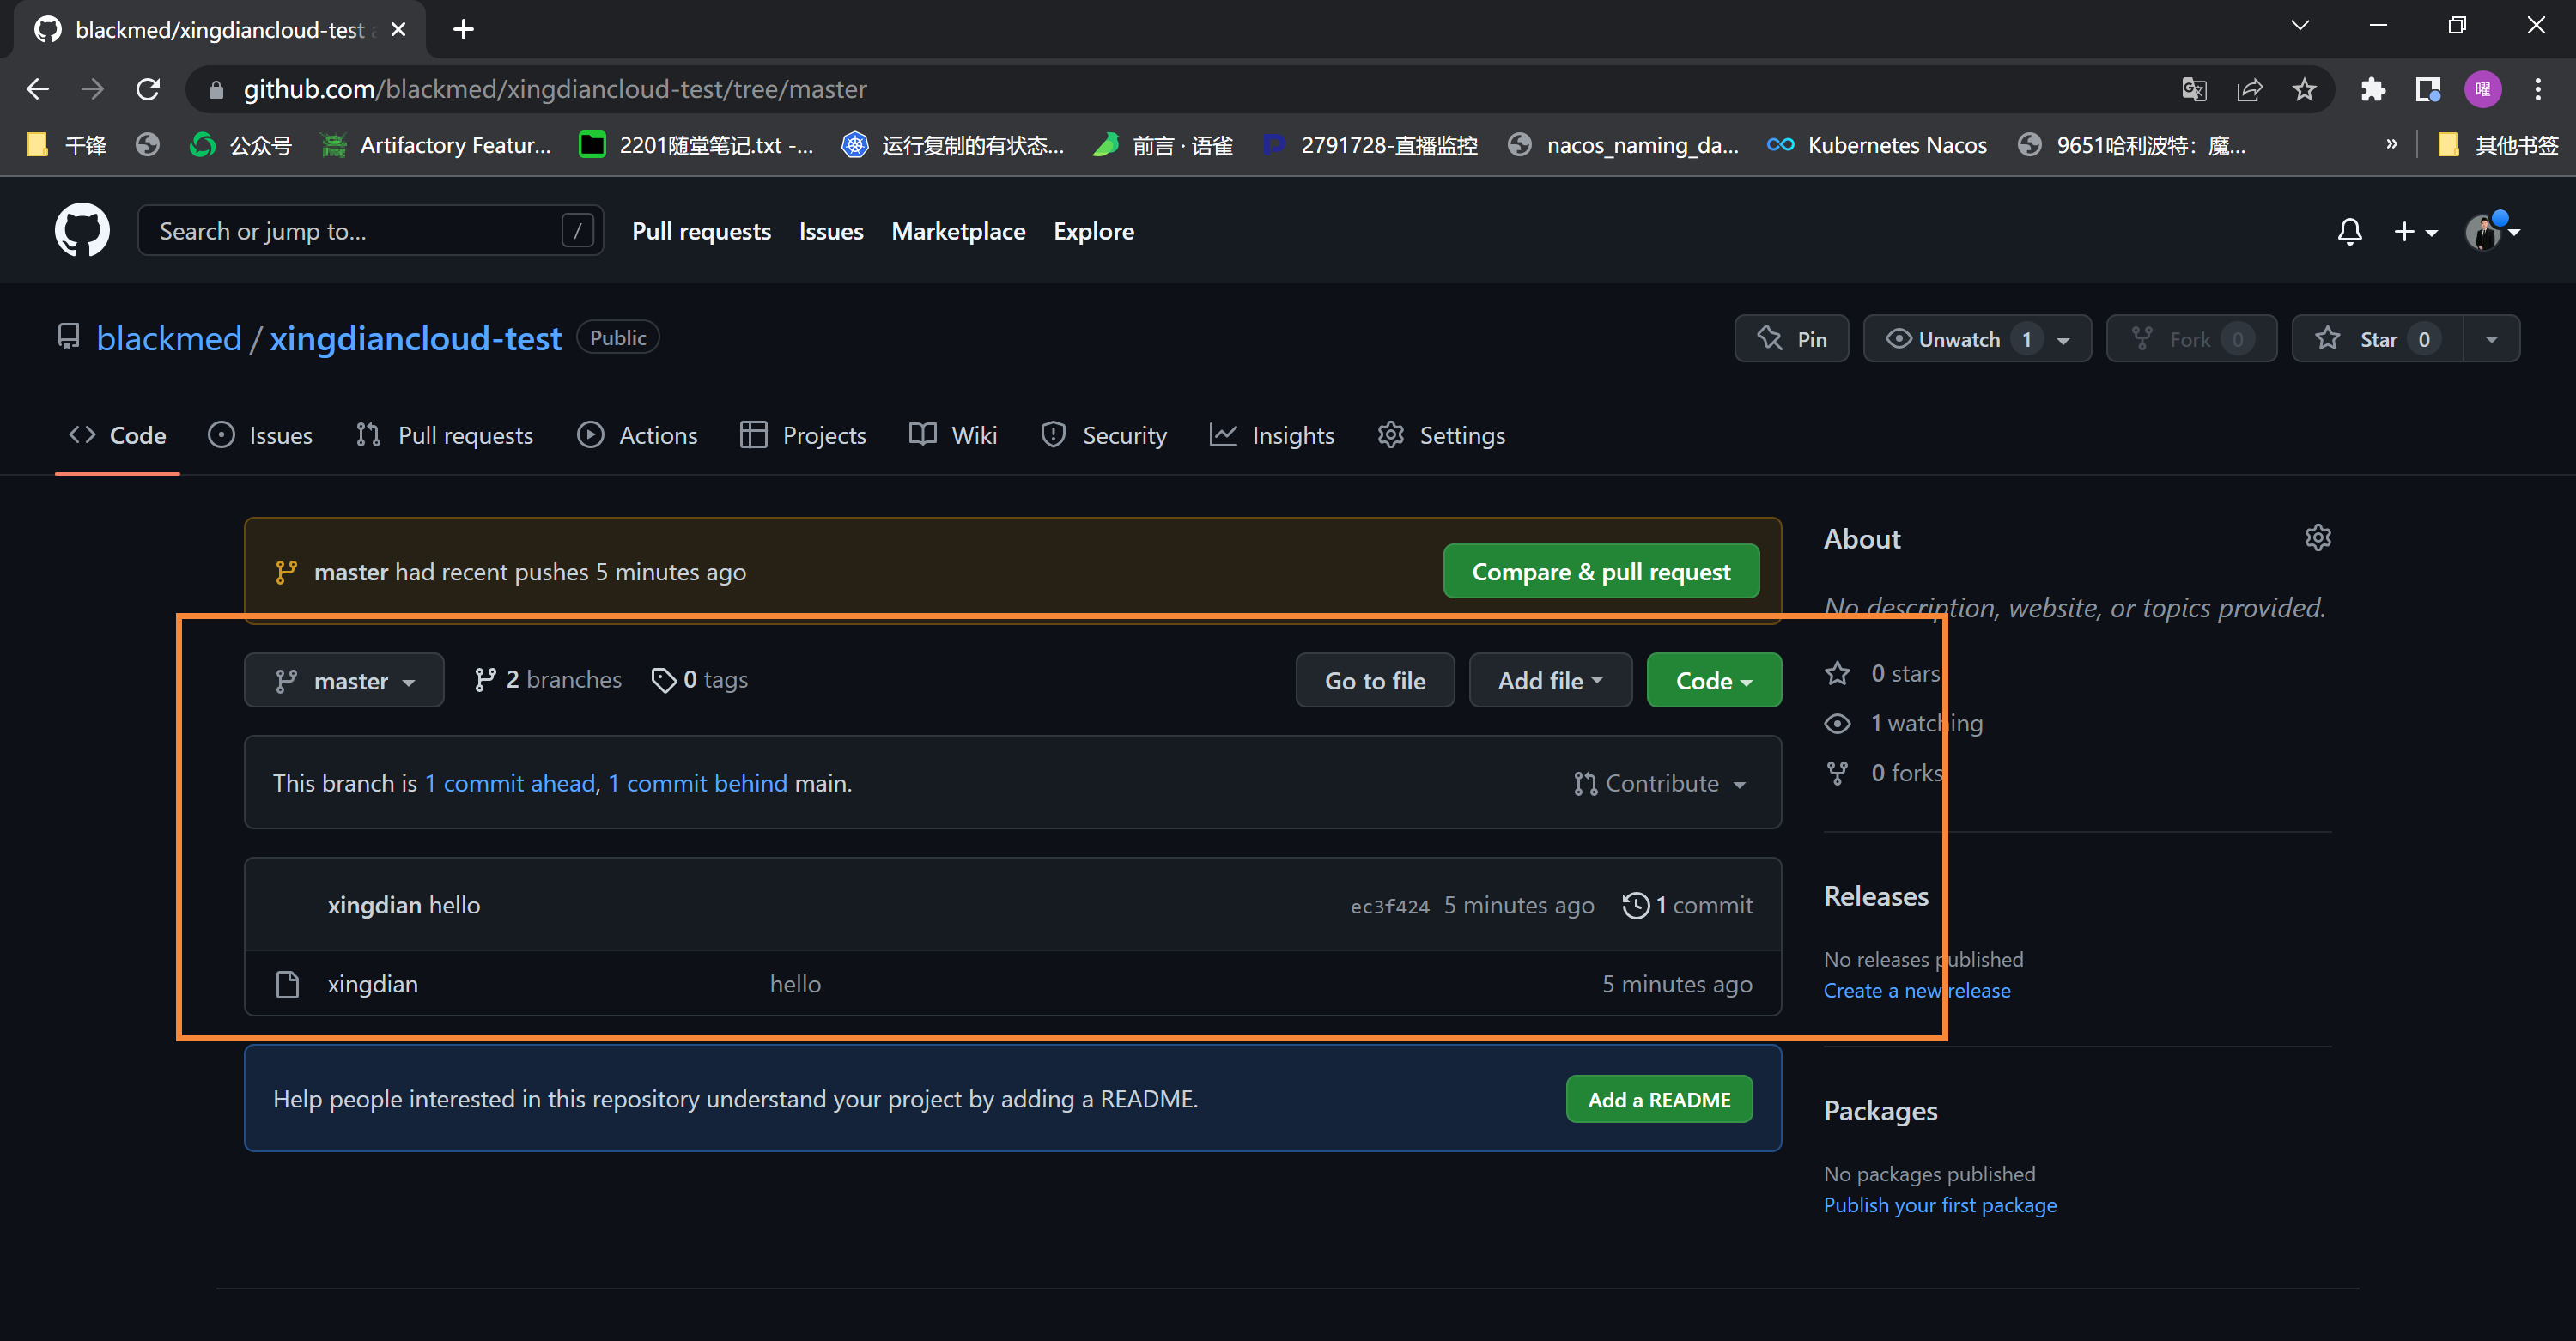
注意:这样上传到github的分支不能跟main分支合并
#### 5.版本穿梭
版本回退:
```shell
# 用 git log 命令查看:
# 每一个提交的版本都唯一对应一个 commit 版本号,
# 使用 git reset 命令退到上一个版本:
[root@xingdian-git ~]# git reset --hard HEAD^
```
```shell
[root@xingdian-git ~]# git reflog
# 查看命令历史,以便确定要回到哪个版本
[root@xingdian-git ~]# git reset --hard commit_id
# 比如git reset --hard 3628164
消失的ID号:
回到早期的版本后再查看git log会发现最近的版本消失,可以使用reflog查看消失的版本ID,用于回退到消失的版本
[root@xingdian-git ~]# git reflog
```
#### 6.分支管理
创建分支:
```
[root@xingdian-git ~]# git checkout -b dev #创建dev分支,然后切换到dev分支
[root@xingdian-git ~]# git checkout #命令加上-b参数表示创建并切换,相当于以下两条命令:
[root@xingdian-git ~]# git branch dev
[root@xingdian-git ~]# git branch #命令查看当前分支,
[root@xingdian-git ~]# git branch #命令会列出所有分支,当前分支前面会标一个*号
[root@xingdian-git ~]# git branch
* dev master
[root@xingdian-git ~]# git add readme.txt
git commit -m "branch test" # 在dev分支上正常提交.
```
分支切换:
```shell
[root@xingdian-git ~]# git checkout master # 切换回master分支
# 查看一个readme.txt文件,刚才添加的内容不见了,因为那个提交是在dev分支上,而master分支此刻的提交点并没有变
```
合并分支:
```shell
[root@xingdian-git ~]# git merge dev # 把dev分支的工作成果合并到master分支上
[root@xingdian-git ~]# git merge # 命令用于合并指定分支到当前分支。
# 合并后,再查看readme.txt的内容,就可以看到,和dev分支的最新提交是完全一样的。
```
删除分支:
```shell
[root@xingdian-git ~]# git branch -d dev #删除dev分支了:
删除后,查看branch,就只剩下master分支了.
```
#### 7.github分支管理
注意:github默认的分支是main而不是master
创建项目:
git服务器上创建项目并上传到github:
```
[root@xingdian-cloud opt]# mkdir a
[root@xingdian-cloud opt]# cd a
[root@xingdian-cloud a]# git remote add origin git@github.com:blackmed/xingdiancloud-test.git
[root@xingdian-cloud a]# echo "hello xingdian" > xingdian
[root@xingdian-cloud a]# git add .
[root@xingdian-cloud a]# git commit -m "hello"
[master (root-commit) ec3f424] hello
1 file changed, 1 insertion(+)
create mode 100644 xingdian
[root@xingdian-cloud a]# git push -u origin master
Warning: Permanently added 'github.com,20.205.243.166' (ECDSA) to the list of known hosts.
Counting objects: 3, done.
Writing objects: 100% (3/3), 221 bytes | 0 bytes/s, done.
Total 3 (delta 0), reused 0 (delta 0)
remote:
remote: Create a pull request for 'master' on GitHub by visiting:
remote: https://github.com/blackmed/xingdiancloud-test/pull/new/master
remote:
To git@github.com:blackmed/xingdiancloud-test.git
* [new branch] master -> master
Branch master set up to track remote branch master from origin.
```
github查看:


注意:这样上传到github的分支不能跟main分支合并
#### 5.版本穿梭
版本回退:
```shell
# 用 git log 命令查看:
# 每一个提交的版本都唯一对应一个 commit 版本号,
# 使用 git reset 命令退到上一个版本:
[root@xingdian-git ~]# git reset --hard HEAD^
```
```shell
[root@xingdian-git ~]# git reflog
# 查看命令历史,以便确定要回到哪个版本
[root@xingdian-git ~]# git reset --hard commit_id
# 比如git reset --hard 3628164
消失的ID号:
回到早期的版本后再查看git log会发现最近的版本消失,可以使用reflog查看消失的版本ID,用于回退到消失的版本
[root@xingdian-git ~]# git reflog
```
#### 6.分支管理
创建分支:
```
[root@xingdian-git ~]# git checkout -b dev #创建dev分支,然后切换到dev分支
[root@xingdian-git ~]# git checkout #命令加上-b参数表示创建并切换,相当于以下两条命令:
[root@xingdian-git ~]# git branch dev
[root@xingdian-git ~]# git branch #命令查看当前分支,
[root@xingdian-git ~]# git branch #命令会列出所有分支,当前分支前面会标一个*号
[root@xingdian-git ~]# git branch
* dev master
[root@xingdian-git ~]# git add readme.txt
git commit -m "branch test" # 在dev分支上正常提交.
```
分支切换:
```shell
[root@xingdian-git ~]# git checkout master # 切换回master分支
# 查看一个readme.txt文件,刚才添加的内容不见了,因为那个提交是在dev分支上,而master分支此刻的提交点并没有变
```
合并分支:
```shell
[root@xingdian-git ~]# git merge dev # 把dev分支的工作成果合并到master分支上
[root@xingdian-git ~]# git merge # 命令用于合并指定分支到当前分支。
# 合并后,再查看readme.txt的内容,就可以看到,和dev分支的最新提交是完全一样的。
```
删除分支:
```shell
[root@xingdian-git ~]# git branch -d dev #删除dev分支了:
删除后,查看branch,就只剩下master分支了.
```
#### 7.github分支管理
注意:github默认的分支是main而不是master
创建项目:
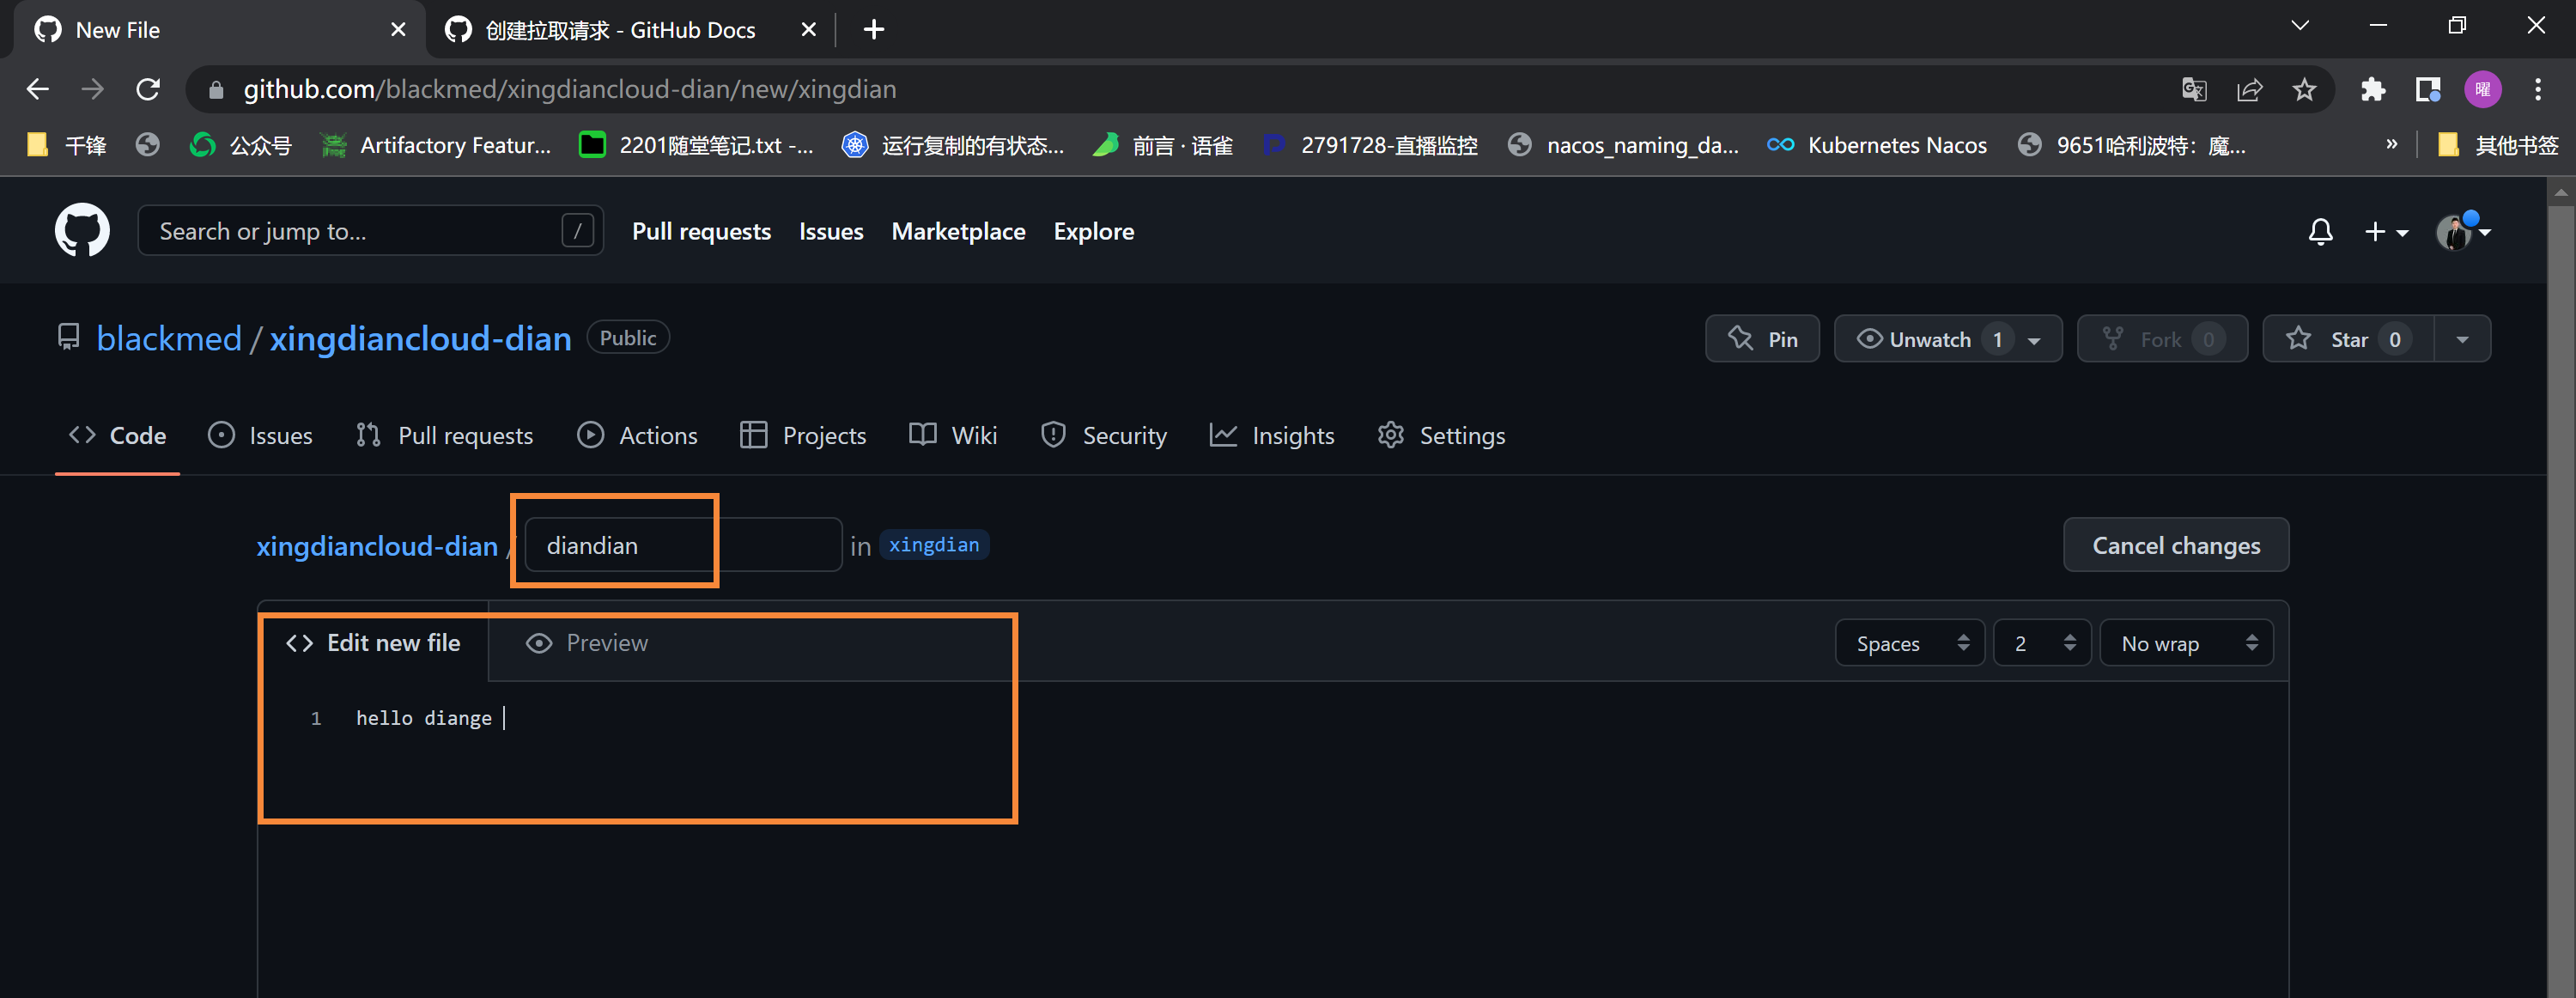
 创建分支:
创建分支:
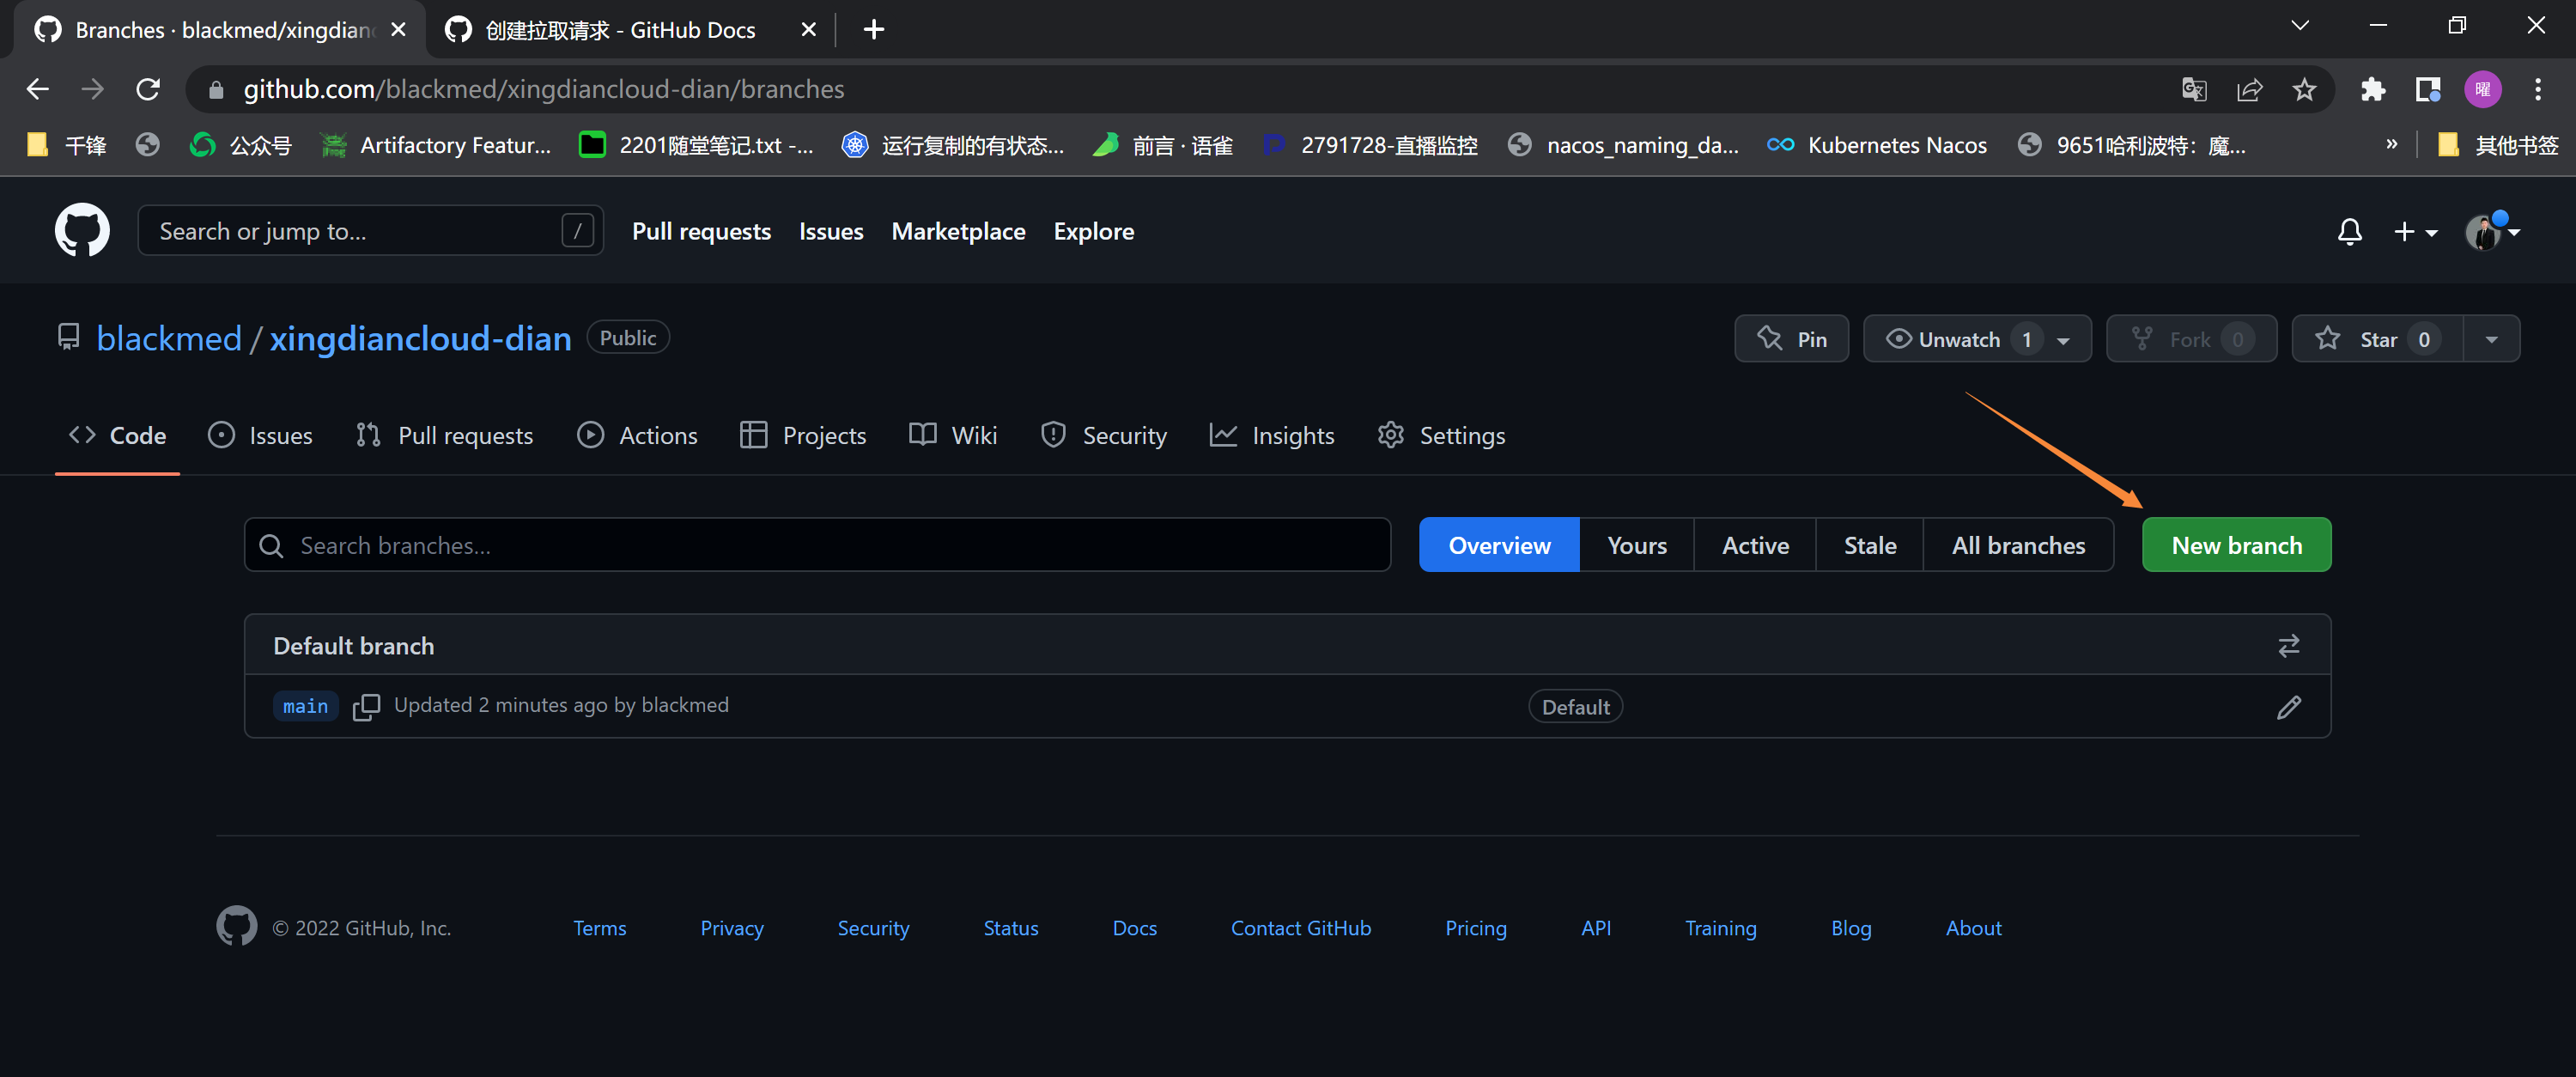 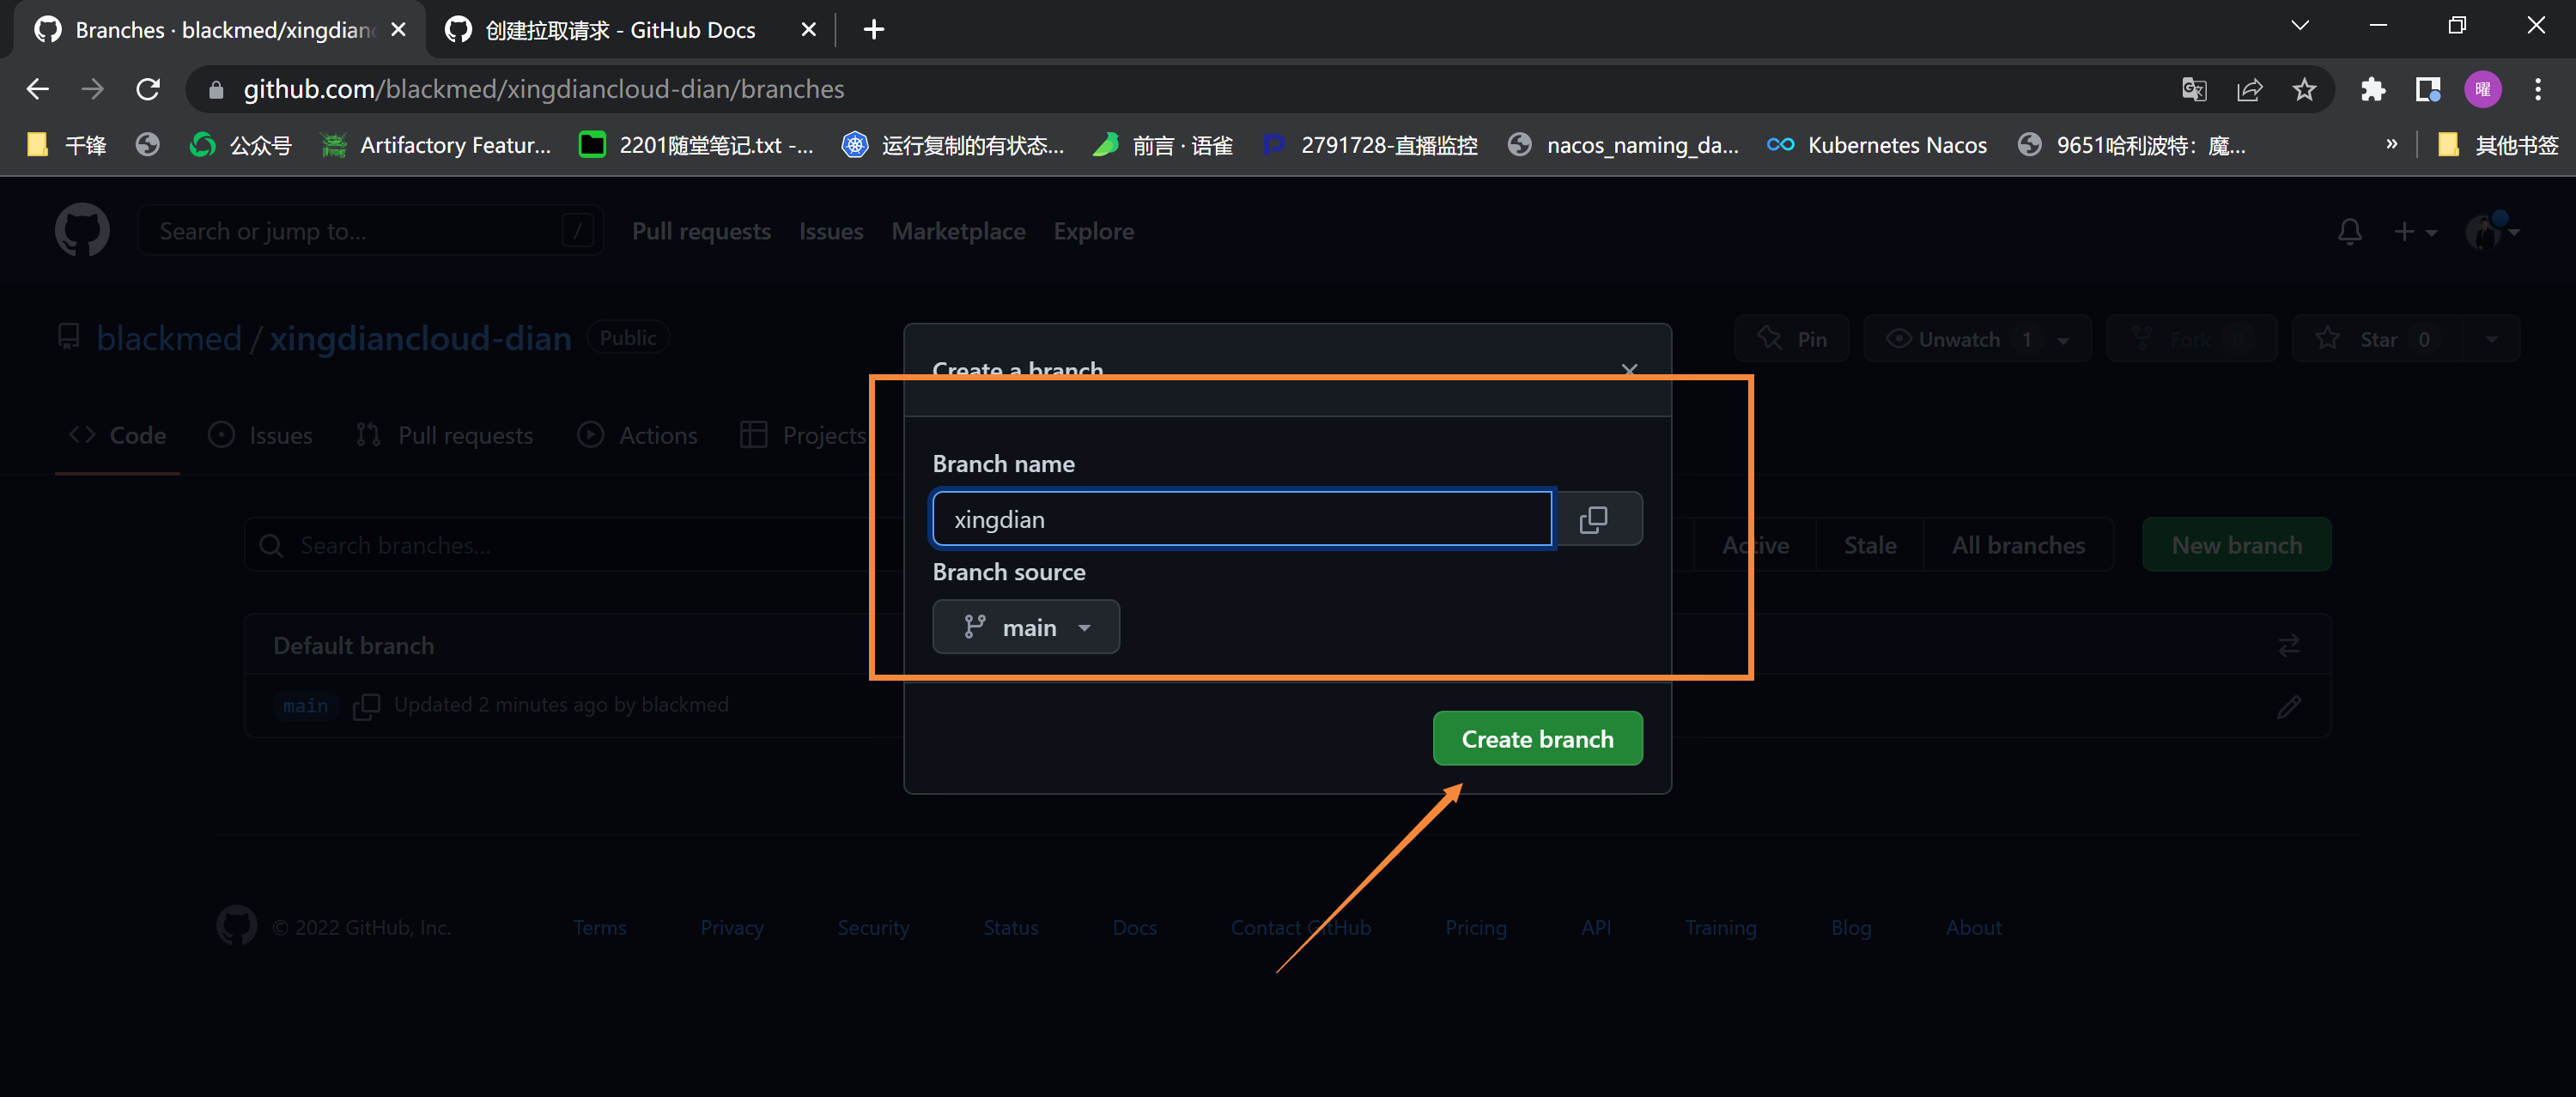

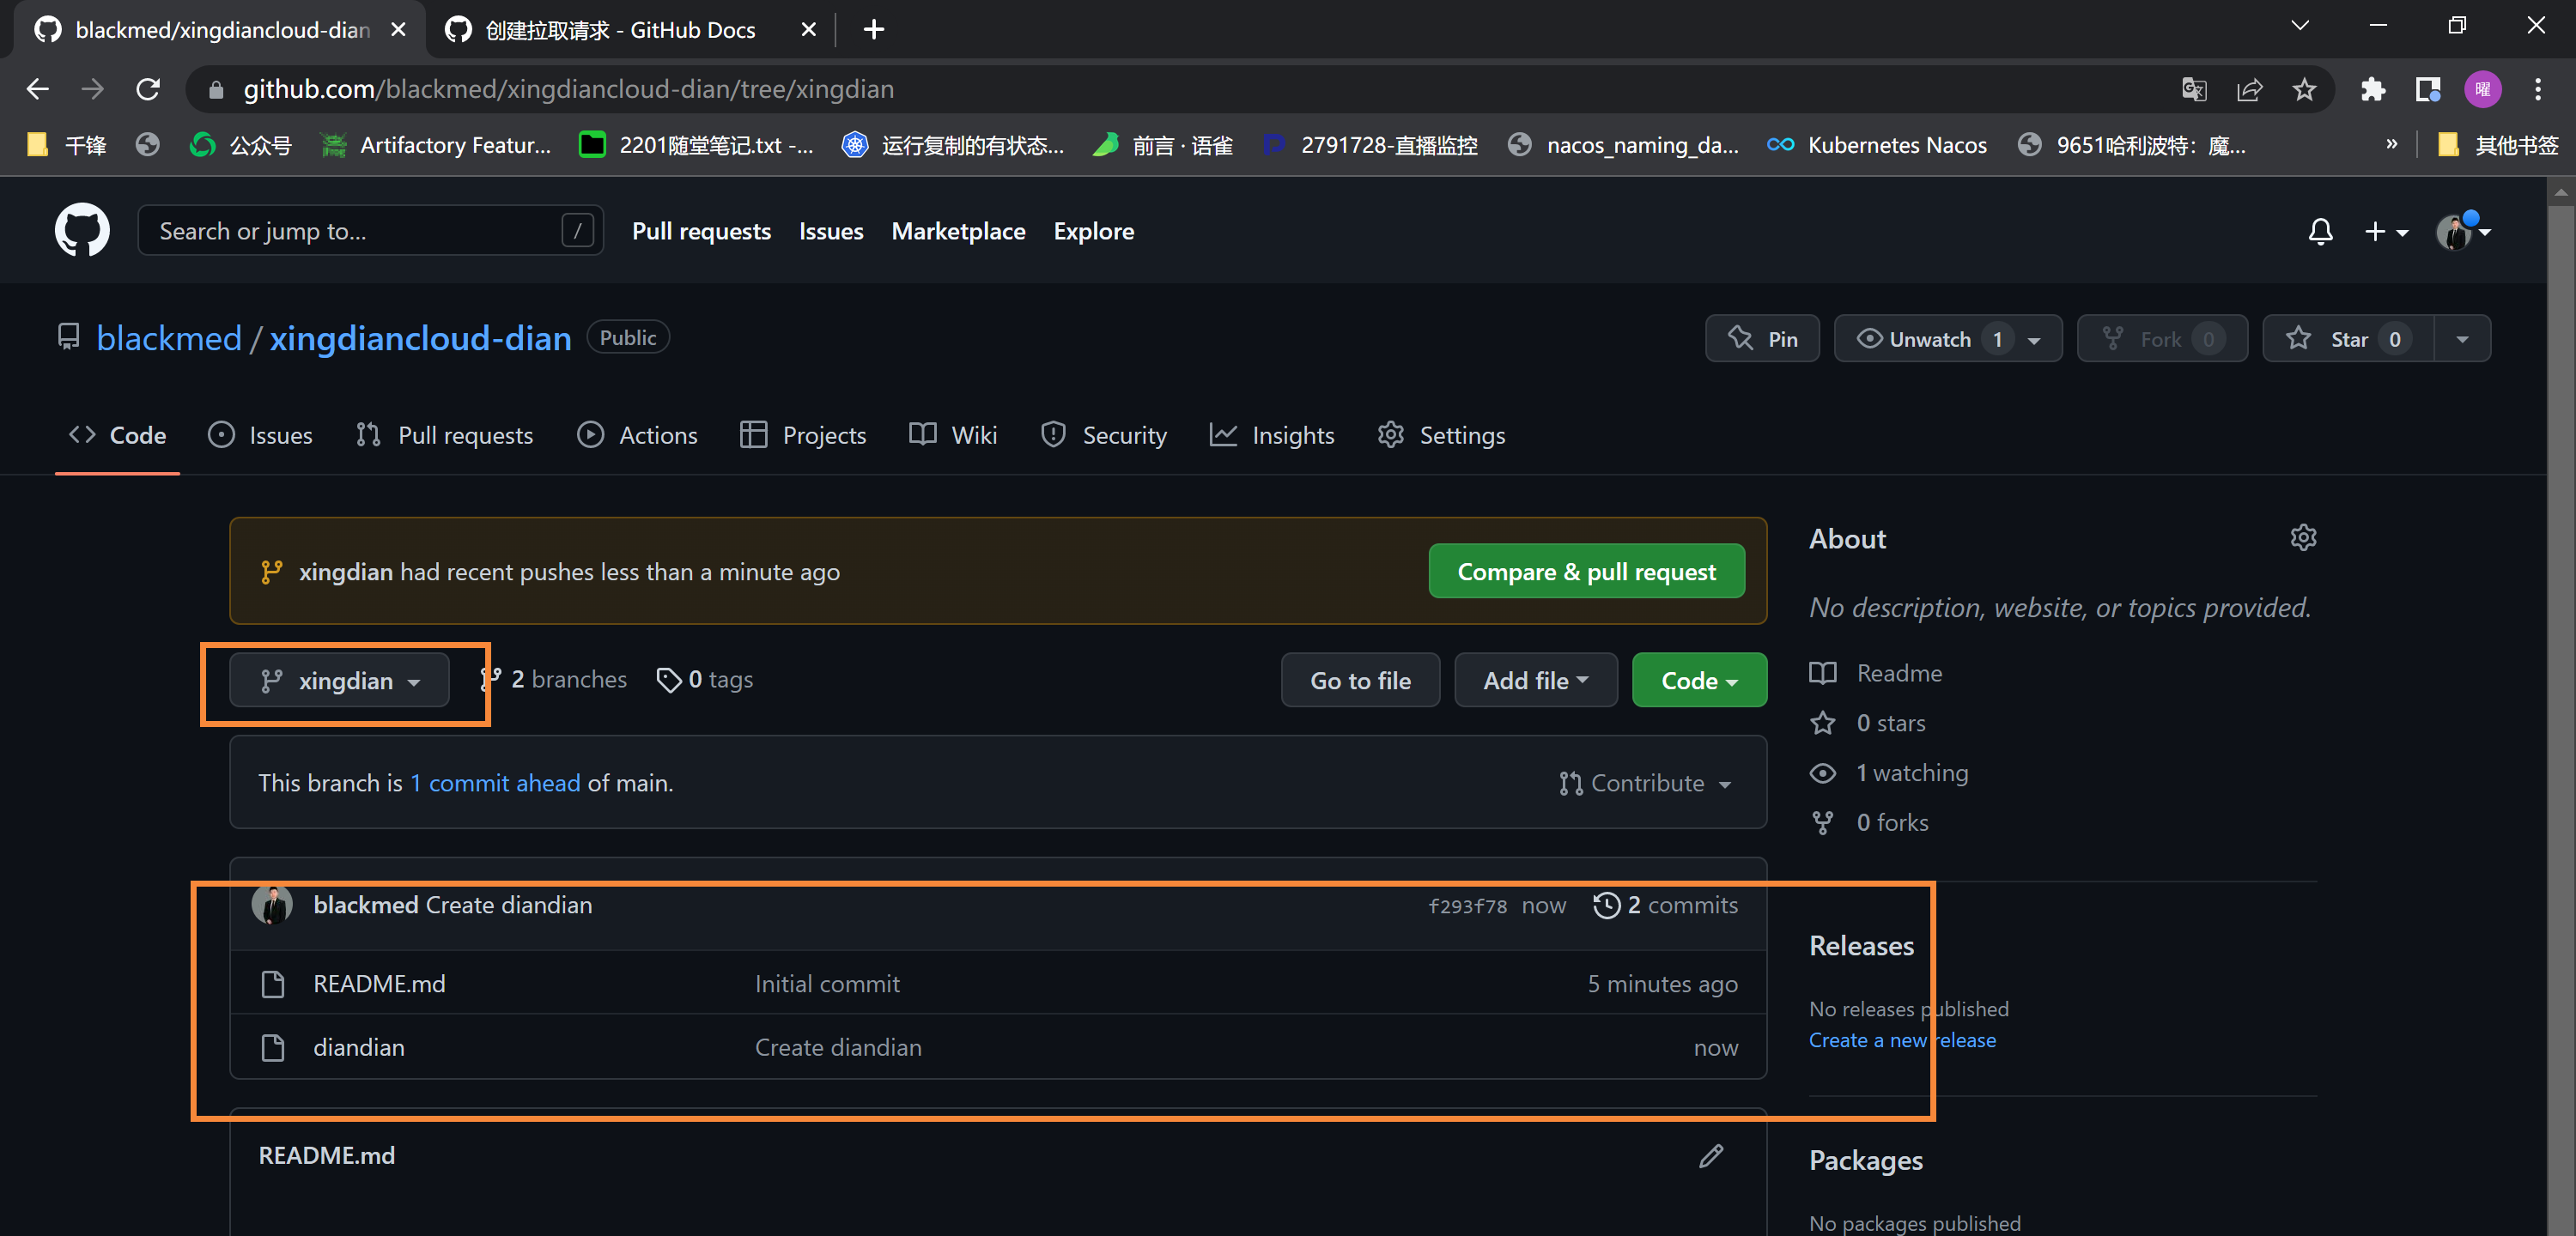
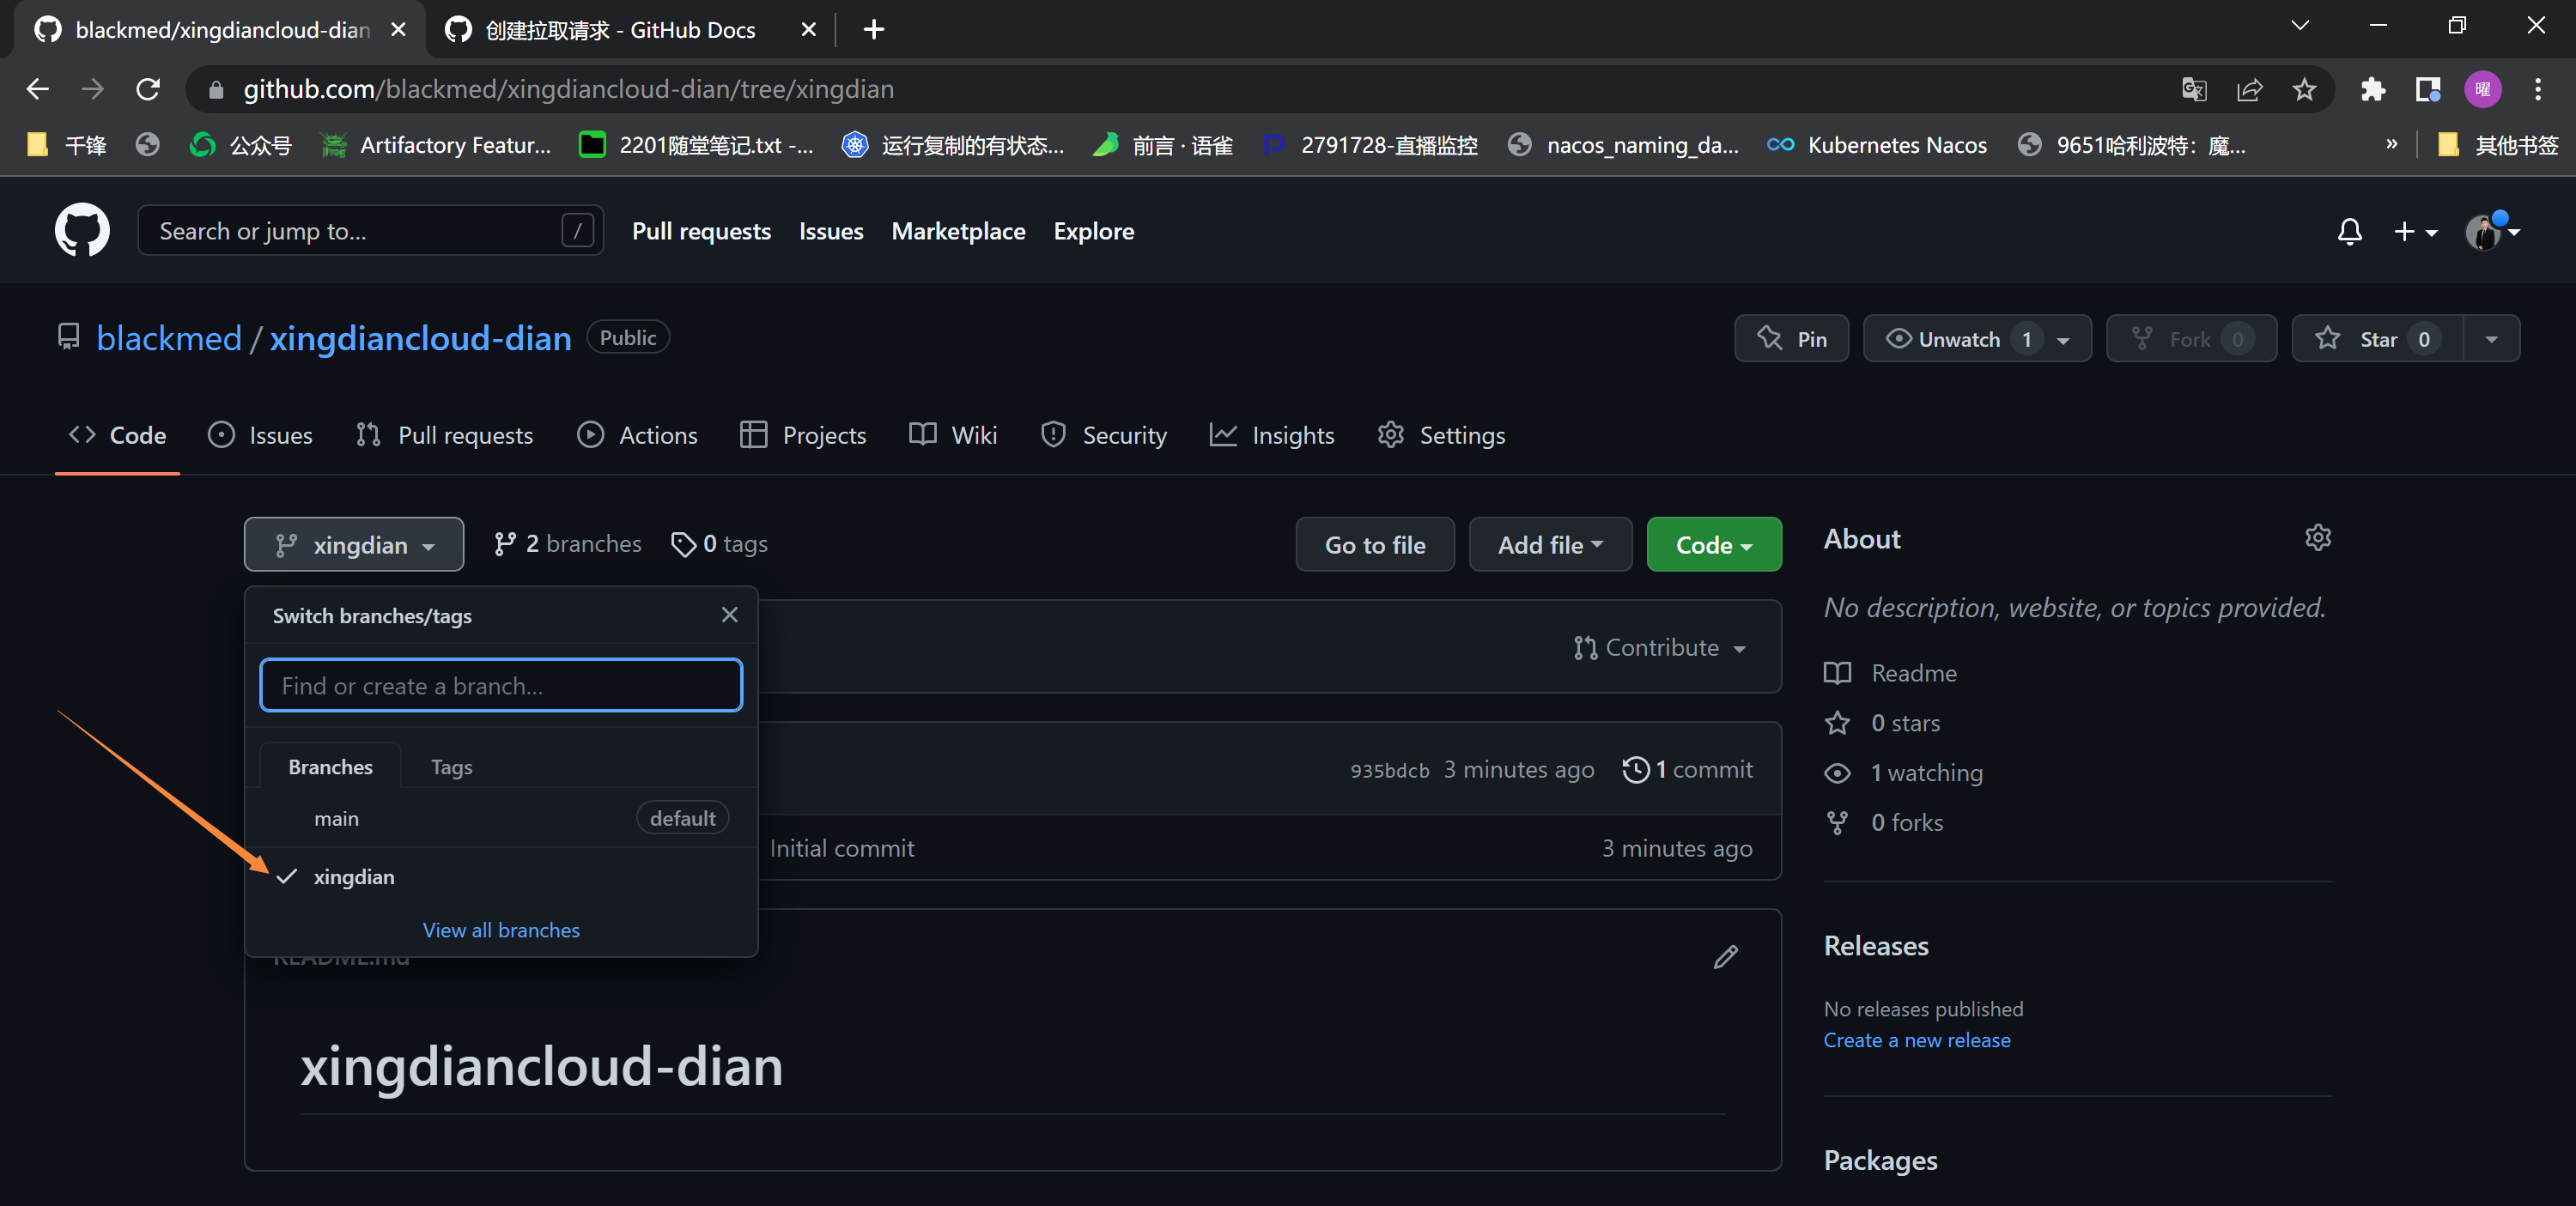 新分支创建文件:

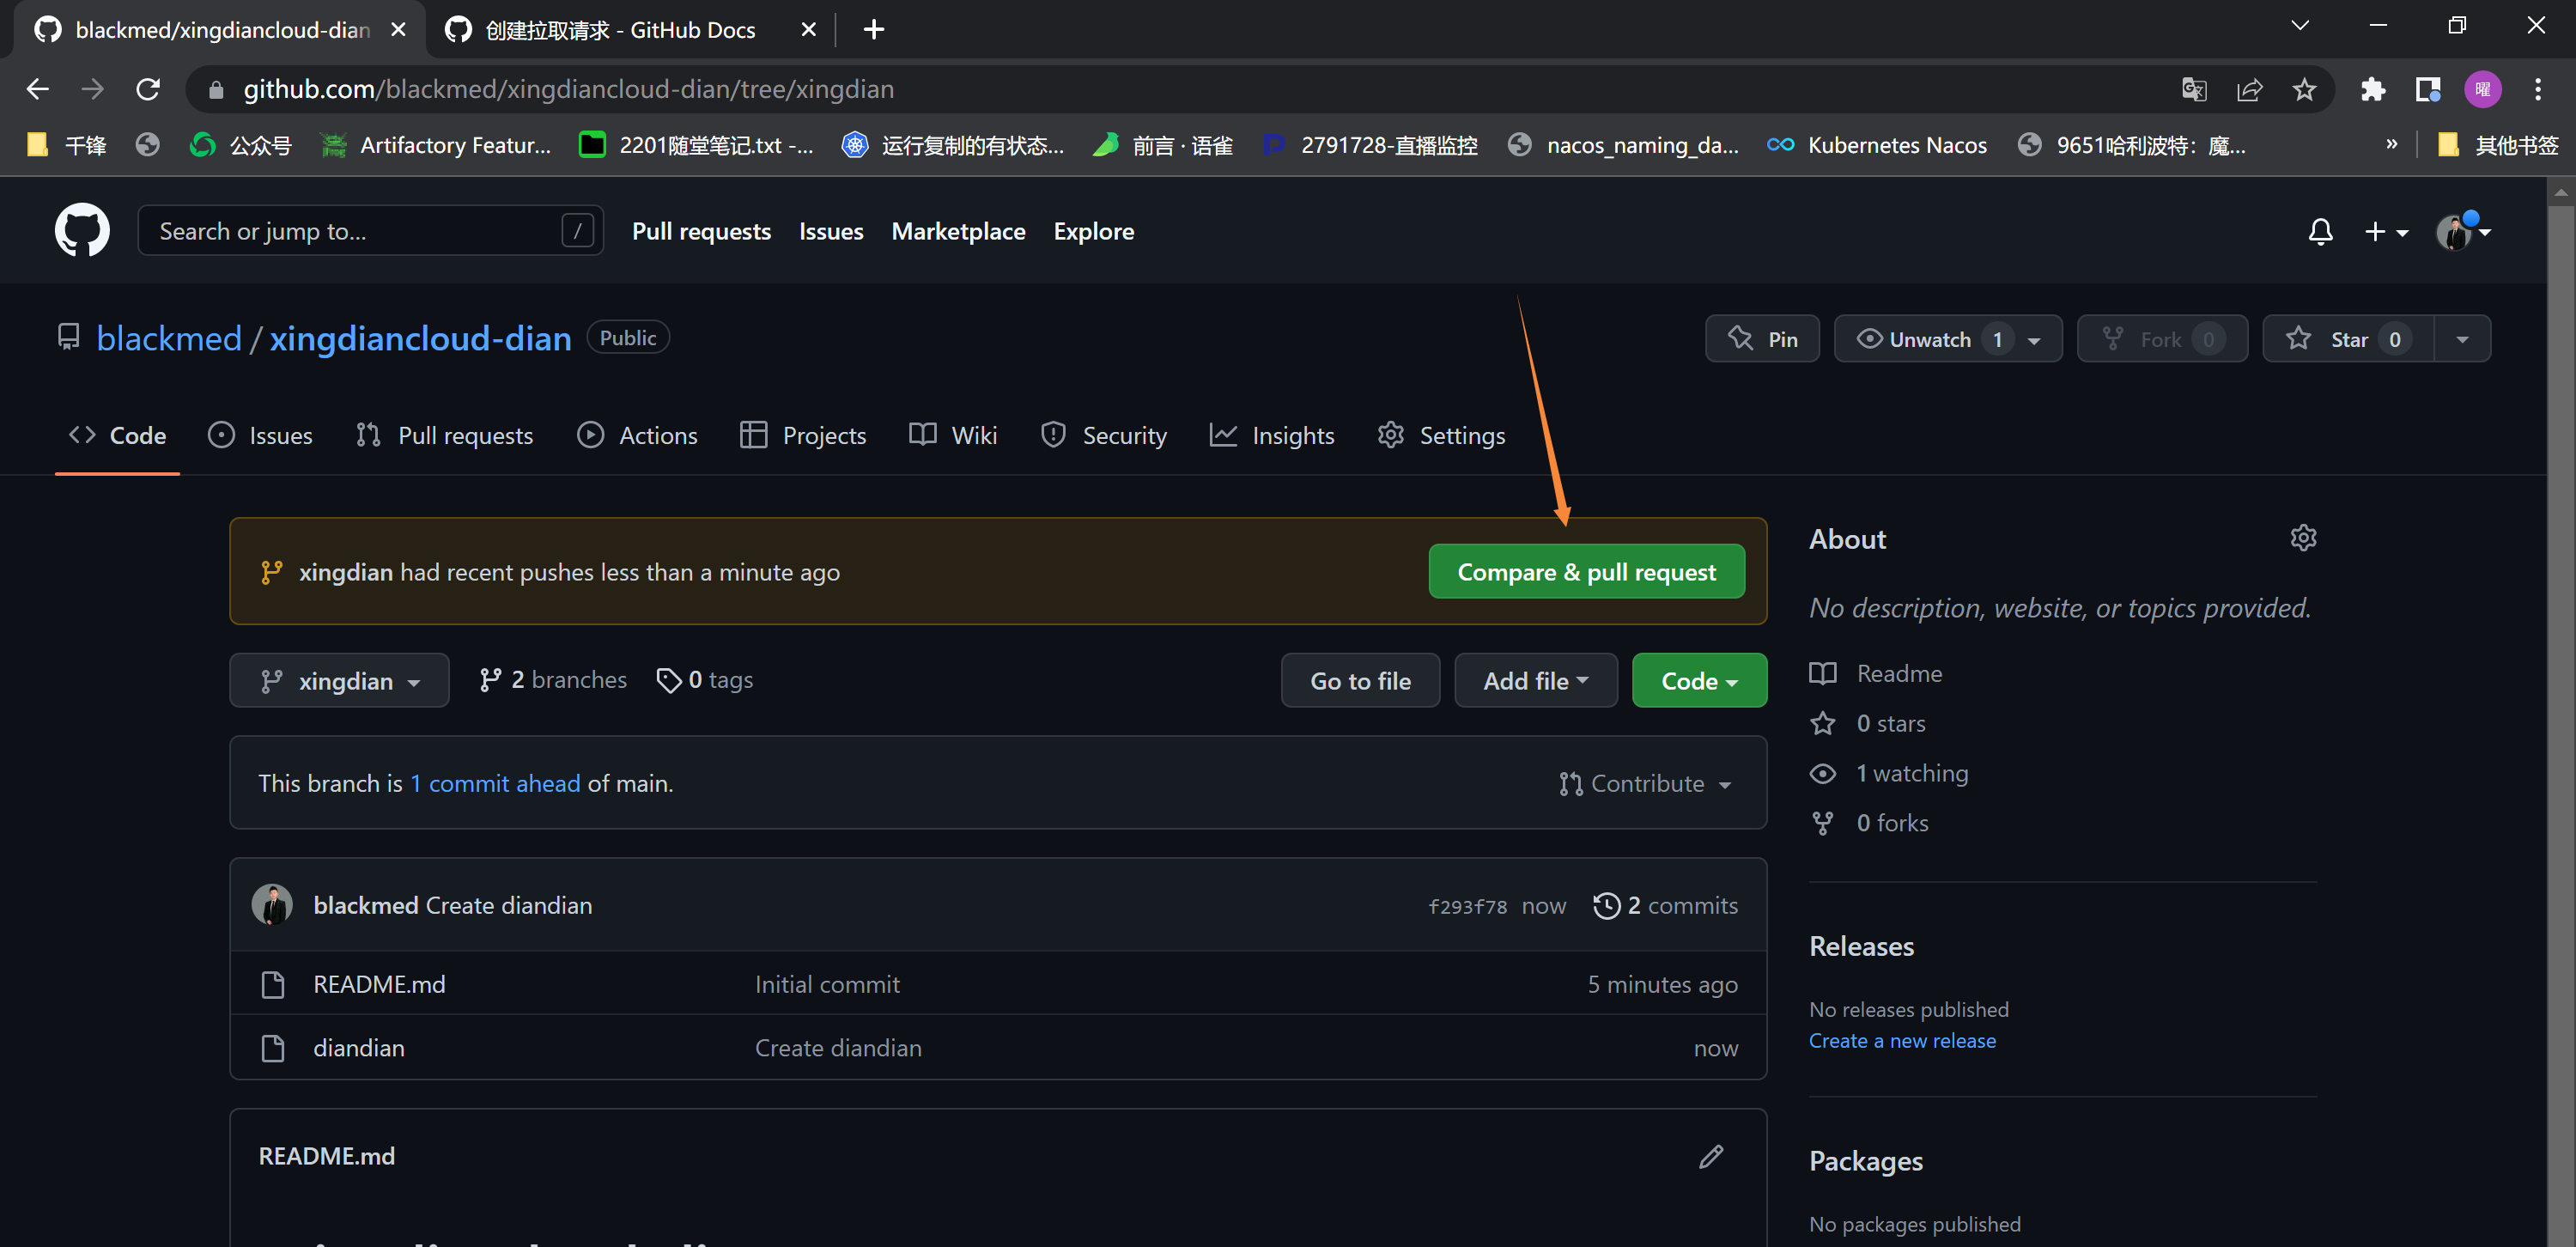
 分支合并:
分支合并:
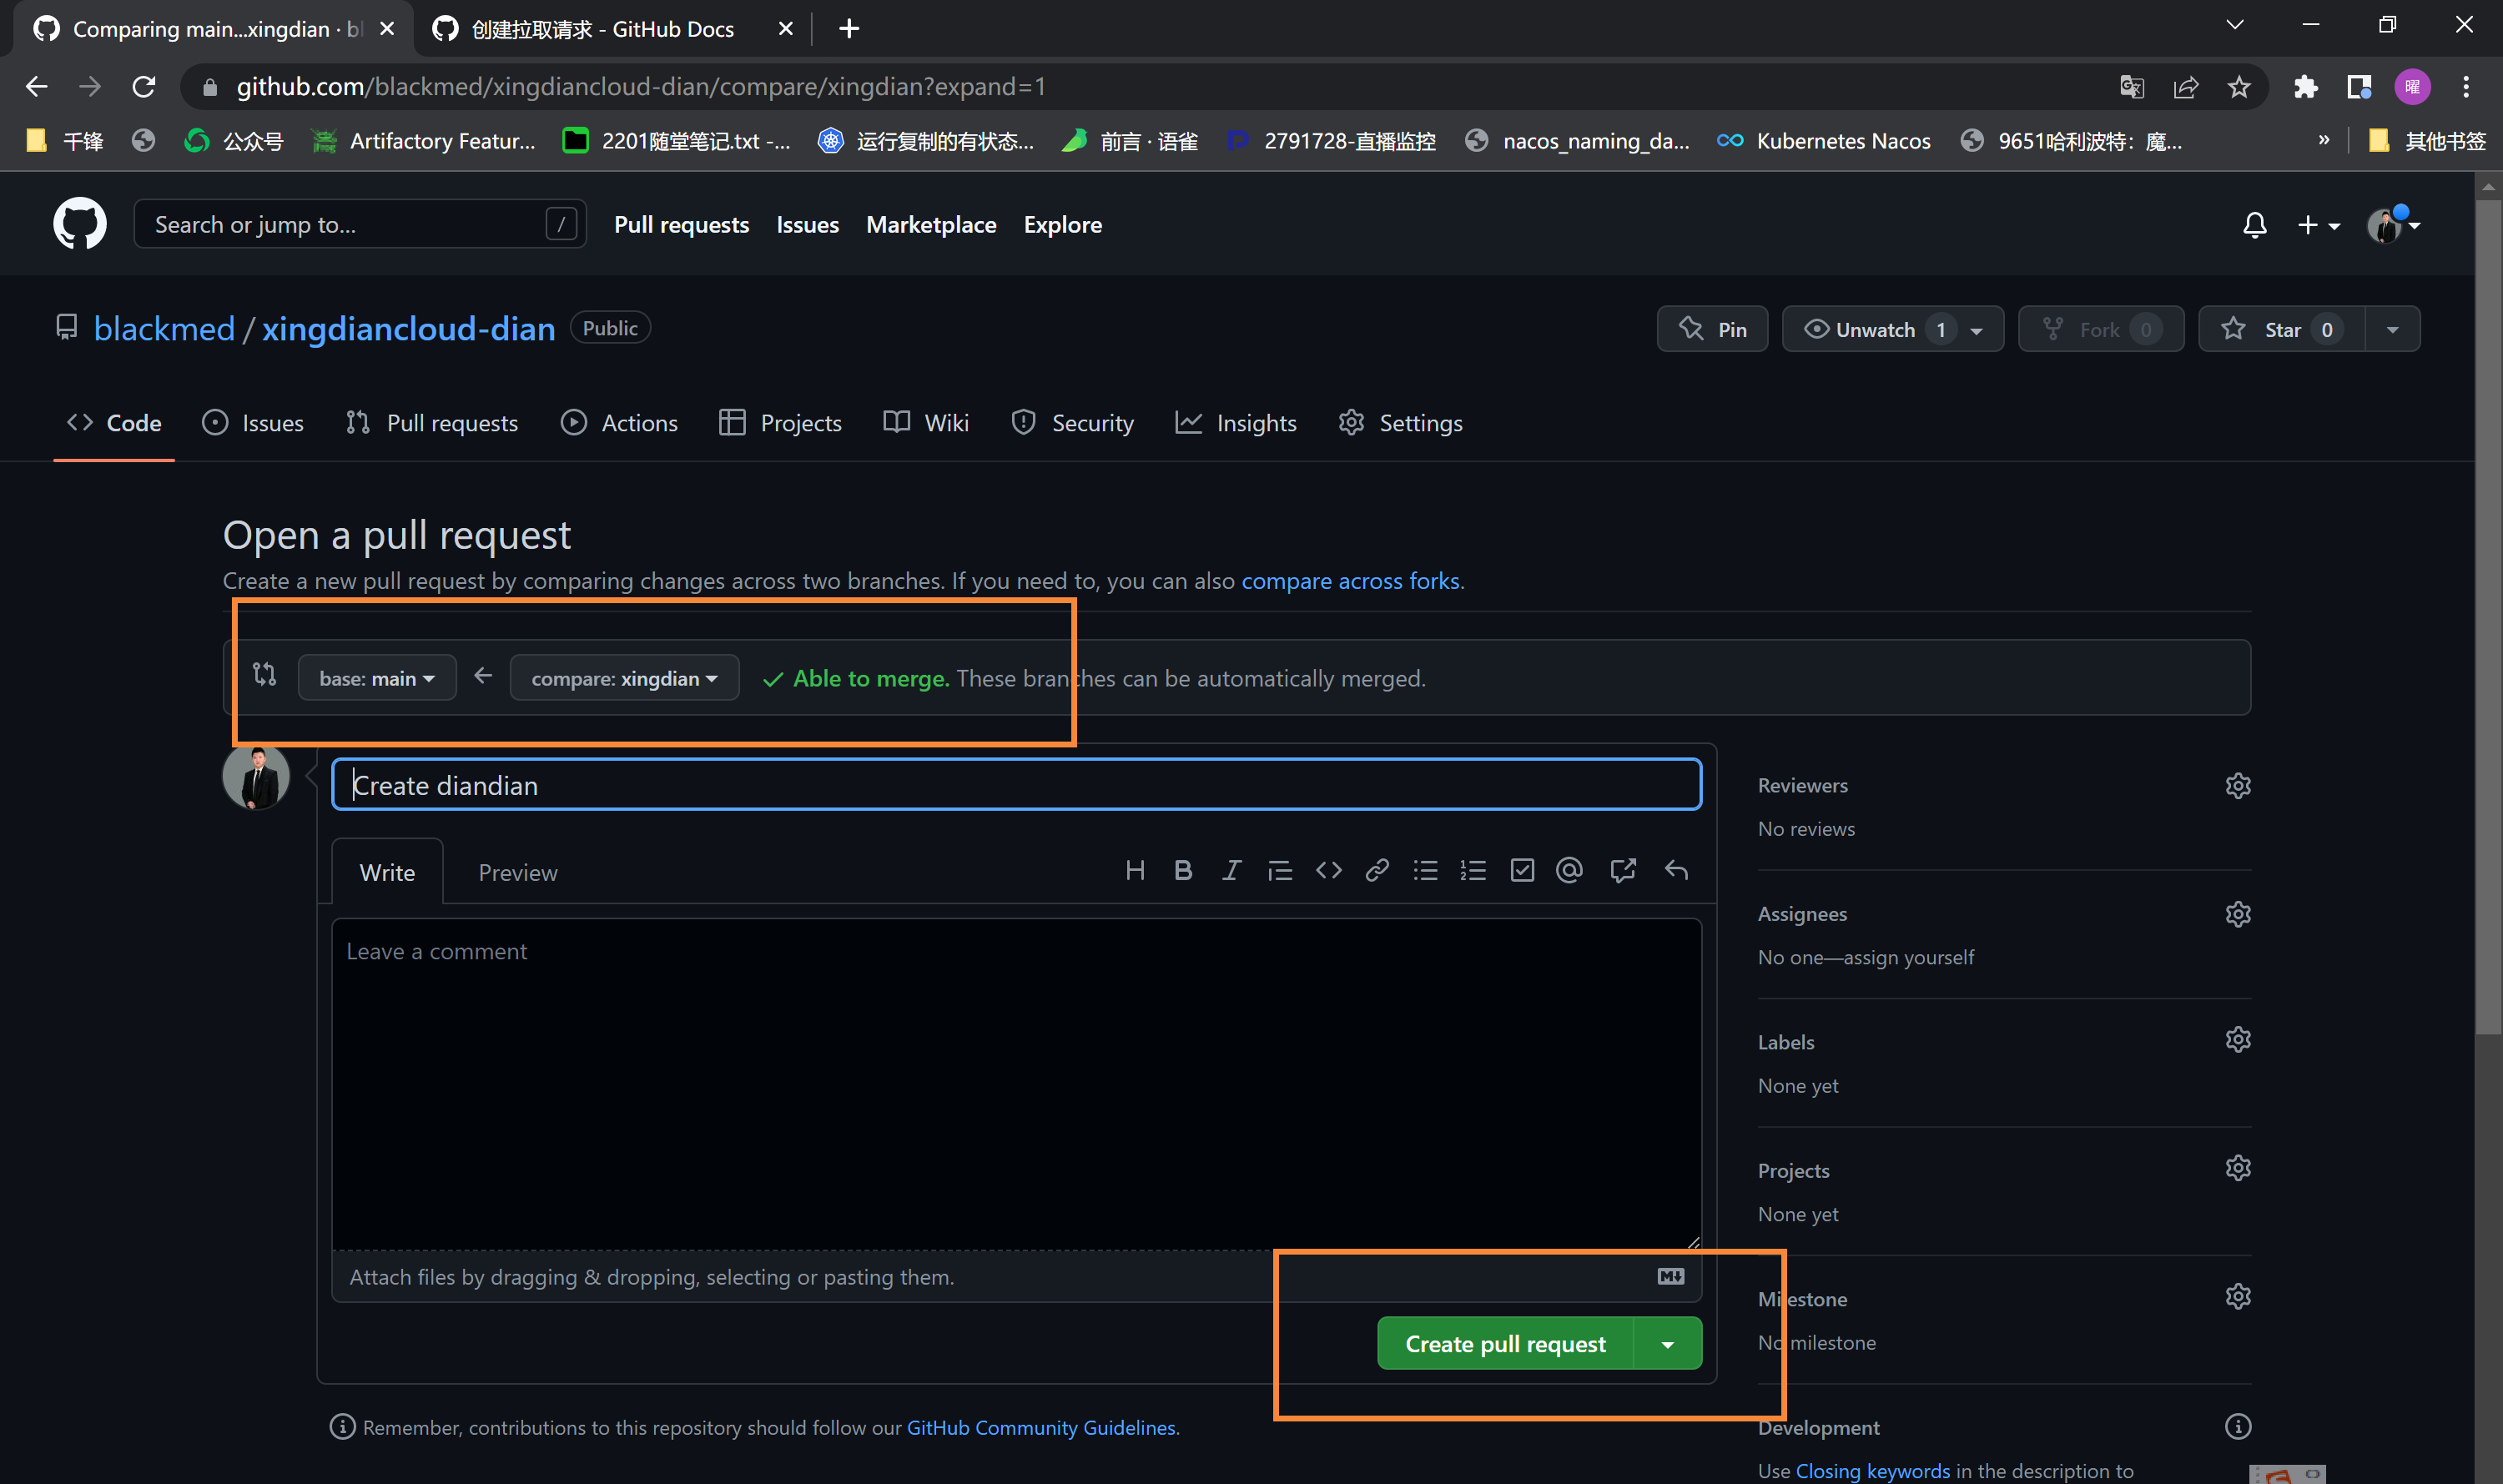
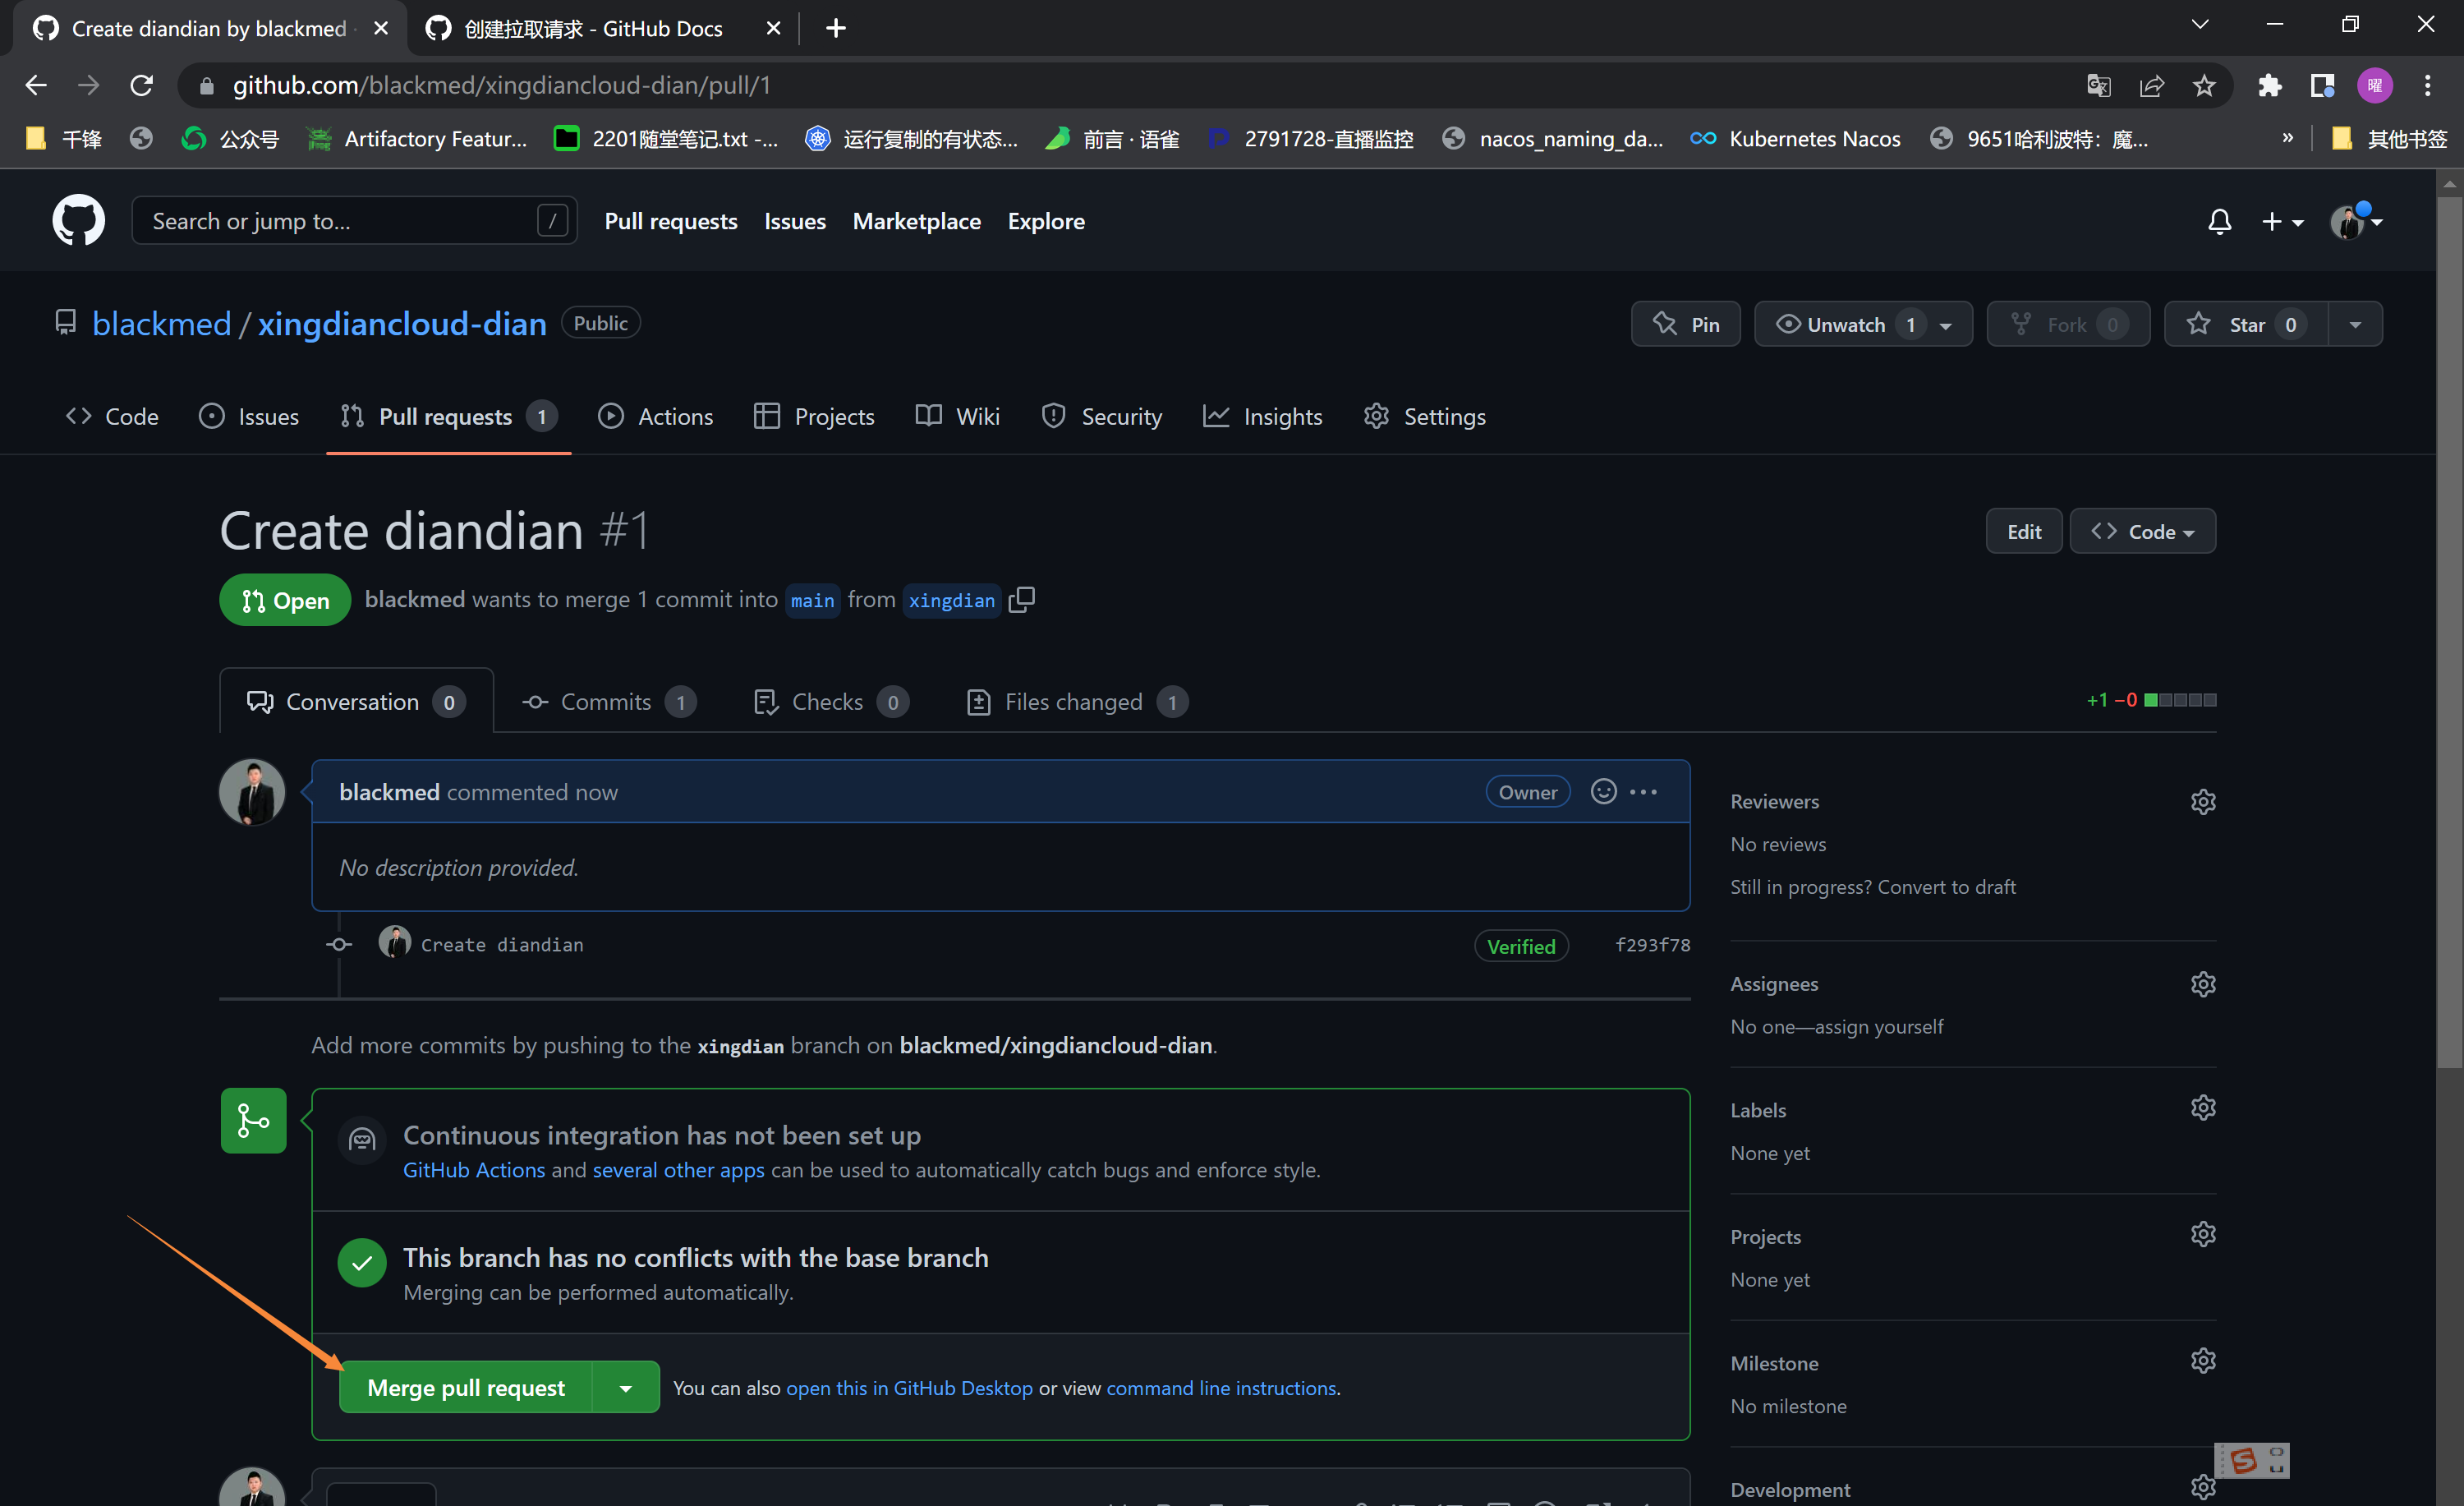
 main分支验证是否合并成功:
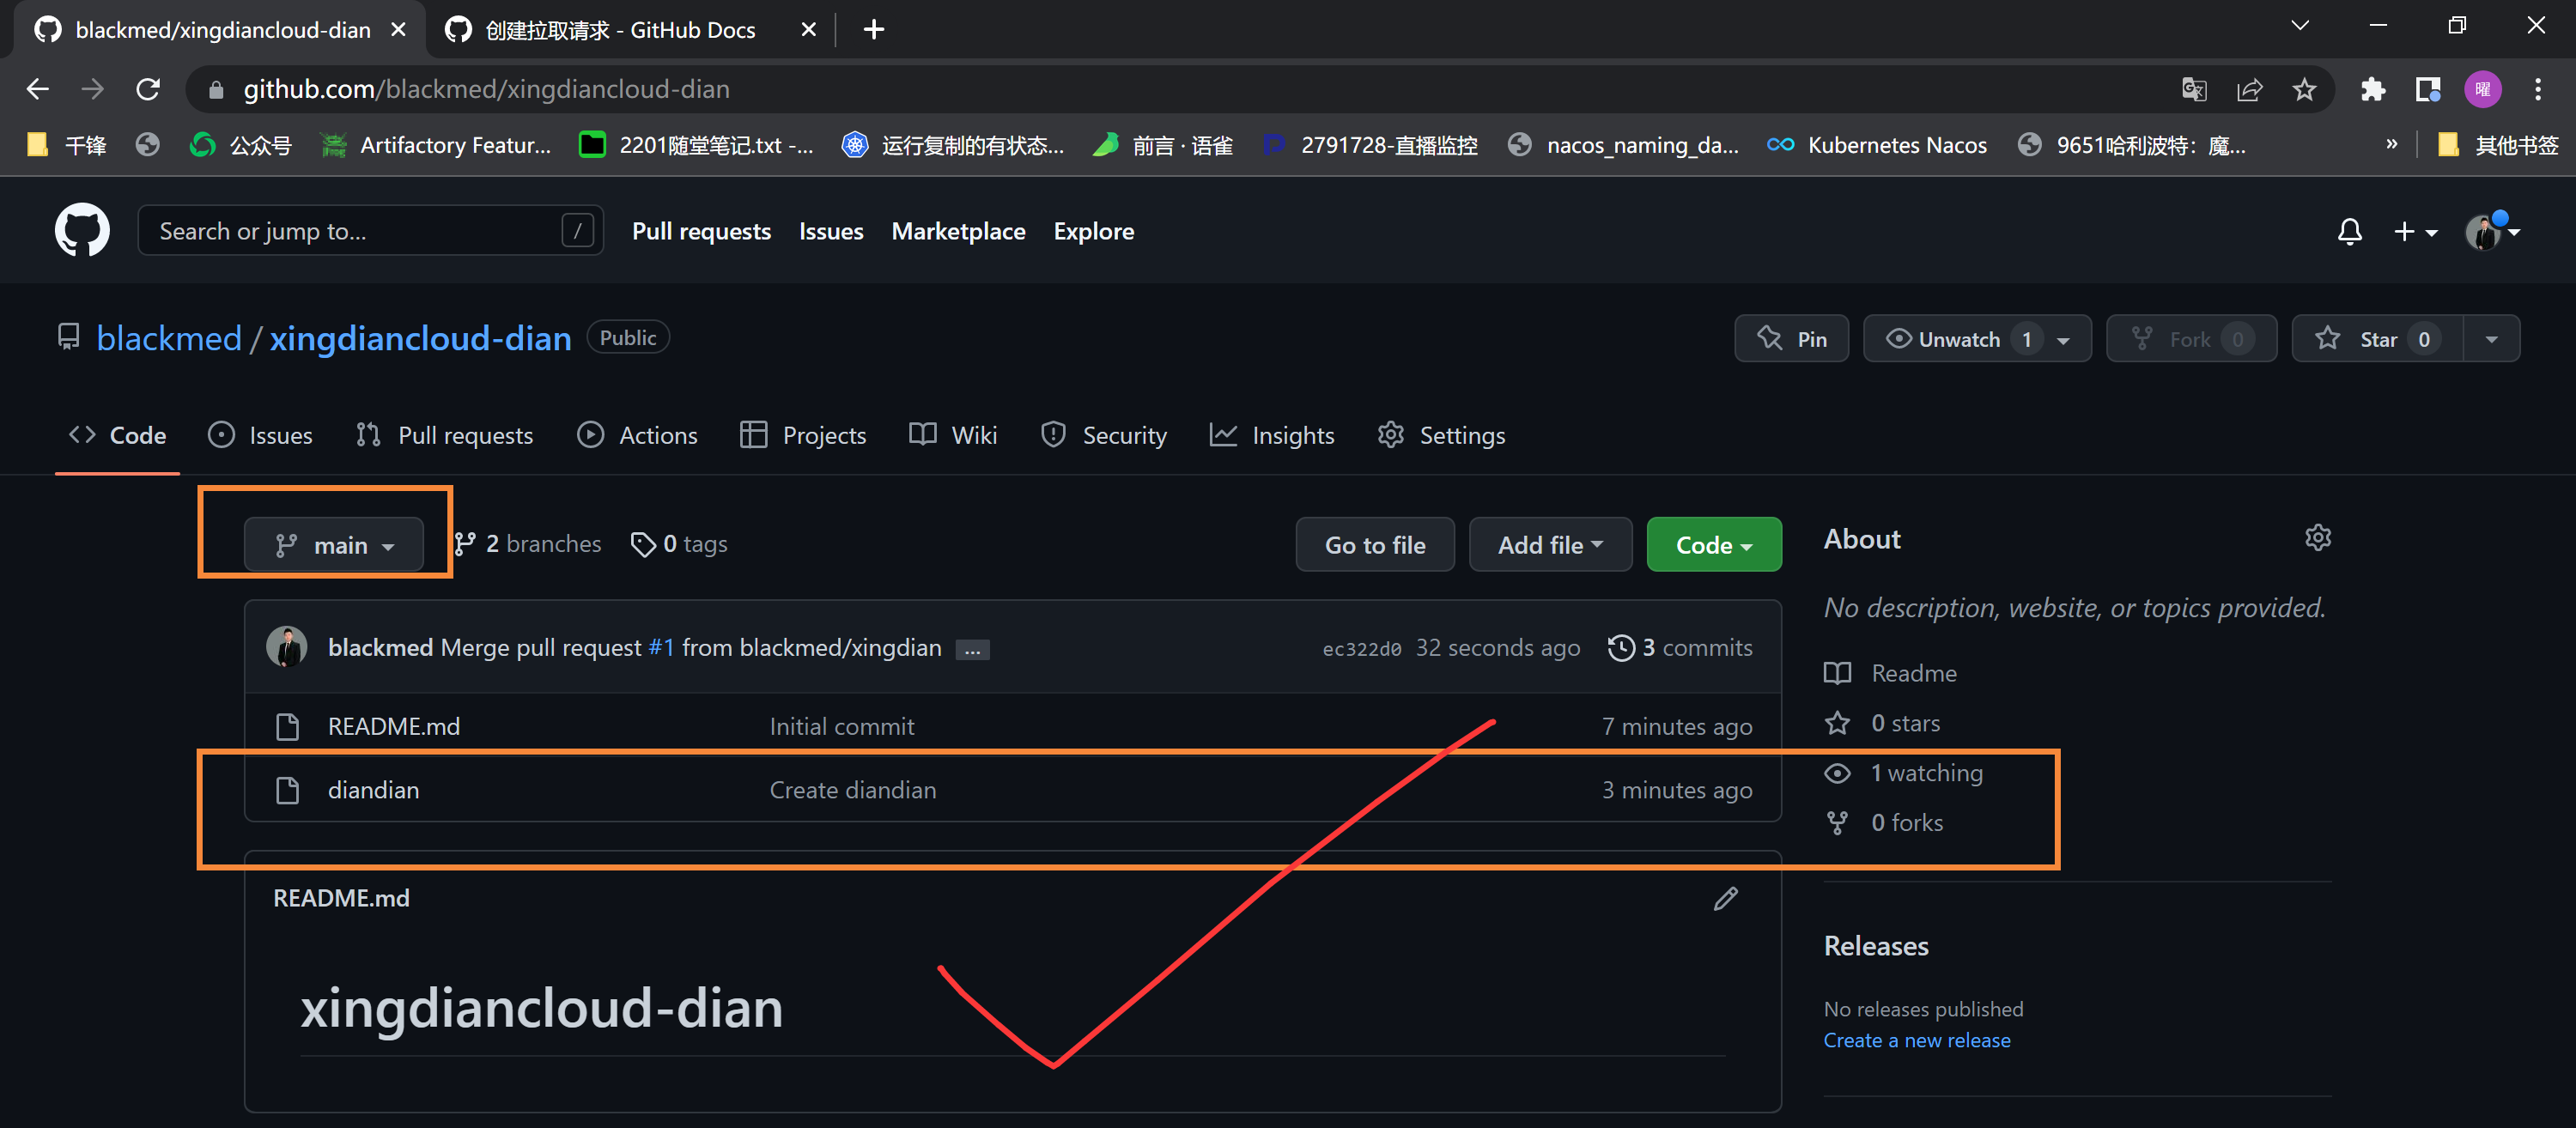 #### 8.使用github上的项目
注意:
前期的配置略
下载仓库到本地:
```shell
[root@xingdian-cloud opt]# git clone git@github.com:blackmed/xingdiancloud-dian.git
Cloning into 'xingdiancloud-dian'...
Warning: Permanently added 'github.com,20.205.243.166' (ECDSA) to the list of known hosts.
remote: Enumerating objects: 7, done.
remote: Counting objects: 100% (7/7), done.
remote: Compressing objects: 100% (4/4), done.
remote: Total 7 (delta 0), reused 0 (delta 0), pack-reused 0
Receiving objects: 100% (7/7), done.
[root@xingdian-cloud opt]# ls
xingdiancloud-dian
```
进入工作目录,模拟代码更新:
```shell
[root@xingdian-cloud opt]# cd xingdiancloud-dian/
[root@xingdian-cloud xingdiancloud-dian]# ls
diandian README.md
[root@xingdian-cloud xingdiancloud-dian]# echo "diange is very good" > xingdian
[root@xingdian-cloud xingdiancloud-dian]# git add .
[root@xingdian-cloud xingdiancloud-dian]# git commit -m "this is diange"
[main 73139aa] this is diange
1 file changed, 1 insertion(+)
create mode 100644 xingdian
[root@xingdian-cloud xingdiancloud-dian]# git push -u origin main
Warning: Permanently added 'github.com,20.205.243.166' (ECDSA) to the list of known hosts.
Counting objects: 4, done.
Delta compression using up to 2 threads.
Compressing objects: 100% (2/2), done.
Writing objects: 100% (3/3), 322 bytes | 0 bytes/s, done.
Total 3 (delta 0), reused 0 (delta 0)
To git@github.com:blackmed/xingdiancloud-dian.git
ec322d0..73139aa main -> main
Branch main set up to track remote branch main from origin.
```
github验证:
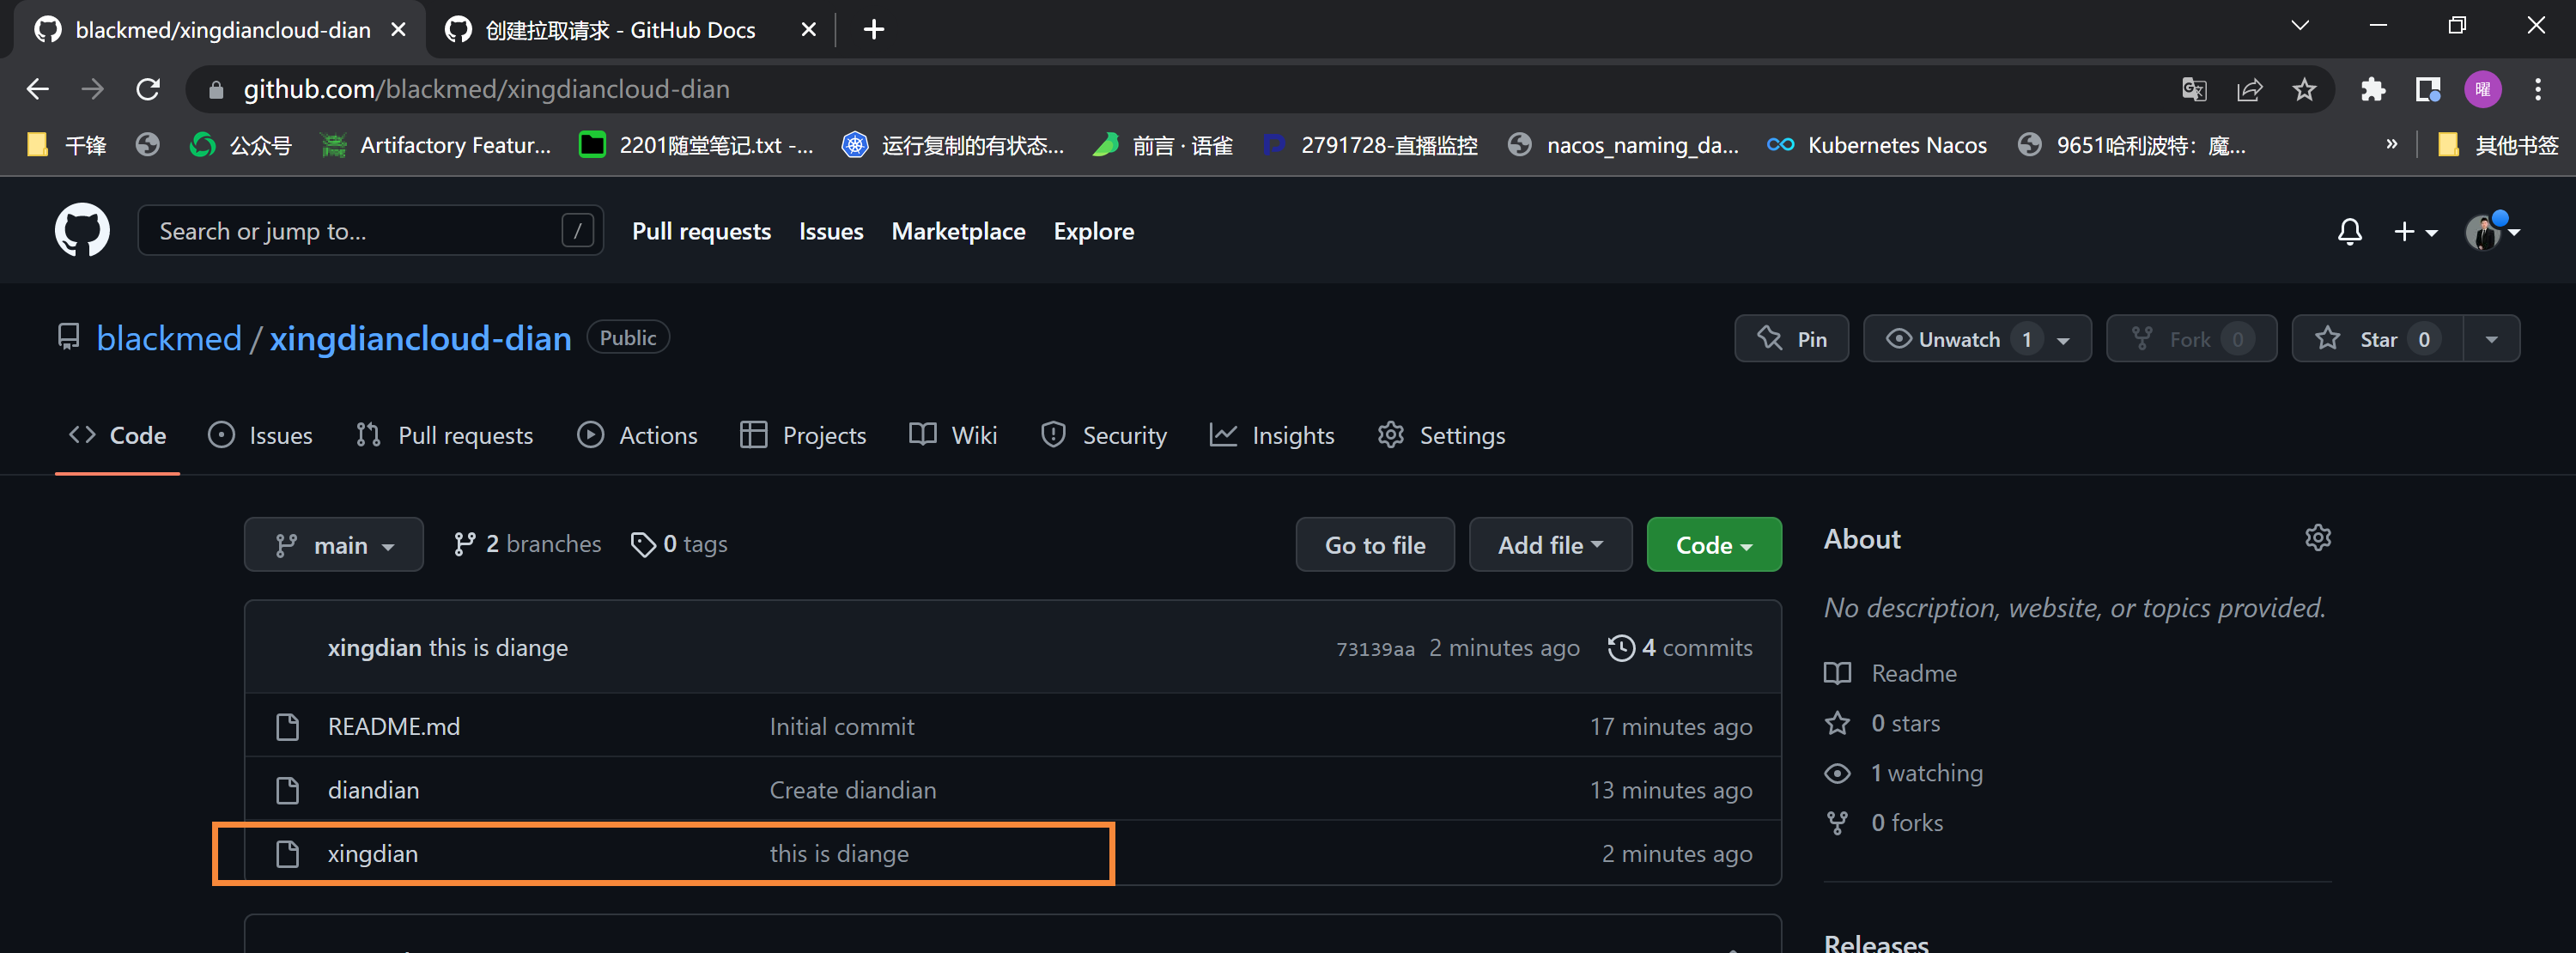 ## 四:Gitlab部署与使用
#### 1.资源环境
| 主机名 | IP地址 | 服务 |
| :----: | :--------: | :------: |
| gitlab | 10.0.0.110 | gitab-ce |
#### 2.环境部署
修改主机名:
```shell
[root@localhost ~]# hostnamectl --static set-hostname cicd-gitlab
```
关闭防火墙和selinux:
```shell
[root@cicd-gitlab ~]# systemctl stop iptables firewalld
[root@cicd-gitlab ~]# systemctl disable iptables firewalld
[root@cicd-gitlab ~]# setenforce 0
```
开启邮件服务:
```shell
[root@cicd-gitlab ~]# systemctl start postfix
[root@cicd-gitlab ~]# systemctl enable postfix
```
添加本地解析:
```shell
[root@cicd-gitlab ~]# vim /etc/hosts
10.0.1.86 gitlab.qfedu.com
```
#### 3.安装gitlab依赖包
```shell
[root@cicd-gitlab ~]# yum install -y curl openssh-server openssh-clients postfix cronie policycoreutils-python
```
#### 4.添加gitlab安装源
```shell
阿里源
[root@cicd-gitlab ~]# vim /etc/yum.repos.d/gitlab-ce.repo
[gitlab-ce]
name=gitlab-ce
baseurl=http://mirrors.tuna.tsinghua.edu.cn/gitlab-ce/yum/el7
Repo_gpgcheck=0
Enabled=1
gpgcheck=0
清华源:
[root@cicd-gitlab ~]# vim gitlab-ce.repo
[gitlab-ce]
name=Gitlab CE Repository
baseurl=https://mirrors.tuna.tsinghua.edu.cn/gitlab-ce/yum/el$releasever/
gpgcheck=0
enabled=1
[root@cicd-gitlab ~]# vim gitlab-ee.repo
[gitlab-ee]
name=Gitlab EE Repository
baseurl=https://mirrors.tuna.tsinghua.edu.cn/gitlab-ee/yum/el$releasever/
gpgcheck=0
enabled=1
官方源:
[root@cicd-gitlab ~]# vim runner_gitlab-ci-multi-runner.repo
[runner_gitlab-ci-multi-runner]
name=runner_gitlab-ci-multi-runner
baseurl=https://packages.gitlab.com/runner/gitlab-ci-multi-runner/el/7/$basearch
repo_gpgcheck=1
gpgcheck=0
enabled=1
gpgkey=https://packages.gitlab.com/runner/gitlab-ci-multi-runner/gpgkey
sslverify=1
sslcacert=/etc/pki/tls/certs/ca-bundle.crt
metadata_expire=300
[runner_gitlab-ci-multi-runner-source]
name=runner_gitlab-ci-multi-runner-source
baseurl=https://packages.gitlab.com/runner/gitlab-ci-multi-runner/el/7/SRPMS
repo_gpgcheck=1
gpgcheck=0
enabled=1
gpgkey=https://packages.gitlab.com/runner/gitlab-ci-multi-runner/gpgkey
sslverify=1
sslcacert=/etc/pki/tls/certs/ca-bundle.crt
metadata_expire=300
```
5.安装gitlab
```shell
[root@cicd-gitlab ~]# yum -y install gitlab-ce
# 自动安装最新版
```
#### 6.查看gitlab版本
```shell
[root@xingdian-git ~]# head -1 /opt/gitlab/version-manifest.txt
gitlab-ce 13.6.1
```
#### 7.Gitlab 配置登录链接
```shell
#设置登录链接
[root@cicd-gitlab ~]# vim /etc/gitlab/gitlab.rb
***
## GitLab URL
##! URL on which GitLab will be reachable.
##! For more details on configuring external_url see:
##! https://docs.gitlab.com/omnibus/settings/configuration.html#configuring-the-external-url-for-gitlab
# 没有域名,可以设置为本机IP地址
external_url 'http://10.0.1.86'
***
[root@cicd-gitlab ~]# grep "^external_url" /etc/gitlab/gitlab.rb
external_url 'http://10.0.1.86' #绑定监听的域名或IP
```
#### 8.初始化 Gitlab
```shell
[root@cicd-gitlab ~]# gitlab-ctl reconfigure
.....
```
#### 9.启动 Gitlab 服务
```shell
[root@cicd-gitlab ~]# gitlab-ctl start
[root@cicd-gitlab ~]# lsof -i:80
COMMAND PID USER FD TYPE DEVICE SIZE/OFF NODE NAME
nginx 22500 root 7u IPv4 50923 0t0 TCP *:http (LISTEN)
nginx 22501 gitlab-www 7u IPv4 50923 0t0 TCP *:http (LISTEN)
```
#### 10.Gitlab服务管理
```shell
[root@cicd-gitlab ~]# gitlab-ctl start # 启动所有 gitlab 组件;
[root@cicd-gitlab ~]# gitlab-ctl stop # 停止所有 gitlab 组件;
[root@cicd-gitlab ~]# gitlab-ctl restart # 重启所有 gitlab 组件;
[root@cicd-gitlab ~]# gitlab-ctl status # 查看服务状态;
[root@cicd-gitlab ~]# gitlab-ctl reconfigure # 初始化服务;
[root@cicd-gitlab ~]# vim /etc/gitlab/gitlab.rb # 修改默认的配置文件;
[root@cicd-gitlab ~]# gitlab-ctl tail # 查看日志;
```
11.登录Gitlab
在浏览器中输入 http://10.0.0.110,然后 change password: ,并使用root用户登录 即可 (后续动作根据提示操作)
```shell
1. 执行命令, 进入交互界面
gitlab-rails console -e production
2. 执行如下命令, 修改root密码为你想要的密码, 无需重启即可完成设置
u=User.where(id:1).first # u定义为root用户
u.password='你的密码' # 设置root密码, 注意需要符合密码强度
u.password_confirmation='你的密码' # 确认当前密码
u.save! # 保存操作
quit # 退出交互界面
```
设置中文:
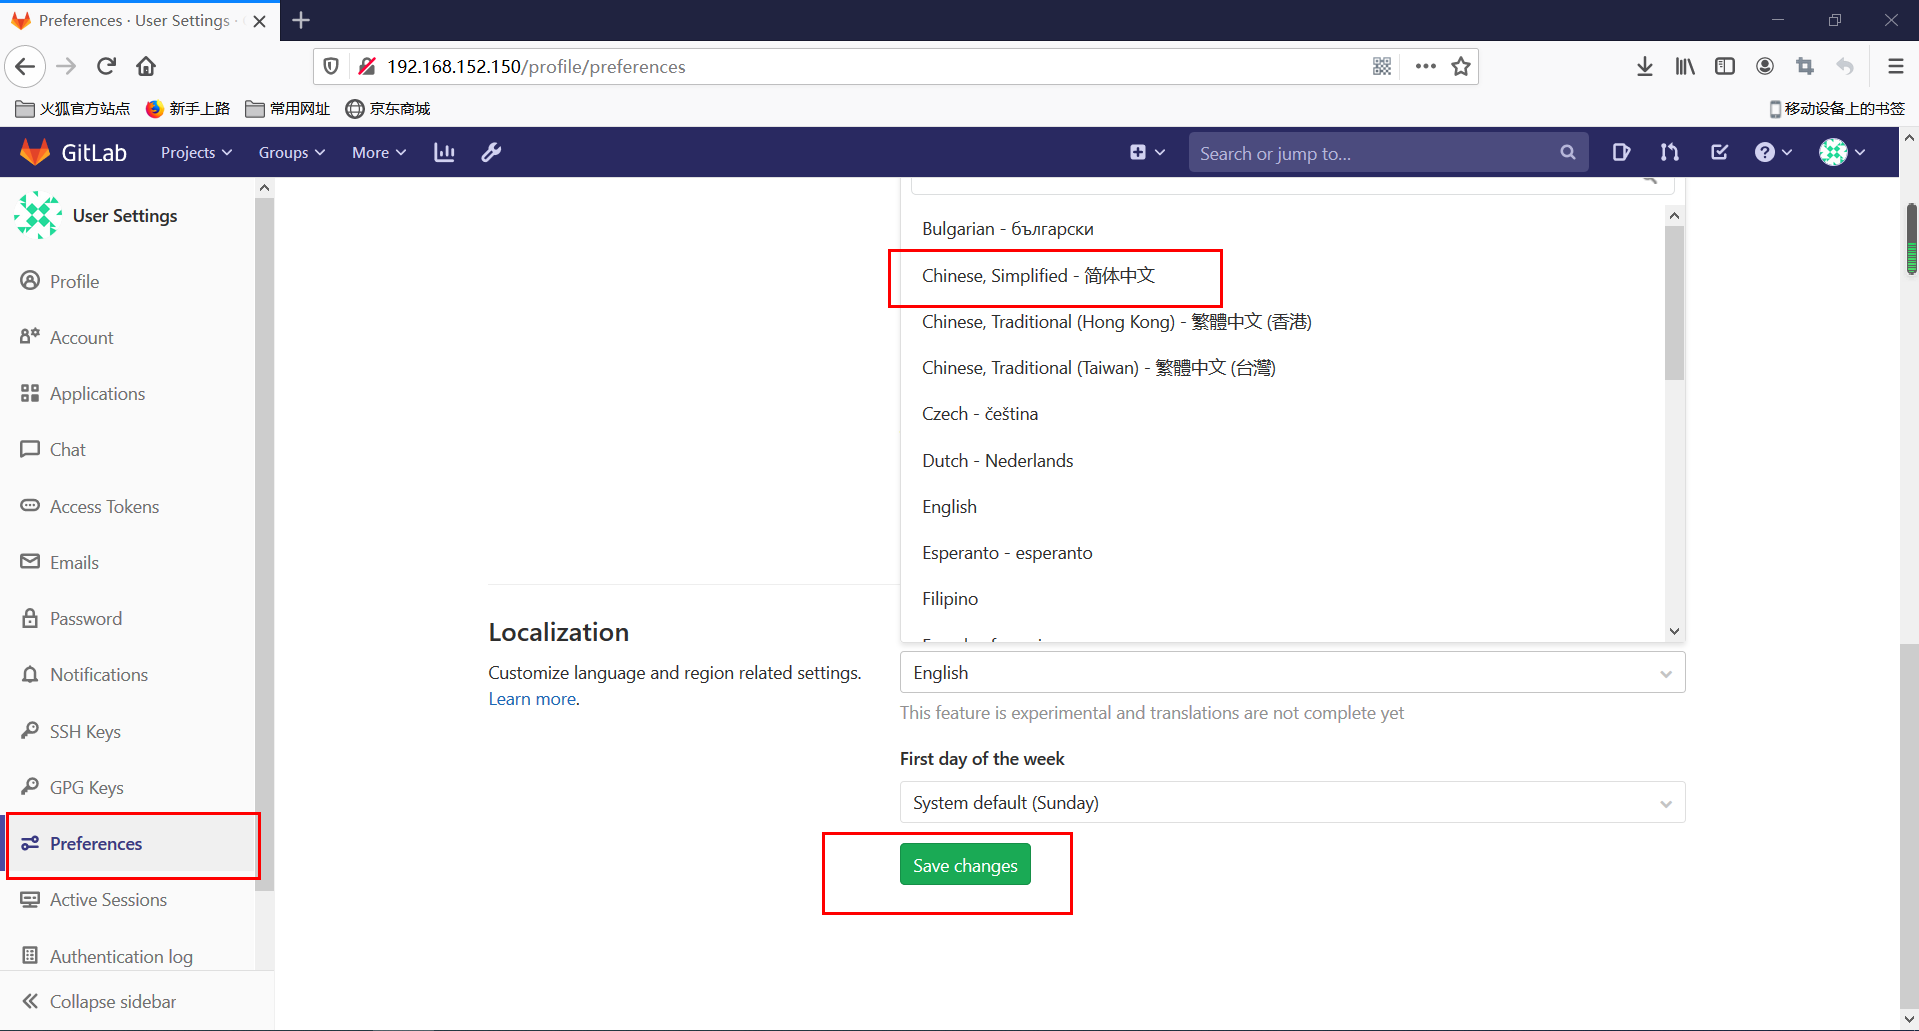
#### 11.Gitlab部署https方式
创建私有密钥:
```shell
[root@cicd-gitlab ~]# mkdir -p /etc/gitlab/ssl
[root@cicd-gitlab ~]# openssl genrsa -out "/etc/gitlab/ssl/gitlab.example.com.key" 2048
Generating RSA private key, 2048 bit long modulus
...............+++
...............................................................................+++
e is 65537 (0x10001)
```
创建私有证书:
```shell
[root@cicd-gitlab ~]# openssl req -new -key "/etc/gitlab/ssl/gitlab.example.com.key" -out "/etc/gitlab/ssl/gitlab.example.com.csr"
You are about to be asked to enter information that will be incorporated
into your certificate request.
What you are about to enter is what is called a Distinguished Name or a DN.
There are quite a few fields but you can leave some blank
For some fields there will be a default value,
If you enter '.', the field will be left blank.
-----
Country Name (2 letter code) [XX]:cn
State or Province Name (full name) []:sh
Locality Name (eg, city) [Default City]:sh
Organization Name (eg, company) [Default Company Ltd]: #输入空格,然后回车
Organizational Unit Name (eg, section) []: #输入空格,然后回车
Common Name (eg, your name or your server's hostname) []:gitlab.example.com
Email Address []:admin@example.com
Please enter the following 'extra' attributes
to be sent with your certificate request
A challenge password []:123456
An optional company name []: #直接回车
查看
[root@cicd-gitlab ~]# ll /etc/gitlab/ssl/
total 8
-rw-r--r-- 1 root root 1066 Jan 2 15:32 gitlab.example.com.csr
-rw-r--r-- 1 root root 1679 Jan 2 15:30 gitlab.example.com.key
```
创建CRT签署证书:
```shell
[root@cicd-gitlab ~]# openssl x509 -req -days 365 -in "/etc/gitlab/ssl/gitlab.example.com.csr" -signkey "/etc/gitlab/ssl/gitlab.example.com.key" -out "/etc/gitlab/ssl/gitlab.example.com.crt"
Signature ok
subject=/C=cn/ST=sh/L=sh/O= /OU= /CN=gitlab.example.com/emailAddress=admin@example.com
Getting Private key
查看
[root@cicd-gitlab ~]# ll /etc/gitlab/ssl/
total 12
-rw-r--r-- 1 root root 1265 Jan 2 15:39 gitlab.example.com.crt
-rw-r--r-- 1 root root 1066 Jan 2 15:32 gitlab.example.com.csr
-rw-r--r-- 1 root root 1679 Jan 2 15:30 gitlab.example.com.key
```
创建pem证书: 利用openssl命令输出pem证书
```shell
[root@gitlab ~]# openssl dhparam -out /etc/gitlab/ssl/dhparam.pem 2048
Generating DH parameters, 2048 bit long safe prime, generator 2
This is going to take a long time
........................................................+................................................................................+.....................................+..................................................................................+..............................................+..................................................................................................................................+..+........................................................................................................................................+..............................................................................................................................................................................+......+..............+.....................................................+.................+.......................................................................................+..+.................................................................................................................................................+..........................................................+.............+.........+...........................................................+........................................................................................................................................................................................................................................+...................................................................................................................................................................................................................................................................................................................++*++*
```
查看生成的证书:
```shell
[root@cicd-gitlab ~]# ll /etc/gitlab/ssl/
total 16
-rw-r--r-- 1 root root 424 Jan 2 15:46 dhparam.pem
-rw-r--r-- 1 root root 1265 Jan 2 15:39 gitlab.example.com.crt
-rw-r--r-- 1 root root 1066 Jan 2 15:32 gitlab.example.com.csr
-rw-r--r-- 1 root root 1679 Jan 2 15:30 gitlab.example.com.key
```
更改文件权限:
```shell
[root@cicd-gitlab ~]# chmod 600 /etc/gitlab/ssl/*
[root@cicd-gitlab ~]# ll /etc/gitlab/ssl/
total 16
-rw------- 1 root root 424 Jan 2 15:46 dhparam.pem
-rw------- 1 root root 1265 Jan 2 15:39 gitlab.example.com.crt
-rw------- 1 root root 1066 Jan 2 15:32 gitlab.example.com.csr
-rw------- 1 root root 1679 Jan 2 15:30 gitlab.example.com.key
```
配置 gitlab:
```shell
[root@cicd-gitlab ~]# cp /etc/gitlab/gitlab.rb{,.bak}
[root@cicd-gitlab ~]# vim /etc/gitlab/gitlab.rb
## 更改如下
13 external_url 'https://gitlab.example.com' 13行左右
952 nginx['redirect_http_to_https'] = true
964 nginx['ssl_certificate'] = "/etc/gitlab/ssl/gitlab.example.com.crt"
965 nginx['ssl_certificate_key'] = "/etc/gitlab/ssl/gitlab.example.com.key"
979 # nginx['ssl_dhparam'] = "/etc/gitlab/ssl/dhparam.pem" # Path to dhparams.pem, eg. /etc/gitlab/ssl/dhparams.pem
```
初始化gitlab相关服务配置:
```shell
[root@cicd-gitlab ~]# gitlab-ctl reconfigure
Starting Chef Client, version 13.6.4
resolving cookbooks for run list: ["gitlab"]
Synchronizing Cookbooks:
- gitlab (0.0.1)
- package (0.1.0)
- postgresql (0.1.0)
- redis (0.1.0)
- mattermost (0.1.0)
- registry (0.1.0)
- gitaly (0.1.0)
- consul (0.0.0)
- nginx (0.1.0)
- runit (0.14.2)
- letsencrypt (0.1.0)
- acme (3.1.0)
- crond (0.1.0)
- compat_resource (12.19.0)
Installing Cookbook Gems:
Compiling Cookbooks...
Recipe: gitlab::default
* directory[/etc/gitlab] action create
- change mode from '0755' to '0775'
Converging 493 resources
* directory[/etc/gitlab] action create (up to date)
* directory[Create /var/opt/gitlab] action create
- create new directory /var/opt/gitlab
- change mode from '' to '0755'
- change owner from '' to 'root'
- change group from '' to 'root'
* directory[/opt/gitlab/embedded/etc] action create
- create new directory /opt/gitlab/embedded/etc
- change mode from '' to '0755'
- change owner from '' to 'root'
- change group from '' to 'root'
* template[/opt/gitlab/embedded/etc/gitconfig] action create
- create new file /opt/gitlab/embedded/etc/gitconfig
- update content in file /opt/gitlab/embedded/etc/gitconfig from none to 987af3
。。。。过程有点长,需要等一会(看个人服务器配置了)
Running handlers:
Running handlers complete
Chef Client finished, 454/655 resources updated in 02 minutes 16 seconds
gitlab Reconfigured!
# 出现这个表示配置没有问题!
```
重启 gitlab:
```shell
[root@cicd-gitlab ~]# gitlab-ctl restart
ok: run: alertmanager: (pid 6526) 1s
ok: run: gitaly: (pid 6543) 0s
ok: run: gitlab-monitor: (pid 6556) 0s
ok: run: gitlab-workhorse: (pid 6579) 1s
ok: run: logrotate: (pid 6589) 0s
ok: run: nginx: (pid 6597) 1s
ok: run: node-exporter: (pid 6681) 0s
ok: run: postgres-exporter: (pid 6687) 1s
ok: run: postgresql: (pid 6698) 0s
ok: run: prometheus: (pid 6706) 0s
ok: run: redis: (pid 6722) 0s
ok: run: redis-exporter: (pid 6856) 0s
ok: run: sidekiq: (pid 6866) 0s
ok: run: unicorn: (pid 6880) 0s
# 可以看出gitlab的所有服务重启完成
```
#### 12.浏览器登录 gitlab
https://gitlab.example.com
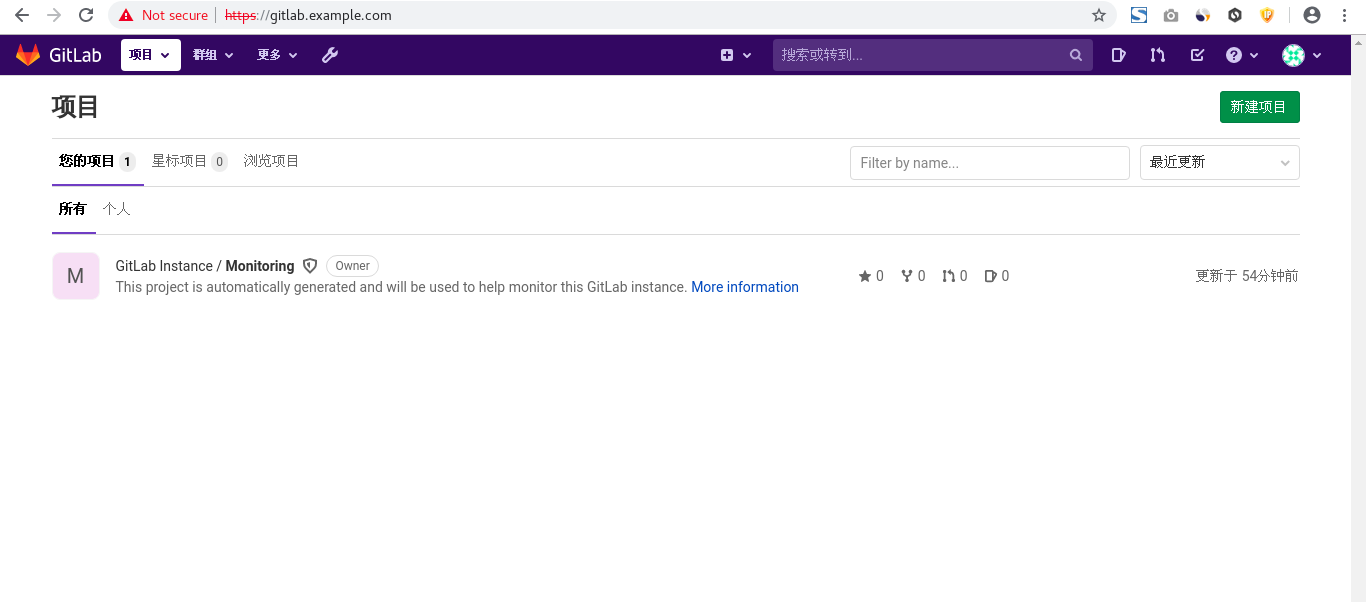
#### 13.Gitlab 添加 SMTP 邮件功能
配置邮件功能:
```shell
[root@cicd-gitlab ~]# grep -P "^[^#].*smtp_|user_email|gitlab_email" /etc/gitlab/gitlab.rb
gitlab_rails['smtp_enable'] = true
gitlab_rails['smtp_address'] = "smtp.163.com"
gitlab_rails['smtp_port'] = 465
gitlab_rails['smtp_user_name'] = "zhuangyaovip@163.com"
gitlab_rails['smtp_password'] = "FULLECVMSVNBSDJH"
gitlab_rails['smtp_domain'] = "163.com"
gitlab_rails['smtp_authentication'] = "login"
gitlab_rails['smtp_enable_starttls_auto'] = true
gitlab_rails['smtp_tls'] = true
gitlab_rails['gitlab_email_enabled'] = true
gitlab_rails['gitlab_email_from'] = 'zhuangyaovip@163.com'
gitlab_rails['gitlab_email_display_name'] = 'Example'
gitlab_rails['gitlab_email_reply_to'] = '1311529042@qq.com'
gitlab_rails['gitlab_email_subject_suffix'] = 'gitlab'
# gitlab_rails['gitlab_email_smime_enabled'] = false
# gitlab_rails['gitlab_email_smime_key_file'] = '/etc/gitlab/ssl/gitlab_smime.key'
# gitlab_rails['gitlab_email_smime_cert_file'] = '/etc/gitlab/ssl/gitlab_smime.crt'
# gitlab_rails['gitlab_email_smime_ca_certs_file'] = '/etc/gitlab/ssl/gitlab_smime_cas.crt'
# user['git_user_email'] = "gitlab@#{node['fqdn']}"
```
停止gitlab服务:
```shell
[root@cicd-gitlab ~]# gitlab-ctl stop
ok: down: gitaly: 0s, normally up
ok: down: gitlab-monitor: 1s, normally up
ok: down: gitlab-workhorse: 0s, normally up
ok: down: logrotate: 1s, normally up
ok: down: nginx: 0s, normally up
ok: down: node-exporter: 1s, normally up
ok: down: postgres-exporter: 0s, normally up
ok: down: postgresql: 0s, normally up
ok: down: prometheus: 0s, normally up
ok: down: redis: 0s, normally up
ok: down: redis-exporter: 1s, normally up
ok: down: sidekiq: 0s, normally up
ok: down: unicorn: 1s, normally up
```
修改配置后需要初始化配置:
```shell
[root@cicd-gitlab ~]# gitlab-ctl reconfigure
......
```
启动服务:
```shell
[root@cicd-gitlab ~]# gitlab-ctl start
ok: run: gitaly: (pid 37603) 0s
ok: run: gitlab-monitor: (pid 37613) 0s
ok: run: gitlab-workhorse: (pid 37625) 0s
ok: run: logrotate: (pid 37631) 0s
ok: run: nginx: (pid 37639) 1s
ok: run: node-exporter: (pid 37644) 0s
ok: run: postgres-exporter: (pid 37648) 1s
ok: run: postgresql: (pid 37652) 0s
ok: run: prometheus: (pid 37660) 1s
ok: run: redis: (pid 37668) 0s
ok: run: redis-exporter: (pid 37746) 0s
ok: run: sidekiq: (pid 37750) 1s
ok: run: unicorn: (pid 37757) 0s
```
Gitlab 发送邮件测试:
```shell
[root@cicd-gitlab ~]# gitlab-rails console
Loading production environment (Rails 4.2.10)
irb(main):001:0> Notify.test_email('1311529042@qq.com', 'Message Subject', 'Message Body').deliver_now
Notify#test_email: processed outbound mail in 2219.5ms
Sent mail to user@destination.com (2469.5ms)
Date: Fri, 04 May 2018 15:50:10 +0800
From: Admin
## 四:Gitlab部署与使用
#### 1.资源环境
| 主机名 | IP地址 | 服务 |
| :----: | :--------: | :------: |
| gitlab | 10.0.0.110 | gitab-ce |
#### 2.环境部署
修改主机名:
```shell
[root@localhost ~]# hostnamectl --static set-hostname cicd-gitlab
```
关闭防火墙和selinux:
```shell
[root@cicd-gitlab ~]# systemctl stop iptables firewalld
[root@cicd-gitlab ~]# systemctl disable iptables firewalld
[root@cicd-gitlab ~]# setenforce 0
```
开启邮件服务:
```shell
[root@cicd-gitlab ~]# systemctl start postfix
[root@cicd-gitlab ~]# systemctl enable postfix
```
添加本地解析:
```shell
[root@cicd-gitlab ~]# vim /etc/hosts
10.0.1.86 gitlab.qfedu.com
```
#### 3.安装gitlab依赖包
```shell
[root@cicd-gitlab ~]# yum install -y curl openssh-server openssh-clients postfix cronie policycoreutils-python
```
#### 4.添加gitlab安装源
```shell
阿里源
[root@cicd-gitlab ~]# vim /etc/yum.repos.d/gitlab-ce.repo
[gitlab-ce]
name=gitlab-ce
baseurl=http://mirrors.tuna.tsinghua.edu.cn/gitlab-ce/yum/el7
Repo_gpgcheck=0
Enabled=1
gpgcheck=0
清华源:
[root@cicd-gitlab ~]# vim gitlab-ce.repo
[gitlab-ce]
name=Gitlab CE Repository
baseurl=https://mirrors.tuna.tsinghua.edu.cn/gitlab-ce/yum/el$releasever/
gpgcheck=0
enabled=1
[root@cicd-gitlab ~]# vim gitlab-ee.repo
[gitlab-ee]
name=Gitlab EE Repository
baseurl=https://mirrors.tuna.tsinghua.edu.cn/gitlab-ee/yum/el$releasever/
gpgcheck=0
enabled=1
官方源:
[root@cicd-gitlab ~]# vim runner_gitlab-ci-multi-runner.repo
[runner_gitlab-ci-multi-runner]
name=runner_gitlab-ci-multi-runner
baseurl=https://packages.gitlab.com/runner/gitlab-ci-multi-runner/el/7/$basearch
repo_gpgcheck=1
gpgcheck=0
enabled=1
gpgkey=https://packages.gitlab.com/runner/gitlab-ci-multi-runner/gpgkey
sslverify=1
sslcacert=/etc/pki/tls/certs/ca-bundle.crt
metadata_expire=300
[runner_gitlab-ci-multi-runner-source]
name=runner_gitlab-ci-multi-runner-source
baseurl=https://packages.gitlab.com/runner/gitlab-ci-multi-runner/el/7/SRPMS
repo_gpgcheck=1
gpgcheck=0
enabled=1
gpgkey=https://packages.gitlab.com/runner/gitlab-ci-multi-runner/gpgkey
sslverify=1
sslcacert=/etc/pki/tls/certs/ca-bundle.crt
metadata_expire=300
```
5.安装gitlab
```shell
[root@cicd-gitlab ~]# yum -y install gitlab-ce
# 自动安装最新版
```
#### 6.查看gitlab版本
```shell
[root@xingdian-git ~]# head -1 /opt/gitlab/version-manifest.txt
gitlab-ce 13.6.1
```
#### 7.Gitlab 配置登录链接
```shell
#设置登录链接
[root@cicd-gitlab ~]# vim /etc/gitlab/gitlab.rb
***
## GitLab URL
##! URL on which GitLab will be reachable.
##! For more details on configuring external_url see:
##! https://docs.gitlab.com/omnibus/settings/configuration.html#configuring-the-external-url-for-gitlab
# 没有域名,可以设置为本机IP地址
external_url 'http://10.0.1.86'
***
[root@cicd-gitlab ~]# grep "^external_url" /etc/gitlab/gitlab.rb
external_url 'http://10.0.1.86' #绑定监听的域名或IP
```
#### 8.初始化 Gitlab
```shell
[root@cicd-gitlab ~]# gitlab-ctl reconfigure
.....
```
#### 9.启动 Gitlab 服务
```shell
[root@cicd-gitlab ~]# gitlab-ctl start
[root@cicd-gitlab ~]# lsof -i:80
COMMAND PID USER FD TYPE DEVICE SIZE/OFF NODE NAME
nginx 22500 root 7u IPv4 50923 0t0 TCP *:http (LISTEN)
nginx 22501 gitlab-www 7u IPv4 50923 0t0 TCP *:http (LISTEN)
```
#### 10.Gitlab服务管理
```shell
[root@cicd-gitlab ~]# gitlab-ctl start # 启动所有 gitlab 组件;
[root@cicd-gitlab ~]# gitlab-ctl stop # 停止所有 gitlab 组件;
[root@cicd-gitlab ~]# gitlab-ctl restart # 重启所有 gitlab 组件;
[root@cicd-gitlab ~]# gitlab-ctl status # 查看服务状态;
[root@cicd-gitlab ~]# gitlab-ctl reconfigure # 初始化服务;
[root@cicd-gitlab ~]# vim /etc/gitlab/gitlab.rb # 修改默认的配置文件;
[root@cicd-gitlab ~]# gitlab-ctl tail # 查看日志;
```
11.登录Gitlab
在浏览器中输入 http://10.0.0.110,然后 change password: ,并使用root用户登录 即可 (后续动作根据提示操作)
```shell
1. 执行命令, 进入交互界面
gitlab-rails console -e production
2. 执行如下命令, 修改root密码为你想要的密码, 无需重启即可完成设置
u=User.where(id:1).first # u定义为root用户
u.password='你的密码' # 设置root密码, 注意需要符合密码强度
u.password_confirmation='你的密码' # 确认当前密码
u.save! # 保存操作
quit # 退出交互界面
```
设置中文:

#### 11.Gitlab部署https方式
创建私有密钥:
```shell
[root@cicd-gitlab ~]# mkdir -p /etc/gitlab/ssl
[root@cicd-gitlab ~]# openssl genrsa -out "/etc/gitlab/ssl/gitlab.example.com.key" 2048
Generating RSA private key, 2048 bit long modulus
...............+++
...............................................................................+++
e is 65537 (0x10001)
```
创建私有证书:
```shell
[root@cicd-gitlab ~]# openssl req -new -key "/etc/gitlab/ssl/gitlab.example.com.key" -out "/etc/gitlab/ssl/gitlab.example.com.csr"
You are about to be asked to enter information that will be incorporated
into your certificate request.
What you are about to enter is what is called a Distinguished Name or a DN.
There are quite a few fields but you can leave some blank
For some fields there will be a default value,
If you enter '.', the field will be left blank.
-----
Country Name (2 letter code) [XX]:cn
State or Province Name (full name) []:sh
Locality Name (eg, city) [Default City]:sh
Organization Name (eg, company) [Default Company Ltd]: #输入空格,然后回车
Organizational Unit Name (eg, section) []: #输入空格,然后回车
Common Name (eg, your name or your server's hostname) []:gitlab.example.com
Email Address []:admin@example.com
Please enter the following 'extra' attributes
to be sent with your certificate request
A challenge password []:123456
An optional company name []: #直接回车
查看
[root@cicd-gitlab ~]# ll /etc/gitlab/ssl/
total 8
-rw-r--r-- 1 root root 1066 Jan 2 15:32 gitlab.example.com.csr
-rw-r--r-- 1 root root 1679 Jan 2 15:30 gitlab.example.com.key
```
创建CRT签署证书:
```shell
[root@cicd-gitlab ~]# openssl x509 -req -days 365 -in "/etc/gitlab/ssl/gitlab.example.com.csr" -signkey "/etc/gitlab/ssl/gitlab.example.com.key" -out "/etc/gitlab/ssl/gitlab.example.com.crt"
Signature ok
subject=/C=cn/ST=sh/L=sh/O= /OU= /CN=gitlab.example.com/emailAddress=admin@example.com
Getting Private key
查看
[root@cicd-gitlab ~]# ll /etc/gitlab/ssl/
total 12
-rw-r--r-- 1 root root 1265 Jan 2 15:39 gitlab.example.com.crt
-rw-r--r-- 1 root root 1066 Jan 2 15:32 gitlab.example.com.csr
-rw-r--r-- 1 root root 1679 Jan 2 15:30 gitlab.example.com.key
```
创建pem证书: 利用openssl命令输出pem证书
```shell
[root@gitlab ~]# openssl dhparam -out /etc/gitlab/ssl/dhparam.pem 2048
Generating DH parameters, 2048 bit long safe prime, generator 2
This is going to take a long time
........................................................+................................................................................+.....................................+..................................................................................+..............................................+..................................................................................................................................+..+........................................................................................................................................+..............................................................................................................................................................................+......+..............+.....................................................+.................+.......................................................................................+..+.................................................................................................................................................+..........................................................+.............+.........+...........................................................+........................................................................................................................................................................................................................................+...................................................................................................................................................................................................................................................................................................................++*++*
```
查看生成的证书:
```shell
[root@cicd-gitlab ~]# ll /etc/gitlab/ssl/
total 16
-rw-r--r-- 1 root root 424 Jan 2 15:46 dhparam.pem
-rw-r--r-- 1 root root 1265 Jan 2 15:39 gitlab.example.com.crt
-rw-r--r-- 1 root root 1066 Jan 2 15:32 gitlab.example.com.csr
-rw-r--r-- 1 root root 1679 Jan 2 15:30 gitlab.example.com.key
```
更改文件权限:
```shell
[root@cicd-gitlab ~]# chmod 600 /etc/gitlab/ssl/*
[root@cicd-gitlab ~]# ll /etc/gitlab/ssl/
total 16
-rw------- 1 root root 424 Jan 2 15:46 dhparam.pem
-rw------- 1 root root 1265 Jan 2 15:39 gitlab.example.com.crt
-rw------- 1 root root 1066 Jan 2 15:32 gitlab.example.com.csr
-rw------- 1 root root 1679 Jan 2 15:30 gitlab.example.com.key
```
配置 gitlab:
```shell
[root@cicd-gitlab ~]# cp /etc/gitlab/gitlab.rb{,.bak}
[root@cicd-gitlab ~]# vim /etc/gitlab/gitlab.rb
## 更改如下
13 external_url 'https://gitlab.example.com' 13行左右
952 nginx['redirect_http_to_https'] = true
964 nginx['ssl_certificate'] = "/etc/gitlab/ssl/gitlab.example.com.crt"
965 nginx['ssl_certificate_key'] = "/etc/gitlab/ssl/gitlab.example.com.key"
979 # nginx['ssl_dhparam'] = "/etc/gitlab/ssl/dhparam.pem" # Path to dhparams.pem, eg. /etc/gitlab/ssl/dhparams.pem
```
初始化gitlab相关服务配置:
```shell
[root@cicd-gitlab ~]# gitlab-ctl reconfigure
Starting Chef Client, version 13.6.4
resolving cookbooks for run list: ["gitlab"]
Synchronizing Cookbooks:
- gitlab (0.0.1)
- package (0.1.0)
- postgresql (0.1.0)
- redis (0.1.0)
- mattermost (0.1.0)
- registry (0.1.0)
- gitaly (0.1.0)
- consul (0.0.0)
- nginx (0.1.0)
- runit (0.14.2)
- letsencrypt (0.1.0)
- acme (3.1.0)
- crond (0.1.0)
- compat_resource (12.19.0)
Installing Cookbook Gems:
Compiling Cookbooks...
Recipe: gitlab::default
* directory[/etc/gitlab] action create
- change mode from '0755' to '0775'
Converging 493 resources
* directory[/etc/gitlab] action create (up to date)
* directory[Create /var/opt/gitlab] action create
- create new directory /var/opt/gitlab
- change mode from '' to '0755'
- change owner from '' to 'root'
- change group from '' to 'root'
* directory[/opt/gitlab/embedded/etc] action create
- create new directory /opt/gitlab/embedded/etc
- change mode from '' to '0755'
- change owner from '' to 'root'
- change group from '' to 'root'
* template[/opt/gitlab/embedded/etc/gitconfig] action create
- create new file /opt/gitlab/embedded/etc/gitconfig
- update content in file /opt/gitlab/embedded/etc/gitconfig from none to 987af3
。。。。过程有点长,需要等一会(看个人服务器配置了)
Running handlers:
Running handlers complete
Chef Client finished, 454/655 resources updated in 02 minutes 16 seconds
gitlab Reconfigured!
# 出现这个表示配置没有问题!
```
重启 gitlab:
```shell
[root@cicd-gitlab ~]# gitlab-ctl restart
ok: run: alertmanager: (pid 6526) 1s
ok: run: gitaly: (pid 6543) 0s
ok: run: gitlab-monitor: (pid 6556) 0s
ok: run: gitlab-workhorse: (pid 6579) 1s
ok: run: logrotate: (pid 6589) 0s
ok: run: nginx: (pid 6597) 1s
ok: run: node-exporter: (pid 6681) 0s
ok: run: postgres-exporter: (pid 6687) 1s
ok: run: postgresql: (pid 6698) 0s
ok: run: prometheus: (pid 6706) 0s
ok: run: redis: (pid 6722) 0s
ok: run: redis-exporter: (pid 6856) 0s
ok: run: sidekiq: (pid 6866) 0s
ok: run: unicorn: (pid 6880) 0s
# 可以看出gitlab的所有服务重启完成
```
#### 12.浏览器登录 gitlab
https://gitlab.example.com

#### 13.Gitlab 添加 SMTP 邮件功能
配置邮件功能:
```shell
[root@cicd-gitlab ~]# grep -P "^[^#].*smtp_|user_email|gitlab_email" /etc/gitlab/gitlab.rb
gitlab_rails['smtp_enable'] = true
gitlab_rails['smtp_address'] = "smtp.163.com"
gitlab_rails['smtp_port'] = 465
gitlab_rails['smtp_user_name'] = "zhuangyaovip@163.com"
gitlab_rails['smtp_password'] = "FULLECVMSVNBSDJH"
gitlab_rails['smtp_domain'] = "163.com"
gitlab_rails['smtp_authentication'] = "login"
gitlab_rails['smtp_enable_starttls_auto'] = true
gitlab_rails['smtp_tls'] = true
gitlab_rails['gitlab_email_enabled'] = true
gitlab_rails['gitlab_email_from'] = 'zhuangyaovip@163.com'
gitlab_rails['gitlab_email_display_name'] = 'Example'
gitlab_rails['gitlab_email_reply_to'] = '1311529042@qq.com'
gitlab_rails['gitlab_email_subject_suffix'] = 'gitlab'
# gitlab_rails['gitlab_email_smime_enabled'] = false
# gitlab_rails['gitlab_email_smime_key_file'] = '/etc/gitlab/ssl/gitlab_smime.key'
# gitlab_rails['gitlab_email_smime_cert_file'] = '/etc/gitlab/ssl/gitlab_smime.crt'
# gitlab_rails['gitlab_email_smime_ca_certs_file'] = '/etc/gitlab/ssl/gitlab_smime_cas.crt'
# user['git_user_email'] = "gitlab@#{node['fqdn']}"
```
停止gitlab服务:
```shell
[root@cicd-gitlab ~]# gitlab-ctl stop
ok: down: gitaly: 0s, normally up
ok: down: gitlab-monitor: 1s, normally up
ok: down: gitlab-workhorse: 0s, normally up
ok: down: logrotate: 1s, normally up
ok: down: nginx: 0s, normally up
ok: down: node-exporter: 1s, normally up
ok: down: postgres-exporter: 0s, normally up
ok: down: postgresql: 0s, normally up
ok: down: prometheus: 0s, normally up
ok: down: redis: 0s, normally up
ok: down: redis-exporter: 1s, normally up
ok: down: sidekiq: 0s, normally up
ok: down: unicorn: 1s, normally up
```
修改配置后需要初始化配置:
```shell
[root@cicd-gitlab ~]# gitlab-ctl reconfigure
......
```
启动服务:
```shell
[root@cicd-gitlab ~]# gitlab-ctl start
ok: run: gitaly: (pid 37603) 0s
ok: run: gitlab-monitor: (pid 37613) 0s
ok: run: gitlab-workhorse: (pid 37625) 0s
ok: run: logrotate: (pid 37631) 0s
ok: run: nginx: (pid 37639) 1s
ok: run: node-exporter: (pid 37644) 0s
ok: run: postgres-exporter: (pid 37648) 1s
ok: run: postgresql: (pid 37652) 0s
ok: run: prometheus: (pid 37660) 1s
ok: run: redis: (pid 37668) 0s
ok: run: redis-exporter: (pid 37746) 0s
ok: run: sidekiq: (pid 37750) 1s
ok: run: unicorn: (pid 37757) 0s
```
Gitlab 发送邮件测试:
```shell
[root@cicd-gitlab ~]# gitlab-rails console
Loading production environment (Rails 4.2.10)
irb(main):001:0> Notify.test_email('1311529042@qq.com', 'Message Subject', 'Message Body').deliver_now
Notify#test_email: processed outbound mail in 2219.5ms
Sent mail to user@destination.com (2469.5ms)
Date: Fri, 04 May 2018 15:50:10 +0800
From: Admin Message Body
=> #