|
|
<h1><center>日志分析集群-8版本</center></h1>
|
|
|
|
|
|
作者:行癫(盗版必究)
|
|
|
|
|
|
------
|
|
|
|
|
|
## 一:环境准备
|
|
|
|
|
|
#### 1.简介
|
|
|
|
|
|
部署模式:es集群采用无主模式
|
|
|
|
|
|
es版本:8.13.4
|
|
|
|
|
|
jdk版本:使用es内嵌的jdk21,无需额外安装jdk环境
|
|
|
|
|
|
操作系统:Centos 7
|
|
|
|
|
|
#### 2.环境
|
|
|
|
|
|
| IP地址 | 主机名 | 角色 |
|
|
|
| :--------: | :---------------: | :-------------: |
|
|
|
| 10.9.12.83 | es-1.xingdian.com | master&data节点 |
|
|
|
| 10.9.12.84 | es-2.xingdian.com | master&data节点 |
|
|
|
| 10.9.12.85 | es-3.xingdian.com | master&data节点 |
|
|
|
|
|
|
## 二:服务器配置
|
|
|
|
|
|
#### 1.创建用户
|
|
|
|
|
|
es不能使用root用户进行部署,故创建新用户管理es集群
|
|
|
|
|
|
```shell
|
|
|
# 添加一个用户 elasticsearch ,密码 elasticsearch
|
|
|
[root@es-1 ~]# useradd elasticsearch && echo elasticsearch|passwd --stdin elasticsearch
|
|
|
```
|
|
|
|
|
|
#### 2.本地解析
|
|
|
|
|
|
```shell
|
|
|
[root@es-1 ~]# vim /etc/hosts
|
|
|
10.9.12.83 es-1.xingdian.com
|
|
|
10.9.12.84 es-2.xingdian.com
|
|
|
10.9.12.85 es-3.xingdian.com
|
|
|
```
|
|
|
|
|
|
#### 3.系统优化
|
|
|
|
|
|
优化最大进程数,最大文件打开数,优化虚拟内存
|
|
|
|
|
|
```shell
|
|
|
[root@es-1 ~]# vim /etc/security/limits.conf
|
|
|
* soft nofile 65536
|
|
|
* hard nofile 131072
|
|
|
* soft nproc 4096
|
|
|
* hard nproc 6553
|
|
|
|
|
|
[root@es-1 ~]# vim /etc/sysctl.conf
|
|
|
vm.max_map_count=262144
|
|
|
|
|
|
[root@es-1 ~]# sysctl -p
|
|
|
```
|
|
|
|
|
|
## 三:集群部署
|
|
|
|
|
|
#### 1.获取安装包
|
|
|
|
|
|
官网获取
|
|
|
|
|
|
#### 2.解压安装
|
|
|
|
|
|
```shell
|
|
|
[root@es-1 ~]# tar -xf elasticsearch-8.13.4-linux-x86_64.tar.gz -C /usr/local
|
|
|
[root@es-1 ~]# mv /usr/local/elasticsearch-8.13.4 /usr/local/es
|
|
|
[root@es-1 ~]# chown -R elasticsearch.elasticsearch /usr/local/es
|
|
|
```
|
|
|
|
|
|
#### 3.配置环境变量
|
|
|
|
|
|
```shell
|
|
|
[root@es-1 ~]# vim /etc/profile
|
|
|
export JAVA_HOME=/usr/local/es/jdk
|
|
|
export ES_HOME=/usr/local/es
|
|
|
export PATH=$PATH:$ES_HOME/bin:$JAVA_HOME/bin
|
|
|
|
|
|
# 刷新环境变量
|
|
|
[root@es-1 ~]# source /etc/profile
|
|
|
```
|
|
|
|
|
|
#### 4.创建目录
|
|
|
|
|
|
目录用来存储数据和存放证书并赋予权限
|
|
|
|
|
|
```shell
|
|
|
[root@es-1 ~]# mkdir -p /usr/local/es/data
|
|
|
[root@es-1 ~]# mkdir -p /usr/local/es/config/certs
|
|
|
[root@es-1 ~]# chown -R elasticsearch:elasticsearch /usr/local/es
|
|
|
```
|
|
|
|
|
|
**注意:截至到目前为止,所有节点服务器的操作都是一致的**
|
|
|
|
|
|
#### 5.签发证书
|
|
|
|
|
|
```shell
|
|
|
# 在第一台服务器节点 es-1.xingdian.com 设置集群多节点通信密钥
|
|
|
# 切换用户
|
|
|
[root@es-1 ~]# su - elasticsearch
|
|
|
|
|
|
[elasticsearch@es-1 ~]$ cd /usr/local/es/bin
|
|
|
|
|
|
[elasticsearch@es-1 bin]$./elasticsearch-certutil ca
|
|
|
|
|
|
warning: ignoring JAVA_HOME=/usr/local/es/jdk; using bundled JDK
|
|
|
This tool assists you in the generation of X.509 certificates and certificate
|
|
|
signing requests for use with SSL/TLS in the Elastic stack.
|
|
|
The 'ca' mode generates a new 'certificate authority'
|
|
|
This will create a new X.509 certificate and private key that can be used
|
|
|
to sign certificate when running in 'cert' mode.
|
|
|
|
|
|
Use the 'ca-dn' option if you wish to configure the 'distinguished name'
|
|
|
of the certificate authority
|
|
|
|
|
|
By default the 'ca' mode produces a single PKCS#12 output file which holds:
|
|
|
* The CA certificate
|
|
|
* The CAs private key
|
|
|
|
|
|
If you elect to generate PEM format certificates (the -pem option), then the output will
|
|
|
be a zip file containing individual files for the CA certificate and private key
|
|
|
|
|
|
Please enter the desired output file [elastic-stack-ca.p12]: # 回车即可
|
|
|
Enter password for elastic-stack-ca.p12 : # 回车即可
|
|
|
|
|
|
# 用 ca 证书签发节点证书,过程中需按三次回车键,生成目录:es的home:/usr/local/es/
|
|
|
[elasticsearch@es-1 bin]$ ./elasticsearch-certutil cert --ca elastic-stack-ca.p12
|
|
|
|
|
|
If you specify any of the following options:
|
|
|
* -pem (PEM formatted output)
|
|
|
* -multiple (generate multiple certificates)
|
|
|
* -in (generate certificates from an input file)
|
|
|
then the output will be be a zip file containing individual certificate/key files
|
|
|
|
|
|
Enter password for CA (elastic-stack-ca.p12) : # 回车即可
|
|
|
Please enter the desired output file [elastic-certificates.p12]: # 回车即可
|
|
|
Enter password for elastic-certificates.p12 : # 回车即可
|
|
|
|
|
|
Certificates written to /usr/local/es/elastic-certificates.p12
|
|
|
|
|
|
This file should be properly secured as it contains the private key for
|
|
|
your instance.
|
|
|
This file is a self contained file and can be copied and used 'as is'
|
|
|
For each Elastic product that you wish to configure, you should copy
|
|
|
this '.p12' file to the relevant configuration directory
|
|
|
and then follow the SSL configuration instructions in the product guide.
|
|
|
|
|
|
For client applications, you may only need to copy the CA certificate and
|
|
|
configure the client to trust this certificate.
|
|
|
|
|
|
# 将生成的证书文件移动到 config/certs 目录中
|
|
|
[elasticsearch@es-1 bin]$ cd /usr/local/es/
|
|
|
[elasticsearch@okd elasticsearch-8.11.0]$ ls -l | grep "elastic-"
|
|
|
-rw------- 1 elasticsearch elasticsearch 3596 Feb 10 16:05 elastic-certificates.p12
|
|
|
-rw------- 1 elasticsearch elasticsearch 2672 Feb 10 16:03 elastic-stack-ca.p12
|
|
|
[elasticsearch@es-1 es]$
|
|
|
[elasticsearch@es-1 es]$ mv elastic-certificates.p12 config/certs/
|
|
|
[elasticsearch@es-1 es]$ mv elastic-stack-ca.p12 config/certs/
|
|
|
```
|
|
|
|
|
|
#### 6.设置集群多节点HTTP证书
|
|
|
|
|
|
```shell
|
|
|
# 签发 Https 证书
|
|
|
[elasticsearch@es-1 es]$ cd /usr/local/es/bin/
|
|
|
[elasticsearch@es-1 bin]$ ./elasticsearch-certutil http
|
|
|
warning: ignoring JAVA_HOME=/usr/local/es/jdk; using bundled JDK
|
|
|
|
|
|
## Elasticsearch HTTP Certificate Utility
|
|
|
The 'http' command guides you through the process of generating certificates
|
|
|
for use on the HTTP (Rest) interface for Elasticsearch.
|
|
|
This tool will ask you a number of questions in order to generate the right
|
|
|
set of files for your needs.
|
|
|
## Do you wish to generate a Certificate Signing Request (CSR)?
|
|
|
A CSR is used when you want your certificate to be created by an existing
|
|
|
Certificate Authority (CA) that you do not control (that is, you do not have
|
|
|
access to the keys for that CA).
|
|
|
If you are in a corporate environment with a central security team, then you
|
|
|
may have an existing Corporate CA that can generate your certificate for you.
|
|
|
Infrastructure within your organisation may already be configured to trust this
|
|
|
CA, so it may be easier for clients to connect to Elasticsearch if you use a
|
|
|
CSR and send that request to the team that controls your CA.
|
|
|
If you choose not to generate a CSR, this tool will generate a new certificate
|
|
|
for you. That certificate will be signed by a CA under your control. This is a
|
|
|
quick and easy way to secure your cluster with TLS, but you will need to
|
|
|
configure all your clients to trust that custom CA.
|
|
|
######################################################
|
|
|
# 是否生成CSR,选择 N ,不需要 #
|
|
|
######################################################
|
|
|
Generate a CSR? [y/N]N
|
|
|
|
|
|
## Do you have an existing Certificate Authority (CA) key-pair that you wish to use to sign your certificate?
|
|
|
|
|
|
If you have an existing CA certificate and key, then you can use that CA to
|
|
|
sign your new http certificate. This allows you to use the same CA across
|
|
|
multiple Elasticsearch clusters which can make it easier to configure clients,
|
|
|
and may be easier for you to manage.
|
|
|
|
|
|
If you do not have an existing CA, one will be generated for you.
|
|
|
######################################################
|
|
|
# 是否使用已经存在的CA证书,选择 y ,因为已经创建签发好了CA #
|
|
|
######################################################
|
|
|
Use an existing CA? [y/N]y
|
|
|
|
|
|
## What is the path to your CA?
|
|
|
Please enter the full pathname to the Certificate Authority that you wish to
|
|
|
use for signing your new http certificate. This can be in PKCS#12 (.p12), JKS
|
|
|
(.jks) or PEM (.crt, .key, .pem) format.
|
|
|
######################################################
|
|
|
# 指定CA证书的路径地址,CA Path:后写绝对路径 #
|
|
|
######################################################
|
|
|
CA Path: /usr/local/es/config/certs/elastic-stack-ca.p12
|
|
|
Reading a PKCS12 keystore requires a password.
|
|
|
It is possible for the keystore's password to be blank,
|
|
|
in which case you can simply press <ENTER> at the prompt
|
|
|
|
|
|
######################################################
|
|
|
# 设置密钥库的密码,直接 回车 即可 #
|
|
|
######################################################
|
|
|
Password for elastic-stack-ca.p12:
|
|
|
|
|
|
## How long should your certificates be valid?
|
|
|
|
|
|
Every certificate has an expiry date. When the expiry date is reached clients
|
|
|
will stop trusting your certificate and TLS connections will fail.
|
|
|
Best practice suggests that you should either:
|
|
|
(a) set this to a short duration (90 - 120 days) and have automatic processes
|
|
|
to generate a new certificate before the old one expires, or
|
|
|
(b) set it to a longer duration (3 - 5 years) and then perform a manual update
|
|
|
a few months before it expires.
|
|
|
|
|
|
You may enter the validity period in years (e.g. 3Y), months (e.g. 18M), or days (e.g. 90D)
|
|
|
######################################################
|
|
|
# 设置证书的失效时间,这里的y表示年,5y则代表失效时间5年 #
|
|
|
######################################################
|
|
|
For how long should your certificate be valid? [5y] 5y
|
|
|
|
|
|
## Do you wish to generate one certificate per node?
|
|
|
|
|
|
If you have multiple nodes in your cluster, then you may choose to generate a
|
|
|
separate certificate for each of these nodes. Each certificate will have its
|
|
|
own private key, and will be issued for a specific hostname or IP address.
|
|
|
|
|
|
Alternatively, you may wish to generate a single certificate that is valid
|
|
|
across all the hostnames or addresses in your cluster.
|
|
|
|
|
|
If all of your nodes will be accessed through a single domain
|
|
|
(e.g. node01.es.example.com, node02.es.example.com, etc) then you may find it
|
|
|
simpler to generate one certificate with a wildcard hostname (*.es.example.com)
|
|
|
and use that across all of your nodes.
|
|
|
|
|
|
However, if you do not have a common domain name, and you expect to add
|
|
|
additional nodes to your cluster in the future, then you should generate a
|
|
|
certificate per node so that you can more easily generate new certificates when
|
|
|
you provision new nodes.
|
|
|
|
|
|
######################################################
|
|
|
# 是否需要为每个节点都生成证书,选择 N 无需每个节点都配置证书 #
|
|
|
######################################################
|
|
|
Generate a certificate per node? [y/N]N
|
|
|
|
|
|
## Which hostnames will be used to connect to your nodes?
|
|
|
These hostnames will be added as "DNS" names in the "Subject Alternative Name"
|
|
|
(SAN) field in your certificate.
|
|
|
You should list every hostname and variant that people will use to connect to
|
|
|
your cluster over http.
|
|
|
Do not list IP addresses here, you will be asked to enter them later.
|
|
|
|
|
|
If you wish to use a wildcard certificate (for example *.es.example.com) you
|
|
|
can enter that here.
|
|
|
|
|
|
Enter all the hostnames that you need, one per line.
|
|
|
######################################################
|
|
|
# 输入需连接集群节点主机名信息,一行输入一个IP地址,空行回车结束 #
|
|
|
######################################################
|
|
|
When you are done, press <ENTER> once more to move on to the next step.
|
|
|
|
|
|
es-1.xingdian.com
|
|
|
es-2.xingdian.com
|
|
|
es-3.xingdian.com
|
|
|
|
|
|
You entered the following hostnames.
|
|
|
|
|
|
- es-1.xingdian.com
|
|
|
- es-2.xingdian.com
|
|
|
- es-3.xingdian.com
|
|
|
|
|
|
####################################################
|
|
|
# 确认以上是否为正确的配置,输入 Y 表示信息正确 #
|
|
|
####################################################
|
|
|
Is this correct [Y/n]Y
|
|
|
|
|
|
## Which IP addresses will be used to connect to your nodes?
|
|
|
If your clients will ever connect to your nodes by numeric IP address, then you
|
|
|
can list these as valid IP "Subject Alternative Name" (SAN) fields in your
|
|
|
certificate.
|
|
|
|
|
|
If you do not have fixed IP addresses, or not wish to support direct IP access
|
|
|
to your cluster then you can just press <ENTER> to skip this step.
|
|
|
|
|
|
Enter all the IP addresses that you need, one per line.
|
|
|
####################################################
|
|
|
# 输入需连接集群节点IP信息,一行输入一个IP地址,空行回车结束 #
|
|
|
####################################################
|
|
|
When you are done, press <ENTER> once more to move on to the next step.
|
|
|
|
|
|
10.9.12.83
|
|
|
10.9.12.84
|
|
|
10.9.12.85
|
|
|
|
|
|
|
|
|
You entered the following IP addresses.
|
|
|
|
|
|
- 10.9.12.83
|
|
|
- 10.9.12.84
|
|
|
- 10.9.12.85
|
|
|
|
|
|
####################################################
|
|
|
# 确认以上是否为正确的配置,输入 Y 表示信息正确 #
|
|
|
####################################################
|
|
|
Is this correct [Y/n]Y
|
|
|
|
|
|
## Other certificate options
|
|
|
The generated certificate will have the following additional configuration
|
|
|
values. These values have been selected based on a combination of the
|
|
|
information you have provided above and secure defaults. You should not need to
|
|
|
change these values unless you have specific requirements.
|
|
|
|
|
|
Key Name: es-1.xingdian.com
|
|
|
Subject DN: CN=es-1.xingdian.com
|
|
|
Key Size: 2048
|
|
|
|
|
|
####################################################
|
|
|
# 是否要更改以上这些选项,选择 N ,不更改证书选项配置 #
|
|
|
####################################################
|
|
|
Do you wish to change any of these options? [y/N]N
|
|
|
|
|
|
## What password do you want for your private key(s)?
|
|
|
|
|
|
Your private key(s) will be stored in a PKCS#12 keystore file named "http.p12".
|
|
|
This type of keystore is always password protected, but it is possible to use a
|
|
|
blank password.
|
|
|
|
|
|
####################################################
|
|
|
# 是否要给证书加密,不需要加密,两次 回车 即可 #
|
|
|
####################################################
|
|
|
If you wish to use a blank password, simply press <enter> at the prompt below.
|
|
|
Provide a password for the "http.p12" file: [<ENTER> for none]
|
|
|
|
|
|
## Where should we save the generated files?
|
|
|
A number of files will be generated including your private key(s),
|
|
|
public certificate(s), and sample configuration options for Elastic Stack products.
|
|
|
These files will be included in a single zip archive.
|
|
|
What filename should be used for the output zip file? [/usr/local/es/elasticsearch-ssl-http.zip]
|
|
|
Zip file written to /usr/local/es/elasticsearch-ssl-http.zip
|
|
|
```
|
|
|
|
|
|
#### 7.分发证书
|
|
|
|
|
|
```shell
|
|
|
# 解压
|
|
|
[elasticsearch@es-1 bin]$ cd /usr/local/es/
|
|
|
[elasticsearch@es-1 es]$ unzip elasticsearch-ssl-http.zip
|
|
|
# 移动证书
|
|
|
[elasticsearch@es-1 es]$ mv ./elasticsearch/http.p12 config/certs/
|
|
|
[elasticsearch@es-1 es]$ mv ./kibana/elasticsearch-ca.pem config/certs/
|
|
|
|
|
|
# 将证书分发到其他节点02 03
|
|
|
[elasticsearch@es-1 es]$ cd /usr/local/es/config/certs
|
|
|
[elasticsearch@es-1 certs]$ ll
|
|
|
total 16
|
|
|
-rw------- 1 elasticsearch elasticsearch 3596 Feb 10 16:05 elastic-certificates.p12
|
|
|
-rw-rw-r-- 1 elasticsearch elasticsearch 1200 Feb 10 16:13 elasticsearch-ca.pem
|
|
|
-rw------- 1 elasticsearch elasticsearch 2672 Feb 10 16:03 elastic-stack-ca.p12
|
|
|
-rw-rw-r-- 1 elasticsearch elasticsearch 3652 Feb 10 16:13 http.p12
|
|
|
[elasticsearch@es-1 certs]$ scp * es-2.xingdian.com:/usr/local/es/config/certs/
|
|
|
[elasticsearch@es-1 certs]$ scp * es-3.xingdian.com:/usr/local/es/config/certs/
|
|
|
```
|
|
|
|
|
|
#### 8.修改配置
|
|
|
|
|
|
```yaml
|
|
|
[elasticsearch@es-1 certs]$ cd /usr/local/es/config/
|
|
|
[elasticsearch@es-1 config]$ vim elasticsearch.yml
|
|
|
cluster.name: xingdian-es
|
|
|
node.name: es-1.xingdian.com
|
|
|
path.data: /usr/local/es/data
|
|
|
path.logs: /usr/local/es/logs
|
|
|
network.host: 0.0.0.0
|
|
|
http.port: 9200
|
|
|
# 种子主机,在选举时用于发现其他主机的,最好配置多个
|
|
|
discovery.seed_hosts: ["es-1.xingdian.com","es-2.xingdian.com","es-3.xingdian.com"]
|
|
|
cluster.initial_master_nodes: ["es-1.xingdian.com","es-2.xingdian.com","es-3.xingdian.com"]
|
|
|
xpack.security.enabled: true
|
|
|
xpack.security.enrollment.enabled: true
|
|
|
xpack.security.http.ssl:
|
|
|
enabled: true
|
|
|
keystore.path: /usr/local/es/config/certs/http.p12
|
|
|
keystore.password: 123456 #如果生成证书时设置了密码则要添加密码配置
|
|
|
truststore.path: /usr/local/es/config/certs/http.p12
|
|
|
truststore.password: 123456 #如果生成证书时设置了密码则要添加密码配置
|
|
|
xpack.security.transport.ssl:
|
|
|
enabled: true
|
|
|
verification_mode: certificate
|
|
|
keystore.path: /usr/local/es/config/certs/elastic-certificates.p12
|
|
|
keystore.password: 123456 #如果生成证书时设置了密码则要添加密码配置
|
|
|
truststore.path: /usr/local/es/config/certs/elastic-certificates.p12
|
|
|
truststore.password: 123456 #如果生成证书时设置了密码则要添加密码配置
|
|
|
http.host: [_local_, _site_]
|
|
|
ingest.geoip.downloader.enabled: false
|
|
|
xpack.security.http.ssl.client_authentication: none
|
|
|
```
|
|
|
|
|
|
注意:
|
|
|
|
|
|
1.xpack.security.http.ssl和xpack.security.transport.ssl后的子配置需要空一格,遵循yml的格式要求
|
|
|
|
|
|
2.如果不需要后续的http证书认证或者用户密码认证可以将以下参数的值改为false
|
|
|
|
|
|
```yaml
|
|
|
xpack.security.http.ssl:
|
|
|
enabled: false
|
|
|
xpack.security.transport.ssl:
|
|
|
enabled: false
|
|
|
```
|
|
|
|
|
|
3.如果后续在业务场景中遇到了跨域的问题,解决跨域的问题添加以下参数
|
|
|
|
|
|
```yaml
|
|
|
http.cors.enabled: true
|
|
|
http.cors.allow-origin: "*"
|
|
|
```
|
|
|
|
|
|
#### 9.参数解释
|
|
|
|
|
|
```shell
|
|
|
cluster.name: xingdian-es
|
|
|
含义: 指定Elasticsearch集群的名称。在此例中,集群名为xingdian-es,所有想要加入此集群的节点都应配置相同的集群名称。
|
|
|
node.name: es-1.xingdian.com
|
|
|
含义: 设置单个节点的名称。这里将节点命名为es-1.xingdian.com,有助于标识和管理集群中的不同节点。
|
|
|
path.data: /usr/local/es/data
|
|
|
含义: 指定Elasticsearch存储数据的路径。数据文件将保存在/usr/local/es/data目录下。
|
|
|
path.logs: /usr/local/es/logs
|
|
|
含义: 配置日志文件的存放路径,即日志将会被写入到/usr/local/es/logs目录中。
|
|
|
network.host: 0.0.0.0
|
|
|
含义: 设置监听所有可用网络接口的IP地址,允许Elasticsearch从任何网络接口接收连接请求。
|
|
|
http.port: 9200
|
|
|
含义: 指定HTTP服务监听的端口号,这里是9200,是Elasticsearch默认的HTTP访问端口。
|
|
|
discovery.seed_hosts: ["es-1.xingdian.com","es-2.xingdian.com","es-3.xingdian.com"]
|
|
|
含义: 列出初始种子节点的地址,用于集群启动时发现其他节点。这有助于新节点加入或现有节点重启后找到集群。
|
|
|
cluster.initial_master_nodes: ["es-1.xingdian.com","es-2.xingdian.com","es-3.xingdian.com"]
|
|
|
含义: 在初次启动或集群完全重启后,指定哪些节点可以成为初始主节点,用于选举过程。
|
|
|
xpack.security.enabled: true
|
|
|
含义: 启用X-Pack安全特性,提供认证、授权、加密传输等功能,增强Elasticsearch的安全性。
|
|
|
xpack.security.http.ssl.enabled: true
|
|
|
含义: 开启HTTP通信的SSL加密,确保客户端与Elasticsearch之间的数据传输安全。
|
|
|
keystore.path, truststore.path, keystore.password, truststore.password
|
|
|
含义: 分别指定了SSL证书的存放路径和密钥库、信任库的密码。这些设置用于保护SSL连接的密钥和信任信息。
|
|
|
http.host: [local, site]
|
|
|
含义: 指定HTTP服务可以绑定的主机名,_local_表示绑定本地主机,_site_允许绑定所有公开站点地址。
|
|
|
ingest.geoip.downloader.enabled: false
|
|
|
含义: 禁用了GeoIP数据库的自动下载功能。GeoIP用于地理定位,禁用后需要手动管理数据库更新。
|
|
|
xpack.security.http.ssl.client_authentication: none
|
|
|
含义: 设置客户端认证方式为“无”,意味着HTTP客户端连接到Elasticsearch时不需要提供证书进行认证。
|
|
|
```
|
|
|
|
|
|
#### 10.JVM参数调整
|
|
|
|
|
|
```
|
|
|
[elasticsearch@es-1 config]$ vim jvm.options
|
|
|
-Xms2g
|
|
|
-Xmx2g
|
|
|
```
|
|
|
|
|
|
注意:该值为真实内存的1/2
|
|
|
|
|
|
#### 11.启动集群
|
|
|
|
|
|
```shell
|
|
|
[elasticsearch@es-1 es]$ nohup /usr/local/es/bin/elasticsearch &
|
|
|
[elasticsearch@es-2 es]$ nohup /usr/local/es/bin/elasticsearch &
|
|
|
[elasticsearch@es-3 es]$ nohup /usr/local/es/bin/elasticsearch &
|
|
|
```
|
|
|
|
|
|
#### 12.设置登录密码
|
|
|
|
|
|
```shell
|
|
|
# 手工指定elastic的新密码 (-i参数)
|
|
|
[elasticsearch@okd ~]$ /usr/local/es/bin/elasticsearch-reset-password -u elastic -i
|
|
|
warning: ignoring JAVA_HOME=/usr/local/es/jdk; using bundled JDK
|
|
|
bThis tool will reset the password of the [elastic] user.
|
|
|
You will be prompted to enter the password.
|
|
|
Please confirm that you would like to continue [y/N]y
|
|
|
Did not understand answer 'by'
|
|
|
Please confirm that you would like to continue [y/N]y
|
|
|
|
|
|
Enter password for [elastic]: # 输入用户elastic的密码
|
|
|
Re-enter password for [elastic]: # 输入用户elastic的密码
|
|
|
Password for the [elastic] user successfully reset.
|
|
|
```
|
|
|
|
|
|
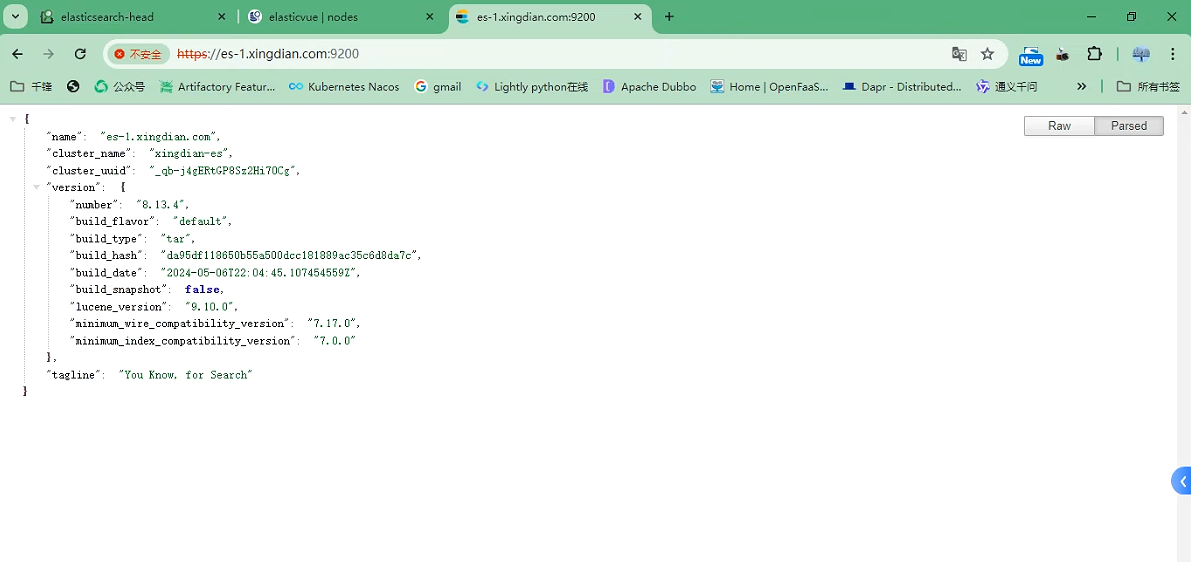
#### 13.浏览器访问
|
|
|
|
|
|
https://es-1.xingdian.com:9200
|
|
|
|
|
|
https://es-2.xingdian.com:9200
|
|
|
|
|
|
https://es-3.xingdian.com:9200
|
|
|
|
|
|
账户密码为:elastic 密码自己设定的
|
|
|
|
|
|
|
|
|
|
|
|
#### 14.HEAD插件访问
|
|
|
|
|
|

|
|
|
|
|
|

|
|
|
|
|
|
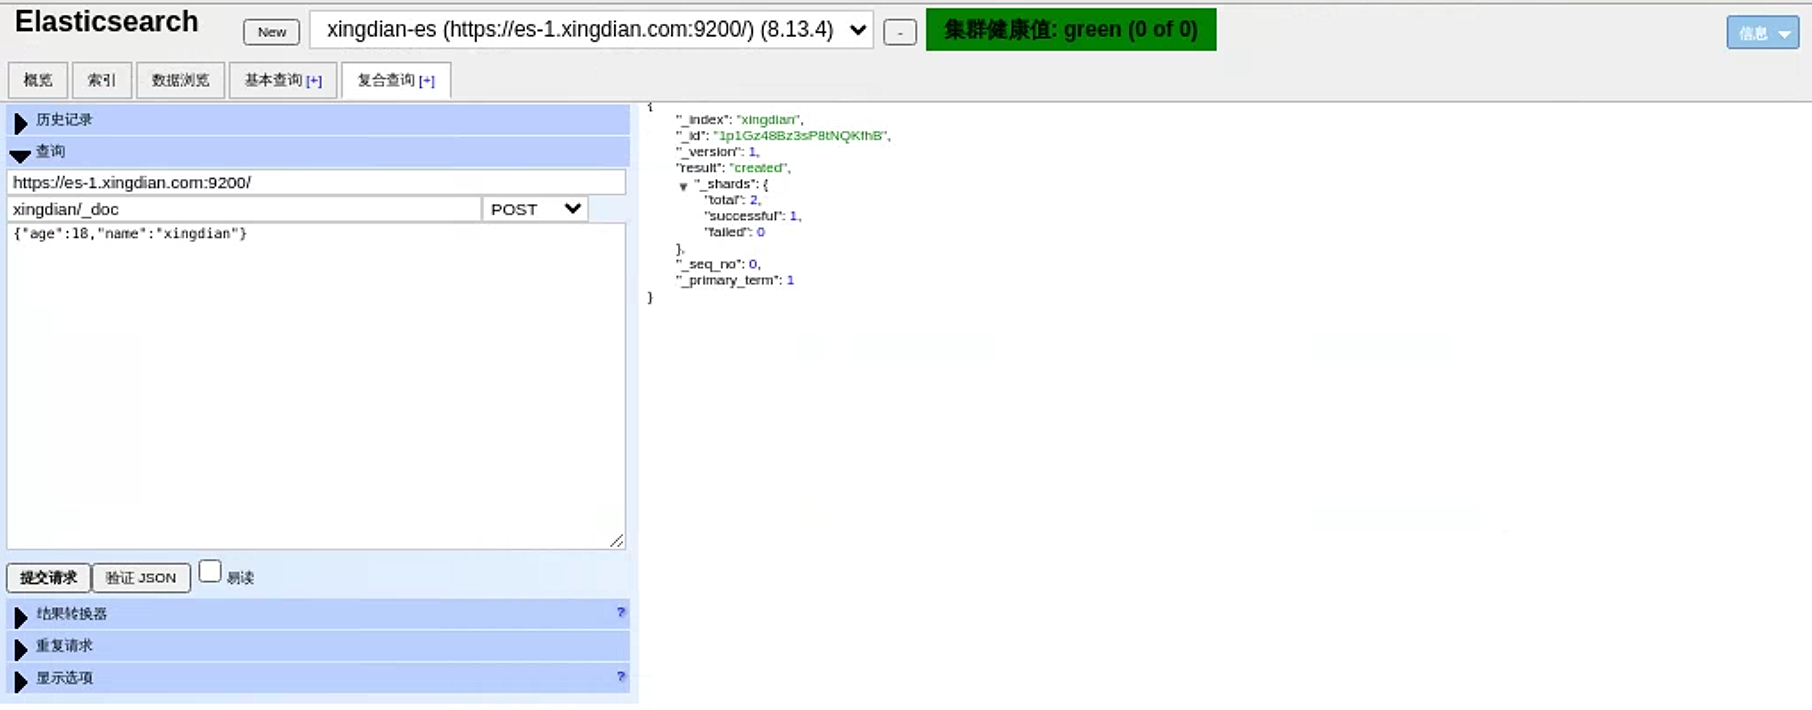
15.模拟数据插入
|
|
|
|
|
|
模拟post请求插入数据
|
|
|
|
|
|
索引名为:xingdian/_doc xingdian为自定义 _doc为固定格式
|
|
|
|
|
|
内容:采用json格式 {"user":"xingdian","mesg":"hello world"}
|
|
|
|
|
|
 |