|
|
<h1><center>KVM进阶使用</center></h1>
|
|
|
|
|
|
**作者:行癫(盗版必究)**
|
|
|
|
|
|
------
|
|
|
|
|
|
## 一:KVM克隆
|
|
|
|
|
|
#### 1.图形化管理方式
|
|
|
|
|
|
关闭要克隆的虚拟机,右键点击虚拟机选择Clone
|
|
|
|
|
|
<img src="https://xingdian-image.oss-cn-beijing.aliyuncs.com/xingdian-image/image-20220711223317768.png" alt="image-20220711223317768" style="zoom:50%;" />
|
|
|
|
|
|
#### 2.字符终端
|
|
|
|
|
|
```shell
|
|
|
[root@localhost ~]# virt-clone -o centos7.0 -n xingdian -f /var/lib/libvirt/images/xingdian.qcow2
|
|
|
Allocating 'xingdian.qcow2' | 10 GB 00:00:03
|
|
|
|
|
|
Clone 'xingdian' created successfully.
|
|
|
|
|
|
注意:
|
|
|
-o:需要克隆的虚拟机名字
|
|
|
-n:克隆后虚拟机的名字
|
|
|
-f:指定克隆后的镜像文件
|
|
|
```
|
|
|
|
|
|
验证:
|
|
|
|
|
|
<img src="https://xingdian-image.oss-cn-beijing.aliyuncs.com/xingdian-image/image-20220711223701321.png" alt="image-20220711223701321" style="zoom:50%;" />
|
|
|
|
|
|
## 二:KVM网络
|
|
|
|
|
|
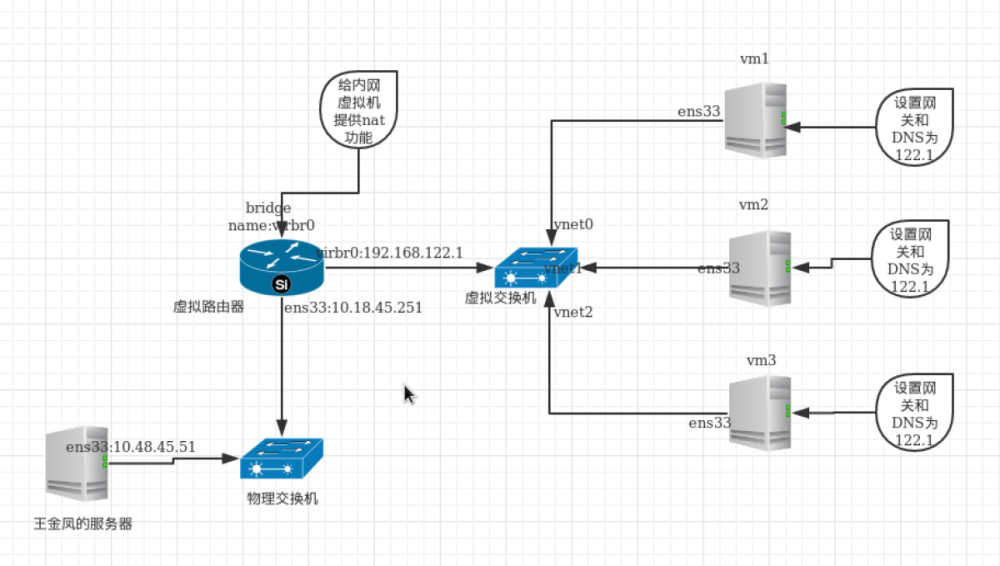
#### 1.NAT网络拓扑
|
|
|
|
|
|
|
|
|
|
|
|
注意:
|
|
|
|
|
|
默认情况下使用的就是NAT网络模式
|
|
|
|
|
|
#### 2.桥接网络拓扑
|
|
|
|
|
|

|
|
|
|
|
|
#### 3.网络相关基本命令
|
|
|
|
|
|
查看一个guest主机的网络接口信息:
|
|
|
|
|
|
```shell
|
|
|
[root@localhost ~]# virsh domiflist xingdian
|
|
|
Interface Type Source Model MAC
|
|
|
-------------------------------------------------------
|
|
|
- network default virtio 52:54:00:89:aa:71
|
|
|
```
|
|
|
|
|
|
列出运行网络信息:
|
|
|
|
|
|
```shell
|
|
|
[root@localhost ~]# virsh net-list
|
|
|
Name State Autostart Persistent
|
|
|
----------------------------------------------------------
|
|
|
default active yes yes
|
|
|
```
|
|
|
|
|
|
列出网络详细信息:
|
|
|
|
|
|
```shell
|
|
|
[root@localhost ~]# virsh net-info default
|
|
|
Name: default
|
|
|
UUID: cdea1242-f581-4624-86d7-c52629b52774
|
|
|
Active: yes
|
|
|
Persistent: yes
|
|
|
Autostart: yes
|
|
|
Bridge: virbr0
|
|
|
```
|
|
|
|
|
|
导出默认网络信息:
|
|
|
|
|
|
```shell
|
|
|
[root@localhost ~]# virsh net-dumpxml default > default.xml
|
|
|
[root@localhost ~]# cat default.xml
|
|
|
<network>
|
|
|
<name>default</name>
|
|
|
<uuid>cdea1242-f581-4624-86d7-c52629b52774</uuid>
|
|
|
<forward mode='nat'>
|
|
|
<nat>
|
|
|
<port start='1024' end='65535'/>
|
|
|
</nat>
|
|
|
</forward>
|
|
|
<bridge name='virbr0' stp='on' delay='0'/>
|
|
|
<mac address='52:54:00:10:80:ce'/>
|
|
|
<ip address='192.168.122.1' netmask='255.255.255.0'>
|
|
|
<dhcp>
|
|
|
<range start='192.168.122.2' end='192.168.122.254'/>
|
|
|
</dhcp>
|
|
|
</ip>
|
|
|
</network>
|
|
|
```
|
|
|
|
|
|
生成网络xml文件:
|
|
|
|
|
|
```shell
|
|
|
[root@localhost ~]# cp default.xml xingdian.xml
|
|
|
[root@localhost ~]# cat xingdian.xml
|
|
|
<network>
|
|
|
<name>xingdian</name>
|
|
|
<uuid>cdea1242-f581-4624-86d7-c52629b52794</uuid>
|
|
|
<forward mode='nat'>
|
|
|
<nat>
|
|
|
<port start='1024' end='65535'/>
|
|
|
</nat>
|
|
|
</forward>
|
|
|
<bridge name='virbr1' stp='on' delay='0'/>
|
|
|
<mac address='52:54:00:10:81:ce'/>
|
|
|
<ip address='10.0.1.1' netmask='255.255.255.0'>
|
|
|
<dhcp>
|
|
|
<range start='10.0.1.2' end='10.0.1.254'/>
|
|
|
</dhcp>
|
|
|
</ip>
|
|
|
</network>
|
|
|
```
|
|
|
|
|
|
利用xml生成新的文件:
|
|
|
|
|
|
```shell
|
|
|
[root@localhost ~]# virsh net-create xingdian.xml
|
|
|
Network xingdian created from xingdian.xml
|
|
|
```
|
|
|
|
|
|
开启持久化网络:
|
|
|
|
|
|
```shell
|
|
|
[root@localhost ~]# virsh net-define xingdian.xml //利用xml文件开启
|
|
|
Network xingdian defined from xingdian.xml
|
|
|
[root@localhost ~]# virsh net-list
|
|
|
Name State Autostart Persistent
|
|
|
----------------------------------------------------------
|
|
|
default active yes yes
|
|
|
diandian active yes yes
|
|
|
xingdian active no yes
|
|
|
```
|
|
|
|
|
|
取消持久化网络:
|
|
|
|
|
|
```shell
|
|
|
[root@localhost ~]# virsh net-undefine xingdian
|
|
|
Network xingdian has been undefined
|
|
|
|
|
|
[root@localhost ~]# virsh net-list
|
|
|
Name State Autostart Persistent
|
|
|
----------------------------------------------------------
|
|
|
default active yes yes
|
|
|
diandian active yes yes
|
|
|
xingdian active no no
|
|
|
```
|
|
|
|
|
|
自启动网络:
|
|
|
|
|
|
```shell
|
|
|
[root@localhost ~]# virsh net-autostart --disable diandian
|
|
|
Network diandian unmarked as autostarted
|
|
|
|
|
|
[root@localhost ~]# virsh net-list --all
|
|
|
Name State Autostart Persistent
|
|
|
----------------------------------------------------------
|
|
|
default active yes yes
|
|
|
diandian active no yes
|
|
|
xingdian active no no
|
|
|
[root@localhost ~]# virsh net-autostart --network diandian
|
|
|
Network diandian marked as autostarted
|
|
|
|
|
|
[root@localhost ~]# virsh net-list --all
|
|
|
Name State Autostart Persistent
|
|
|
----------------------------------------------------------
|
|
|
default active yes yes
|
|
|
diandian active yes yes
|
|
|
xingdian active no no
|
|
|
```
|
|
|
|
|
|
查看虚拟机IP地址:
|
|
|
|
|
|
```shell
|
|
|
[root@localhost ~]# virsh dumpxml xingdian | grep mac
|
|
|
<partition>/machine</partition>
|
|
|
<type arch='x86_64' machine='pc-i440fx-rhel7.0.0'>hvm</type>
|
|
|
<mac address='52:54:00:89:aa:71'/>
|
|
|
[root@localhost ~]# arp -a | grep 52:54:00:89:aa:71
|
|
|
? (192.168.122.54) at 52:54:00:89:aa:71 [ether] on virbr0
|
|
|
```
|
|
|
|
|
|
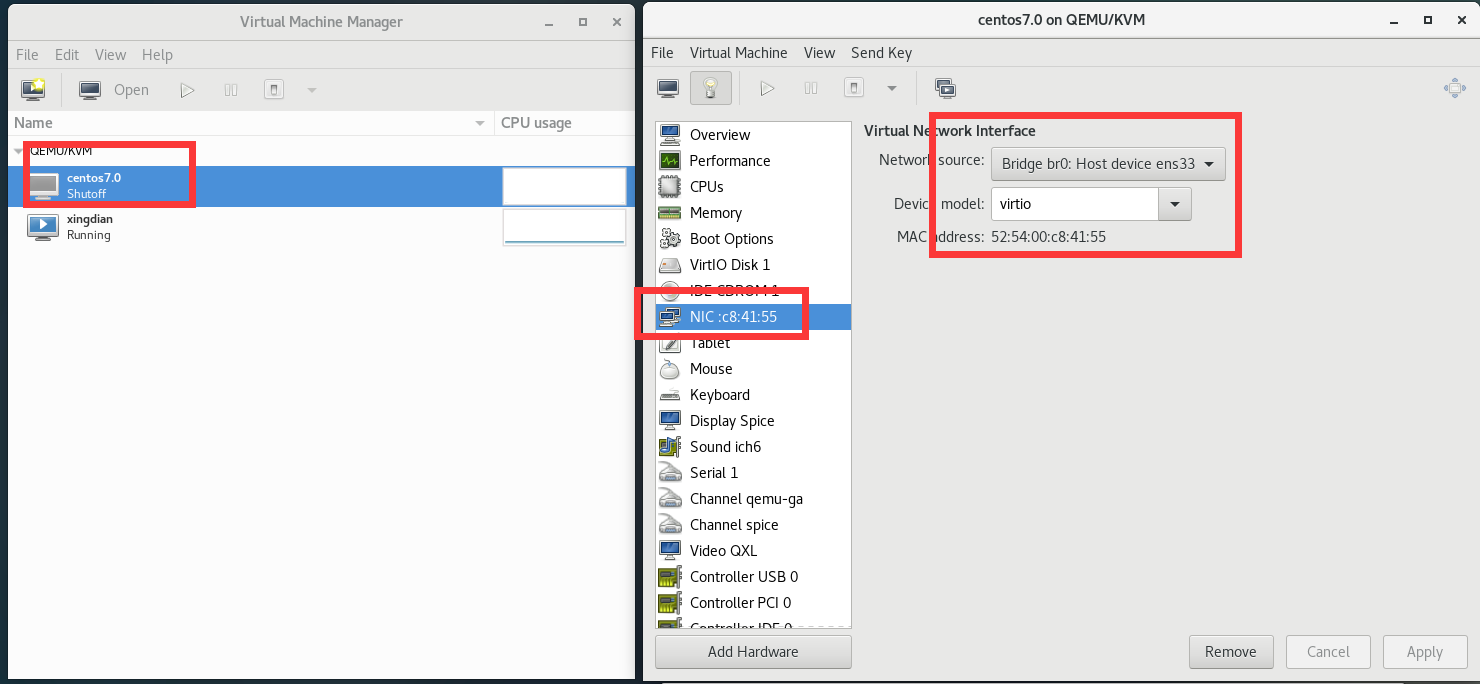
#### 4.创建桥接网络
|
|
|
|
|
|
创建桥接网卡br0,把br0作为网桥使用,绑定enp2s0到br0网桥:
|
|
|
|
|
|
```shell
|
|
|
[root@localhost ~]# virsh iface-bridge ens33 br0
|
|
|
```
|
|
|
|
|
|
执行上述命令,实际上就是在/etc/sysconfig/networking-script目录下增加一个虚拟网桥 br0,文件名称为ifcfg-br0
|
|
|
|
|
|
```shell
|
|
|
[root@localhost network-scripts]# cat ifcfg-br0
|
|
|
DEVICE="br0"
|
|
|
ONBOOT="yes"
|
|
|
TYPE="Bridge"
|
|
|
BOOTPROTO="dhcp"
|
|
|
IPV6INIT="yes"
|
|
|
IPV6_AUTOCONF="yes"
|
|
|
DHCPV6C="no"
|
|
|
STP="on"
|
|
|
DELAY="0"
|
|
|
```
|
|
|
|
|
|
查看网卡配置文件
|
|
|
|
|
|
```shell
|
|
|
[root@localhost network-scripts]# cat ifcfg-ens33
|
|
|
DEVICE="ens33"
|
|
|
ONBOOT="yes"
|
|
|
BRIDGE="br0"
|
|
|
```
|
|
|
|
|
|
重启网络:
|
|
|
|
|
|
```shell
|
|
|
[root@localhost network-scripts]# systemctl restart network
|
|
|
```
|
|
|
|
|
|
查看桥接:
|
|
|
|
|
|
```shell
|
|
|
[root@localhost network-scripts]# brctl show
|
|
|
bridge name bridge id STP enabled interfaces
|
|
|
br0 8000.000c29f4ba45 yes ens33
|
|
|
vnet1
|
|
|
virbr0 8000.5254001080ce yes virbr0-nic
|
|
|
vnet0
|
|
|
virbr1 8000.5254001081ce yes virbr1-nic
|
|
|
virbr2 8000.525400035e3c yes virbr2-nic
|
|
|
```
|
|
|
|
|
|
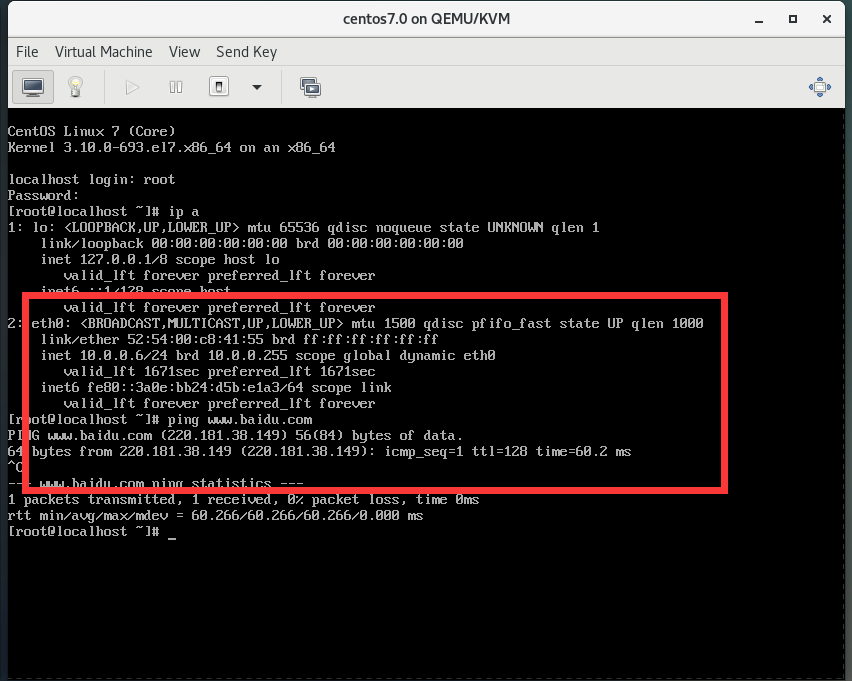
使用桥接:
|
|
|
|
|
|
|
|
|
|
|
|
|
|
|
|
|
|
## 三:KVM快照
|
|
|
|
|
|
#### 1.图形化方式
|
|
|
|
|
|

|
|
|
|
|
|
#### 2.命令方式
|
|
|
|
|
|
为虚拟机创建快照:
|
|
|
|
|
|
```shell
|
|
|
[root@localhost ~]# virsh snapshot-create-as xingdian xingdian.snap
|
|
|
Domain snapshot xingdian.snap created
|
|
|
```
|
|
|
|
|
|
查看镜像信息:
|
|
|
|
|
|
```shell
|
|
|
[root@localhost ~]# qemu-img info /var/lib/libvirt/images/xingdian.qcow2
|
|
|
image: /var/lib/libvirt/images/xingdian.qcow2
|
|
|
file format: qcow2
|
|
|
virtual size: 10G (10737418240 bytes)
|
|
|
disk size: 1.5G
|
|
|
cluster_size: 65536
|
|
|
Snapshot list:
|
|
|
ID TAG VM SIZE DATE VM CLOCK
|
|
|
1 xingdian.snap 248M 2022-07-12 01:16:13 00:40:55.839
|
|
|
Format specific information:
|
|
|
compat: 1.1
|
|
|
lazy refcounts: true
|
|
|
```
|
|
|
|
|
|
虚拟机增加内容,创建快照:
|
|
|
|
|
|
```shell
|
|
|
[root@localhost ~]# touch a.txt
|
|
|
[root@localhost ~]# virsh snapshot-create-as xingdian xingdian.snap2
|
|
|
Domain snapshot xingdian.snap2 created
|
|
|
```
|
|
|
|
|
|
关闭虚拟机,恢复到第一个快照:
|
|
|
|
|
|
```shell
|
|
|
[root@localhost ~]# virsh shutdown xingdian
|
|
|
Domain xingdian is being shutdown
|
|
|
[root@localhost ~]# virsh snapshot-revert xingdian xingdian.snap
|
|
|
```
|
|
|
|
|
|
验证:
|
|
|
|
|
|
```shell
|
|
|
[root@localhost ~]# virsh list
|
|
|
Id Name State
|
|
|
----------------------------------------------------
|
|
|
6 xingdian running
|
|
|
|
|
|
[root@localhost ~]# ssh 192.168.122.54
|
|
|
root@192.168.122.54's password:
|
|
|
Last login: Tue Jul 12 00:56:36 2022 from 192.168.122.1
|
|
|
[root@localhost ~]# ls
|
|
|
anaconda-ks.cfg
|
|
|
```
|
|
|
|
|
|
注意:
|
|
|
|
|
|
没有a.txt代表恢复快照成功
|
|
|
|
|
|
## 四:脚本管理KVM
|
|
|
|
|
|
```shell
|
|
|
[root@localhost ~]# cat kvm-manager.sh
|
|
|
#!/bin/bash
|
|
|
#kvm manager
|
|
|
#by xingdian.
|
|
|
#for centos7
|
|
|
|
|
|
images_dir=/var/lib/libvirt/images
|
|
|
xml_dir=/etc/libvirt/qemu
|
|
|
red_col="\e[1;31m"
|
|
|
blue_col="\e[1;34m"
|
|
|
reset_col="\e[0m"
|
|
|
|
|
|
centos6u8_base_img=centos6u8_base.qcow2
|
|
|
centos7u3_base_img=centos7u3_base.qcow2
|
|
|
win7_base_img=win7_base.qcow2
|
|
|
|
|
|
centos6u8_base_xml=centos6u8_base.xml
|
|
|
centos7u3_base_xml=centos7u3_base.xml
|
|
|
win7_base_xml=win7_base.xml
|
|
|
|
|
|
menu() {
|
|
|
cat <<-EOF
|
|
|
+------------------------------------------------+
|
|
|
| |
|
|
|
| ====================== |
|
|
|
| 虚拟机基本管理 v4.0 |
|
|
|
| by xingdian |
|
|
|
| ====================== |
|
|
|
| 1. 安装KVM |
|
|
|
| 2. 安装或重置CentOS-6.8 |
|
|
|
| 3. 安装或重置CentOS-7.3 |
|
|
|
| 4. 安装或重置Windows-7 |
|
|
|
| 5. 删除所有虚拟机 |
|
|
|
| q. 退出管理程序 |
|
|
|
| |
|
|
|
+------------------------------------------------+
|
|
|
EOF
|
|
|
}
|
|
|
|
|
|
kvm_install_hint() {
|
|
|
systemctl libvirtd status &>/dev/null
|
|
|
if [ $? -ne 0 ];then
|
|
|
echo -e "${red_col}未安装KVM软件或未启动libvirtd进程,请检查${reset_col}"
|
|
|
continue
|
|
|
fi
|
|
|
}
|
|
|
|
|
|
download_kvm_script() {
|
|
|
wget -O /root/Desktop/virt-manager.desktop ftp://10.18.40.100/kvm/virt-manager.desktop &>/dev/null
|
|
|
wget -O /root/Desktop/Readme.txt ftp://10.18.40.100/kvm/readme.txt &>/dev/null
|
|
|
chmod a+x /root/Desktop/virt-manager.desktop &>/dev/null
|
|
|
|
|
|
wget -O /root/桌面/virt-manager.desktop ftp://10.18.40.100/virt-manager.desktop &>/dev/null
|
|
|
wget -O /root/桌面/Readme.txt ftp://10.18.40.100/kvm/readme.txt &>/dev/null
|
|
|
chmod a+x /root/桌面/virt-manager.desktop &>/dev/null
|
|
|
|
|
|
wget -O /usr/local/sbin/kvm-manager ftp://10.18.40.100/kvm/kvm-manager.sh &>/dev/null
|
|
|
chmod a+x /usr/local/sbin/kvm-manager &>/dev/null
|
|
|
}
|
|
|
|
|
|
conn_test() {
|
|
|
ping -c1 10.18.40.100 &>/dev/null
|
|
|
if [ $? -ne 0 ];then
|
|
|
echo -e "${red_col}无法访问10.18.40.100, 请检查网络或稍后再试!${reset_col}"
|
|
|
echo
|
|
|
exit
|
|
|
fi
|
|
|
}
|
|
|
|
|
|
menu
|
|
|
|
|
|
while :
|
|
|
do
|
|
|
|
|
|
echo -en "${blue_col}请选择相应的操作[1-7], 显示菜单[m]: ${reset_col}"
|
|
|
read choose
|
|
|
|
|
|
case $choose in
|
|
|
1)
|
|
|
conn_test
|
|
|
download_kvm_script
|
|
|
|
|
|
read -p "确认开始安装KVM [y]: " kvm_install
|
|
|
if [ ! "${kvm_install}" = "y" ];then
|
|
|
echo -e "$red_col输入不正确! $reset_col"
|
|
|
continue
|
|
|
fi
|
|
|
|
|
|
rpm -q virt-manager &>/dev/null
|
|
|
if [ $? -ne 0 ];then
|
|
|
echo "开始安装KVM......"
|
|
|
yum -y groupinstall "virtual*"
|
|
|
systemctl start libvirtd
|
|
|
systemctl enable libvirtd
|
|
|
fi
|
|
|
|
|
|
|
|
|
echo "-----------------------------------------------------------"
|
|
|
echo "KVM 安装完成,请查看桌面上的Readme文件..."
|
|
|
echo "-----------------------------------------------------------"
|
|
|
;;
|
|
|
2)
|
|
|
conn_test
|
|
|
download_kvm_script
|
|
|
|
|
|
read -p "确认重置CentOS 6.8 虚拟机吗?[y]: " rebuild_centos6u8
|
|
|
if [ ! "${rebuild_centos6u8}" = "y" ];then
|
|
|
echo -e "$red_col输入不正确! $reset_col"
|
|
|
continue
|
|
|
fi
|
|
|
|
|
|
if [ ! -f ${images_dir}/${centos6u8_base_img} ];then
|
|
|
echo "正在下载镜像文件,请稍候......"
|
|
|
wget -O ${images_dir}/${centos6u8_base_img} ftp://10.18.40.100/kvm/base_image/${centos6u8_base_img}
|
|
|
fi
|
|
|
|
|
|
for i in {1..5}
|
|
|
do
|
|
|
vm_name=centos6u8-${i}
|
|
|
vm_uuid=$(uuidgen)
|
|
|
vm_disk=${vm_name}.qcow2
|
|
|
vm_xml=${xml_dir}/${vm_name}.xml
|
|
|
vm_mac="52:54:$(dd if=/dev/urandom count=1 2>/dev/null | md5sum | sed -r 's/^(..)(..)(..)(..).*$/\1:\2:\3:\4/')"
|
|
|
base_xml=${xml_dir}/centos6u8_base.xml
|
|
|
|
|
|
virsh destroy ${vm_name} &>/dev/null
|
|
|
virsh undefine ${vm_name} &>/dev/null
|
|
|
rm -rf ${xml_dir}/${vm_xml}
|
|
|
rm -rf ${images_dir}/${vm_name}.*
|
|
|
|
|
|
#disk
|
|
|
qemu-img create -f qcow2 -b ${images_dir}/${centos6u8_base_img} ${images_dir}/${vm_disk} &>/dev/null
|
|
|
|
|
|
#xml
|
|
|
wget -q ftp://10.18.40.100/kvm/base_xml/${centos6u8_base_xml} -O ${base_xml}
|
|
|
cp ${base_xml} ${vm_xml}
|
|
|
sed -i -r "s#VM_NAME#$vm_name#" ${vm_xml}
|
|
|
sed -i -r "s#VM_UUID#$vm_uuid#" ${vm_xml}
|
|
|
sed -i -r "s#VM_DISK#$vm_disk#" ${vm_xml}
|
|
|
sed -i -r "s#VM_MAC#$vm_mac#" ${vm_xml}
|
|
|
|
|
|
#define
|
|
|
virsh define ${vm_xml} &>/dev/null
|
|
|
echo "虚拟机${vm_name} 重置完成..."
|
|
|
done
|
|
|
;;
|
|
|
|
|
|
3)
|
|
|
conn_test
|
|
|
download_kvm_script
|
|
|
|
|
|
read -p "确认重置所有的CentOS7.3虚拟机吗?[y]: " rebuild_centos7u3
|
|
|
if [ ! "${rebuild_centos7u3}" = "y" ];then
|
|
|
echo -e "$red_col输入不正确! $reset_col"
|
|
|
continue
|
|
|
fi
|
|
|
|
|
|
if [ ! -f ${images_dir}/${centos7u3_base_img} ];then
|
|
|
echo "正在下载镜像文件,请稍候......"
|
|
|
wget -O ${images_dir}/${centos7u3_base_img} ftp://10.18.40.100/kvm/base_image/${centos7u3_base_img}
|
|
|
fi
|
|
|
|
|
|
for i in {1..5}
|
|
|
do
|
|
|
vm_name=centos7u3-${i}
|
|
|
vm_uuid=$(uuidgen)
|
|
|
vm_disk=${vm_name}.qcow2
|
|
|
vm_xml=${xml_dir}/${vm_name}.xml
|
|
|
vm_mac="52:54:$(dd if=/dev/urandom count=1 2>/dev/null | md5sum | sed -r 's/^(..)(..)(..)(..).*$/\1:\2:\3:\4/')"
|
|
|
base_xml=${xml_dir}/centos7u3_base.xml
|
|
|
|
|
|
virsh destroy ${vm_name} &>/dev/null
|
|
|
virsh undefine ${vm_name} &>/dev/null
|
|
|
rm -rf ${xml_dir}/${vm_xml}
|
|
|
rm -rf ${images_dir}/${vm_name}.*
|
|
|
|
|
|
#disk
|
|
|
qemu-img create -f qcow2 -b ${images_dir}/${centos7u3_base_img} ${images_dir}/${vm_disk} &>/dev/null
|
|
|
|
|
|
#xml
|
|
|
wget -q ftp://10.18.40.100/kvm/base_xml/${centos7u3_base_xml} -O ${base_xml}
|
|
|
cp ${base_xml} ${vm_xml}
|
|
|
sed -i -r "s#VM_NAME#$vm_name#" ${vm_xml}
|
|
|
sed -i -r "s#VM_UUID#$vm_uuid#" ${vm_xml}
|
|
|
sed -i -r "s#VM_DISK#$vm_disk#" ${vm_xml}
|
|
|
sed -i -r "s#VM_MAC#$vm_mac#" ${vm_xml}
|
|
|
|
|
|
#define
|
|
|
virsh define ${vm_xml} &>/dev/null
|
|
|
echo "虚拟机${vm_name} 重置完成..."
|
|
|
done
|
|
|
;;
|
|
|
|
|
|
4)
|
|
|
conn_test
|
|
|
download_kvm_script
|
|
|
|
|
|
read -p "确认重置 windows 7 虚拟机吗?[y]: " rebuild_win7
|
|
|
if [ ! "${rebuild_win7}" = "y" ];then
|
|
|
echo -e "$red_col输入不正确! $reset_col"
|
|
|
continue
|
|
|
fi
|
|
|
|
|
|
if [ ! -f ${images_dir}/${win7_base_img} ];then
|
|
|
echo "正在下载镜像文件,请稍候......"
|
|
|
wget -O ${images_dir}/${win7_base_img} ftp://10.18.40.100/kvm/base_image/${win7_base_img}
|
|
|
fi
|
|
|
|
|
|
virsh destroy win7 &>/dev/null
|
|
|
virsh undefine win7 &>/dev/null
|
|
|
rm -rf ${xml_dir}/win7.xml
|
|
|
rm -rf ${images_dir}/win7.qcow2
|
|
|
|
|
|
qemu-img create -f qcow2 -b ${images_dir}/${win7_base_img} ${images_dir}/win7.qcow2 &>/dev/null
|
|
|
|
|
|
wget -q ftp://10.18.40.100/kvm/base_xml/win7_base.xml -O ${xml_dir}/win7.xml
|
|
|
virsh define ${xml_dir}/win7.xml &>/dev/null
|
|
|
echo "虚拟机 windows 重置完成..."
|
|
|
;;
|
|
|
|
|
|
5)
|
|
|
conn_test
|
|
|
download_kvm_script
|
|
|
|
|
|
all_vm=$(virsh list --all |awk '/[0-9]/{print $2}')
|
|
|
|
|
|
echo -en "${red_col}确认删除所有虚拟机吗?[y]:${reset_col} "
|
|
|
read delete_all
|
|
|
|
|
|
if [ ! "${delete_all}" = "y" ];then
|
|
|
echo -e "$red_col放弃删除! $reset_col"
|
|
|
continue
|
|
|
fi
|
|
|
|
|
|
for vm in ${all_vm}
|
|
|
do
|
|
|
virsh destroy $vm &>/dev/null
|
|
|
virsh undefine $vm &>/dev/null
|
|
|
|
|
|
rm -rf ${xml_dir}/${vm}.xml
|
|
|
rm -rf ${images_dir}/${vm}*
|
|
|
echo "已删除虚拟机 $vm"
|
|
|
done
|
|
|
;;
|
|
|
|
|
|
m)
|
|
|
clear
|
|
|
menu
|
|
|
;;
|
|
|
q)
|
|
|
exit
|
|
|
;;
|
|
|
'')
|
|
|
;;
|
|
|
*)
|
|
|
echo "输入错误!"
|
|
|
|
|
|
esac
|
|
|
|
|
|
done
|
|
|
```
|
|
|
|
|
|
|
|
|
|
|
|
|
|
|
|
|
|
|
|
|
|