24 KiB
数据库Mysql主从复制
作者:行癫(盗版必究)
一:环境准备
1.操作系统 Stream 9
2.数据库版本 Mysql 8.4.4
3.节点属性M-S-S
二:数据库安装
注意:以下操作所有节点部署
1.准备仓库
[root@master ~]# yum -y install https://dev.mysql.com/get/mysql84-community-release-el9-1.noarch.rpm
2.安装数据库
[root@master ~]# yum -y install mysql mysql-server
3.启动数据库
[root@master ~]# systemctl start mysqld

[root@master ~]# systemctl enable
4.修改初始密码
[root@master ~]# cat /var/log/mysqld.log | grep password
2025-04-01T07:52:03.074402Z 6 [Note] [MY-010454] [Server] A temporary password is generated for root@localhost: 7afbYmmmJt))
[root@master ~]# mysqladmin  -u root -p'7afbYmmmJt))' password 'XingDian@123'
mysqladmin: [Warning] Using a password on the command line interface can be insecure.
Warning: Since password will be sent to server in plain text, use ssl connection to ensure password safety.
三:配置主从
1.创建证书
1.创建目录
[root@master ~]# mkdir /etc/mysql/ssl -p
2.创建CA证书
[root@master ssl]# openssl genrsa 2048 > ca-key.pem
[root@master ssl]# openssl req -new -x509 -nodes -days 3650 -key ca-key.pem -out ca-cert.pem
3.创建server证书
[root@master ssl]# openssl genrsa 2048 > server-key.pem
[root@master ssl]# openssl req -new -key server-key.pem -out server-req.pem
[root@master ssl]# openssl x509 -req -in server-req.pem -days 3650 -CA ca-cert.pem -CAkey ca-key.pem -set_serial 01 -out server-cert.pem
4.创建client证书
[root@master ssl]# openssl genrsa 2048 > client-key.pem
[root@master ssl]# openssl req -new -key client-key.pem -out client-req.pem
[root@master ssl]# openssl x509 -req -in client-req.pem -days 3650 -CA ca-cert.pem -CAkey ca-key.pem -set_serial 02 -out client-cert.pem
5.证书同步
所有节点创建对应的目录
所有节点同步证书文件
2.主节点
1.开启GITD模式
[root@master ~]# cat /etc/my.cnf
server_id=1
gtid_mode=on
enforce_gtid_consistency=on
binlog_checksum=none
log_bin=mysql-bin
log_slave_updates=on
binlog_format=row
require_secure_transport=ON
ssl-ca=/etc/mysql/ssl/ca-cert.pem
ssl-cert=/etc/mysql/ssl/server-cert.pem
ssl-key=/etc/mysql/ssl/server-key.pem
[root@master ~]# systemctl restart mysqld
2.创建用户并授权
[root@slave-1 ~]# mysql -u root -pXingDian@123
mysql: [Warning] Using a password on the command line interface can be insecure.
Welcome to the MySQL monitor.  Commands end with ; or \g.
Your MySQL connection id is 8
Server version: 8.4.4 MySQL Community Server - GPL

Copyright (c) 2000, 2025, Oracle and/or its affiliates.

Oracle is a registered trademark of Oracle Corporation and/or its
affiliates. Other names may be trademarks of their respective
owners.

Type 'help;' or '\h' for help. Type '\c' to clear the current input statement.

mysql>  create user slave identified with 'caching_sha2_password' BY 'XingDian@123' REQUIRE SSL;
Query OK, 0 rows affected (0.08 sec) 强制启用ssl传输
mysql> GRANT REPLICATION SLAVE ON *.* to 'slave'@'%';
Query OK, 0 rows affected (0.27 sec)

mysql> GRANT CONNECTION_ADMIN ON *.* to 'slave'@'%';
Query OK, 0 rows affected (0.06 sec)

mysql> GRANT BACKUP_ADMIN ON *.* to 'slave'@'%';
Query OK, 0 rows affected (0.10 sec)

mysql> flush privileges;
Query OK, 0 rows affected (0.05 sec)
2.从节点
1.开启GITD模式
[root@slave-1 ~]# cat /etc/my.cnf
server_id=2
gtid_mode=on
enforce_gtid_consistency=on
binlog_checksum=none
log_bin=mysql-bin
log_slave_updates=on
binlog_format=row

require_secure_transport=ON
ssl-ca=/etc/mysql/ssl/ca-cert.pem
ssl-cert=/etc/mysql/ssl/client-cert.pem
ssl-key=/etc/mysql/ssl/client-key.pem

[root@slave-1 ~]# systemctl restart mysqld
2.连接主库
连接数据库后输入edit,复制以下内容保存退出
CHANGE REPLICATION SOURCE TO
  SOURCE_HOST='master.mysql.com',
  SOURCE_USER='slave',
  SOURCE_PASSWORD='XingDian@123',
  SOURCE_AUTO_POSITION=1,
  SOURCE_SSL=1,
  SOURCE_SSL_CA='/etc/mysql/ssl/ca-cert.pem',
  SOURCE_SSL_CERT='/etc/mysql/ssl/client-cert.pem',
  SOURCE_SSL_KEY='/etc/mysql/ssl/client-key.pem';
3.启动复制
mysql> start replica;
Query OK, 0 rows affected (0.38 sec)
4.查看状态
注意观察IO线程和SQL线程,都为YES则主从复制成功
mysql> show replica status\G
*************************** 1. row ***************************
             Replica_IO_State: Waiting for source to send event
                  Source_Host: master.mysql.com
                  Source_User: slave
                  Source_Port: 3306
                Connect_Retry: 60
              Source_Log_File: mysql-bin.000001
          Read_Source_Log_Pos: 841
               Relay_Log_File: slave-1-relay-bin.000002
                Relay_Log_Pos: 1050
        Relay_Source_Log_File: mysql-bin.000001
           Replica_IO_Running: Yes
          Replica_SQL_Running: Yes
              Replicate_Do_DB:
          Replicate_Ignore_DB:
           Replicate_Do_Table:
       Replicate_Ignore_Table:
      Replicate_Wild_Do_Table:
  Replicate_Wild_Ignore_Table:
                   Last_Errno: 0
                   Last_Error:
                 Skip_Counter: 0
          Exec_Source_Log_Pos: 841
              Relay_Log_Space: 1255
              Until_Condition: None
               Until_Log_File:
                Until_Log_Pos: 0
           Source_SSL_Allowed: Yes
           Source_SSL_CA_File: /etc/mysql/ssl/ca-cert.pem
           Source_SSL_CA_Path:
              Source_SSL_Cert: /etc/mysql/ssl/client-cert.pem
            Source_SSL_Cipher:
               Source_SSL_Key: /etc/mysql/ssl/client-key.pem
        Seconds_Behind_Source: 0
Source_SSL_Verify_Server_Cert: No
                Last_IO_Errno: 0
                Last_IO_Error:
               Last_SQL_Errno: 0
               Last_SQL_Error:
  Replicate_Ignore_Server_Ids:
             Source_Server_Id: 1
                  Source_UUID: 50a9a869-0efa-11f0-8e51-52540047de4e
             Source_Info_File: mysql.slave_master_info
                    SQL_Delay: 0
          SQL_Remaining_Delay: NULL
    Replica_SQL_Running_State: Replica has read all relay log; waiting for more updates
           Source_Retry_Count: 10
                  Source_Bind:
      Last_IO_Error_Timestamp:
     Last_SQL_Error_Timestamp:
               Source_SSL_Crl:
           Source_SSL_Crlpath:
           Retrieved_Gtid_Set: 50a9a869-0efa-11f0-8e51-52540047de4e:1-3
            Executed_Gtid_Set: 50a9a869-0efa-11f0-8e51-52540047de4e:1-3
                Auto_Position: 1
         Replicate_Rewrite_DB:
                 Channel_Name:
           Source_TLS_Version:
       Source_public_key_path:
        Get_Source_public_key: 0
            Network_Namespace:
1 row in set (0.00 sec)
5.注意
Master节点查看binlog
mysql> SHOW BINARY LOG STATUS\G
*************************** 1. row ***************************
             File: mysql-bin.000001
         Position: 1030
     Binlog_Do_DB:
 Binlog_Ignore_DB:
Executed_Gtid_Set: 50a9a869-0efa-11f0-8e51-52540047de4e:1-4
1 row in set (0.00 sec)
自8.0.22版本后以下命令不能使用
start slave;
show slave status;
start master;
chang master to
四:组复制
MySQL 组复制提供了一个高可用性、高弹性、可靠的 MySQL 服务
1.MySQL 组复制的背景
创建容错系统的最常见方法是采用组件冗余,换句话说,可以删除组件,系统应该继续按预期运行,复制数据库必须处理这样一个事实,即它们需要维护和管理多台服务器,而不仅仅是一台;此外,由于服务器协同工作以创建组,因此必须处理其他一些经典的分布式系统问题,例如网络分区或脑裂场景。
因此,最终的挑战是将数据库和数据复制的逻辑与以一致且简单的方式协调多台服务器的逻辑融合在一起。换句话说,让多台服务器就系统状态和每次更改时每个服务器上的数据达成一致。这可以概括为让服务器就每个数据库状态转换达成一致,以便它们都像一个数据库一样进行,或者它们最终会收敛到相同的状态。这意味着它们需要作为一个(分布式)状态机运行。
MySQL 组复制提供分布式状态机复制,服务器之间具有强大的协调性。当服务器属于同一组时,它们会自动协调。该组可以在具有自动主节点选举的单主模式下运行,其中一次只有一个服务器接受更新。或者,对于更高级的用户,该组可以部署在多主模式下,其中所有服务器都可以接受更新,即使它们是并发发出的。这种能力是以应用程序必须解决此类部署所施加的限制为代价的。
有一个内置的组成员关系服务,可以在任何给定时间点为所有服务器保持一致且可用的组视图。服务器可以离开和加入组,视图也会相应更新。有时服务器可能会意外离开组,在这种情况下,故障检测机制会检测到这种情况并通知组视图已更改。这一切都是自动的。
为了提交事务,组中的大多数必须就全局事务序列中给定事务的顺序达成一致。决定提交或中止事务由每个服务器单独完成,但所有服务器都做出相同的决定。如果存在网络分区,导致成员无法达成一致的分裂,则系统在解决此问题之前不会继续进行。因此,还有一个内置的、自动的脑裂保护机制。
所有这些都由提供的组通信系统 (GCS) 协议提供支持。它们提供故障检测机制、组成员关系服务以及安全且完全有序的消息传递。所有这些特性都是创建系统的关键,该系统可确保数据在服务器组中一致地复制。这项技术的核心是 Paxos 算法的实现。它充当组通信引擎。
总结:
故障检测
故障转移
脑裂保护
2.组复制和主从复制关系
MySQL的 **组复制(Group Replication)并不需要建立在传统的主从复制(Master-Slave Replication)**之上,但它确实利用了主从复制的基础架构来实现
数据同步。
在组复制中,所有节点都作为对等的主节点,彼此之间通过复制协议同步数据。因此,尽管组复制使用了与主从复制相似的机制,但它是一个独立的、高可用
的集群解决方案,不需要先配置主从复制。
综上,组复制不依赖于主从复制的预先配置,但它们在底层数据同步机制上有相似之处。可以直接部署组复制,而无需先设置主从复制。
3.组复制架构
1.单主模式
单主模式下,组中有一个设置为读写模式的单主服务器,组中的所有其他成员都设置为只读模式;在单主模式下,组复制强制只有一个服务器写入组,因此与多主模式相比,一致性检查可以不那么严格,并且 DDL 语句不需要任何额外的处理
2.被指定主服务器成员更改方式
如果现有主服务器离开组(无论是自愿还是意外),则会自动选举一个新的主服务器
可以使用 group_replication_set_as_primary() 函数指定一个特定成员作为新的主服务器
3.新主服务器选举
自动主服务器成员选举过程,对潜在的新主服务器成员进行排序,然后选择最合适的成员。每个成员都根据其 MySQL Server 版本中的主服务器选举算法在本地做出自己的决定;因为所有成员都必须达成相同的决定,所以如果其他组成员运行的是较低版本的 MySQL Server,则成员会调整其主服务器选举算法,以便它们的行为与组中 MySQL Server 版本最低的成员的行为相同。
3.项目环境
操作系统:Centos Stream 9
数据库版本:Mysql 8.4.4
节点架构:M-M-M
4.项目准备
注意:以下所有操作没有说明情况下,针对所有节点
1.关闭防护墙和SElinux
2.本地解析
[root@master ~]# cat /etc/hosts
127.0.0.1   localhost localhost.localdomain localhost4 localhost4.localdomain4
::1         localhost localhost.localdomain localhost6 localhost6.localdomain6
10.9.12.146 master master.mysql.cn
10.9.12.134 node-1 node1.mysql.cn
10.9.12.144 node-2 node2.mysql.cn
3.安装数据库
[root@master ~]# dnf install -y https://dev.mysql.com/get/mysql84-community-release-el9-1.noarch.rpm
[root@master ~]# yum -y install mysql mysql-server
4.启动数据库
[root@master ~]# systemctl start mysqld && systemctl enable mysqld
5.数据库初始化
[root@master ~]# cat /var/log/mysqld.log  | grep password
2025-04-02T02:28:17.614431Z 6 [Note] [MY-010454] [Server] A temporary password is generated for root@localhost: *u*nw<thP1T#
[root@master ~]# mysqladmin  -u root -p'*u*nw<thP1T#' password 'XingDian@123'
mysqladmin: [Warning] Using a password on the command line interface can be insecure.
Warning: Since password will be sent to server in plain text, use ssl connection to ensure password safety.
5.配置组复制
1.对于 Group Replication,数据必须存储在 InnoDB 事务存储引擎中;使用其他存储引擎,包括临时MEMORY存储引擎,可能会在 Group Replication 中出现错误
2.复制框架,MySQL 组复制要求配置复制,启用GTID方式
3.组复制设置
4.所有节点都要配置
[root@master ~]# cat /etc/my.cnf

disabled_storage_engines="MyISAM,BLACKHOLE,FEDERATED,ARCHIVE,MEMORY"

server_id=1
gtid_mode=ON
enforce_gtid_consistency=ON
binlog_checksum=none
log_bin=mysql-bin
log_slave_updates=on
binlog_format=row

#group replication

plugin_load_add='group_replication.so'
group_replication_group_name="1cbfbd68-0f8b-11f0-a78f-5254004ffc09"
group_replication_start_on_boot=off
group_replication_local_address= "master.mysql.cn:33061"
group_replication_group_seeds= "master.mysql.cn:33061,node1.mysql.cn:33061,node2.mysql.cn:33061"
group_replication_bootstrap_group=off
参数解释
group_ replication_group_name:
必须是有效的UUID;使用SELECT UUID()生成,所有组内节点保持一致,当来自客户端的事务和由组成员内部生成的视图更改事件写入到二进制日志时使用
group_ replication_start_on_boot:
设置为off,在服务器启动时不自动开始操作;确保可以在手动启动插件之前配置服务器;一次成员已经配置好后,可改为on,以便在服务器启动时自动开始
group_ replication_local_address:
设置成员用于与组内其他成员之间的内部通信的网络地址和端口;远程实例的组通信引擎(XCom,Paxos变体)的成员-成员连接
group_replication_local_address:
配置的网络地址必须由所有组成员解析,每个节点写各自的地址,域名IP均可,端口33061
group_replication_group_seeds:
设置群组成员的主机名和端口,这些成员用于新成员建立与群组的连接;一旦连接建立,群组成员信息在性能chema表replication_group_members中
group_ replication_bootstrap_group:
设置是否引导组服务(即创建一个组),一定要设置为off,否则每次重启都会引导一个新组出来
配置完成后,重启服务
6.查看插件

7.分布式恢复的用户凭据
当有新成员加入组复制时,会通过分布式恢复进程(Distributed Recovery Process)来同步数据。分布式恢复进程会先找一个数据的捐赠者(Donor),并通过一个名为group_replication_reocvery的通道将捐赠者binlog中的事务发送给新成员。在这里需要一个授权用户凭证来建立分布式恢复的连接。这个用户在所有的组成员上都必须存在。
1.禁用二进制日志以便在每个实例上单独创建复制用户
mysql> SET SQL_LOG_BIN=0;
2.创建具有以下权限的MySQL用户
mysql> CREATE USER rpl_user@'%' IDENTIFIED BY 'password';
mysql> GRANT REPLICATION SLAVE ON *.* TO rpl_user@'%';
mysql> GRANT CONNECTION_ADMIN ON *.* TO rpl_user@'%';
mysql> GRANT BACKUP_ADMIN ON *.* TO rpl_user@'%';
mysql> GRANT GROUP_REPLICATION_STREAM ON *.* TO rpl_user@'%';
mysql> FLUSH PRIVILEGES;
3.参数解释
REPLICATION_SLAVE,用于在捐赠服务器上建立分布式恢复连接以检索数据
CONNECTION_ADMIN,确保群组复制连接不会在其中一个服务器被置于离线模式时终止
BACKUP_ADMIN,如果复制组中的服务器设置了支持克隆,该权限是必要的,以便成员可以在分布式恢复中作为捐赠服务器
GROUP_REPLICATION_STREAM,如果MySQL通信栈用于复制组,该权限是必要的,以便用户账户可以使用MySQL通信栈在群组复制中建立和维护连接
4.重新启用二进制日志
mysql> SET SQL_LOG_BIN=1;
5.将用户凭证提供给服务器,以便用于分布式恢复
mysql> CHANGE REPLICATION SOURCE TO SOURCE_USER='rpl_user',
    ->   SOURCE_PASSWORD='password'
    ->   FOR CHANNEL 'group_replication_recovery';
6.以上操作组内所有的节点都要执行
8.组复制引导
第一次启动组复制称作引导,引导会创建一个组出来。通过group_replication_bootstrap_group参数来控制引导动作。引导组复制必须由单一服务器完成且只需要执行一次。如果group_replication_bootstrap_group设置为on,则每次重启都会创建出一个同名新组,这也是前面参数中将其设置为off的原因。
mysql> set global group_replication_bootstrap_group=on;
mysql> start group_replication;
mysql> set global group_replication_bootstrap_group=off;
注意:
除了第一个节点需要开启,group_replication_bootstrap_group,其余节点都只需要启动start group_replication
否则会产生经典的分布式系统问题 --- 脑裂(split brain)
9.成员加入组
详细过程参考7-8
10.查看组成员
mysql> SELECT * FROM performance_schema.replication_group_members;
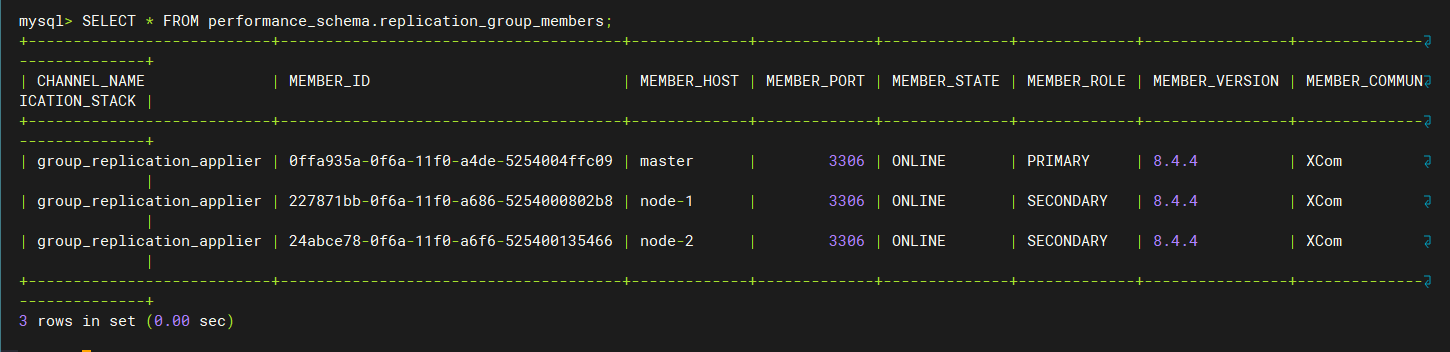
MASTER_STATE:节点状态,ONLINE为在线,正常状态
MEMBER_ROLE:成员角色,PRIMARY为主节点
11.模拟产生数据
主库可以作为捐赠者(Donor),可以将这些事务变更同步给后加入的成员
主节点:
mysql> create database test;
Query OK, 1 row affected (0.10 sec)

mysql> use test
Database changed
mysql> CREATE TABLE t1 (c1 INT PRIMARY KEY, c2 TEXT NOT NULL);
Query OK, 0 rows affected (0.24 sec)

mysql> INSERT INTO t1 VALUES (1, 'Luis');
Query OK, 1 row affected (0.13 sec)

mysql> SELECT * FROM t1;
+----+------+
| c1 | c2   |
+----+------+
|  1 | Luis |
+----+------+
1 row in set (0.00 sec)

mysql> SHOW BINLOG EVENTS;
+------------------+-----+----------------+-----------+-------------+---------------------------------------------------------------------------------+
| Log_name         | Pos | Event_type     | Server_id | End_log_pos | Info                                                                            |
+------------------+-----+----------------+-----------+-------------+---------------------------------------------------------------------------------+
| mysql-bin.000001 |   4 | Format_desc    |         1 |         127 | Server ver: 8.4.4, Binlog ver: 4                                                |
| mysql-bin.000001 | 127 | Previous_gtids |         1 |         154 |                                                                                 |
| mysql-bin.000001 | 154 | Gtid           |         1 |         234 | SET @@SESSION.GTID_NEXT= '1cbfbd68-0f8b-11f0-a78f-5254004ffc09:1'               |
| mysql-bin.000001 | 234 | Query          |         1 |         338 | create database test /* xid=28 */                                               |
| mysql-bin.000001 | 338 | Gtid           |         1 |         418 | SET @@SESSION.GTID_NEXT= '1cbfbd68-0f8b-11f0-a78f-5254004ffc09:2'               |
| mysql-bin.000001 | 418 | Query          |         1 |         556 | use `test`; CREATE TABLE t1 (c1 INT PRIMARY KEY, c2 TEXT NOT NULL) /* xid=33 */ |
| mysql-bin.000001 | 556 | Gtid           |         1 |         638 | SET @@SESSION.GTID_NEXT= '1cbfbd68-0f8b-11f0-a78f-5254004ffc09:3'               |
| mysql-bin.000001 | 638 | Query          |         1 |         709 | BEGIN                                                                           |
| mysql-bin.000001 | 709 | Table_map      |         1 |         760 | table_id: 99 (test.t1)                                                          |
| mysql-bin.000001 | 760 | Write_rows     |         1 |         802 | table_id: 99 flags: STMT_END_F                                                  |
| mysql-bin.000001 | 802 | Xid            |         1 |         829 | COMMIT /* xid=34 */                                                             |
+------------------+-----+----------------+-----------+-------------+---------------------------------------------------------------------------------+
11 rows in set (0.00 sec)
成员节点:
12.组复制容错测试
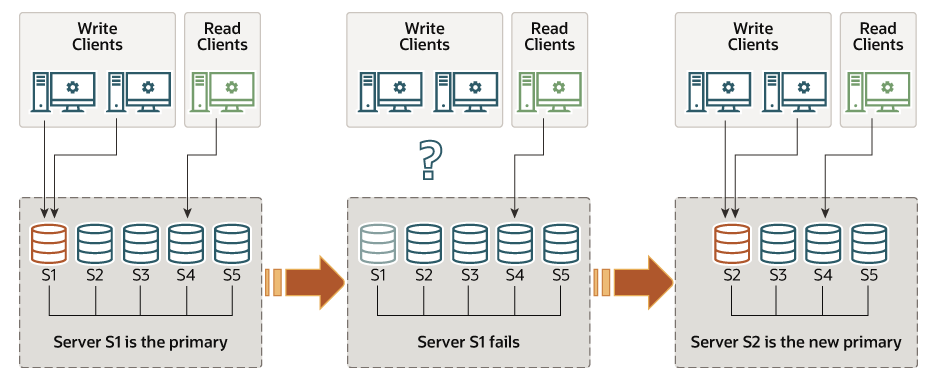
1.非正常方式关闭主节点数据库

2.从节点查看组复制状态
mysql> select * from performance_schema.replication_group_members;
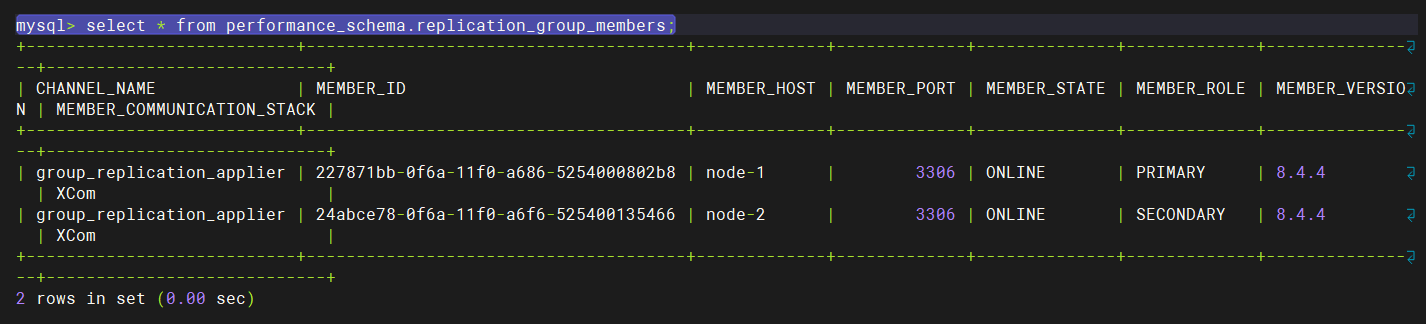
此时服务器node1的角色自动从secondary变为primay,表示其被提升为新的主库,完成了故障切换
3.重新启动旧组
启动数据库并启动组复制
mysql> start group_replication;
4.查看成员信息
mysql> SELECT * FROM performance_schema.replication_group_members;

将原主库重新启动,并加入组复制,注意此时宕机的主库将以从库的身份加入组复制(不会自动恢复主库身份),主库依然是上次切换的node1